sphinx-themes.org が便利

ということで,Sphinx Themesというテーマが一覧で見られるサイトが出来たようです.
ひと目で確認できるので便利です.

ちなみにテーマの変更方法は以下のページを参考に.(基本的にはpipで入れてconf.pyのhtml_themeに指定)

SphinxについてはSphinx-Users.jpで日本語で一通り学べます :)

Linuxでそこそこ軽量なreStructuredTextリアルタイムプレビュー付きのエディタとしてReTextというものがおすすめです.(最近はMarkdown Editorとして紹介されることが多いですが名前のとおりもともとはreSTエディタでした)

最近は軽量マークアップ言語としてMarkdownが有名になりましたが,もう少し複雑なドキュメントを書きたい場合などにSphinx(reStructuredText)はおすすめです.PythonLinux Kernelのドキュメントをはじめ様々なサイトで活用されています.

Sphinxの書籍もあります.

Byobu + GNU screen でFunction Key割り当てを無効にする

Byobuの既定値ではFunction Keyに機能が割り当てられています.

/usr/share/byobu/keybindings/f-keys.screen

自分は使わないし,別のFunction Keyを利用するアプリケーションで利用できなくなるので無効にしています.
無効にする方法をメモしておきます.

適当なテキストエディタで~/.byobu/keybindingsを開きます.viなどの編集モードのあるエディタの場合は編集モードにして,Ctrl+a !(aは設定してあるescape key)を押すと以下のラインが出てくるので頭の:を消して保存します.他にsourceの行がある場合はそれよりも下に書かないと上書きされるので注意.

:source /usr/share/byobu/keybindings/f-keys.screen.disable

環境(Ubuntu 16.04 LTS arm64)によってはこうなりました.$BYOBU_PREFIX/usrだったので実態は同じですね.

:source $BYOBU_PREFIX/share/byobu/keybindings/f-keys.screen.disable

Byobuを起動し直すと反映されているはずです.
Ctrl+a !を使わず同じテキストを書いても問題ないようでした.

Tmuxは利用してないので未検証ですが以下のあたりのファイルで同じような設定ができそうな気がします.

~/.byobu/keybindings.tmux
/usr/share/byobu/keybindings/f-keys.tmux.disable

以下の環境で確認しました.

  • Debian sid amd64
  • Debian stretch armhf/arm64
  • Ubuntu 16.04 LTS amd64/arm64
  • Ubuntu 17.10 amd64
追記)この記事はByobu GNU screenで,以下はByobu Tmux

Raspbian stretch イメージを Devuan ascii にしてみる

DevuanというDebianからのフォークディストリビューションがあります.

これは脱SystemdなLinuxディストリビューションで,Raspberry Pi等のarmhfにも対応しています.そしてDebianからDevuanに移行することが出来ます.(Debian jessie -> Devuan jessie)
DebianベースのRaspbianからも同様に移行できるというmailを見かけたので試してみます.

SD cardでやったほうが手順は少ないのですが,遅いし寿命も縮むだろうしってことでイメージサイズを拡大したRaspbianを元にchroot + QEMU User EmulatorでArm以外のhostででやってみました.

サイズを拡大したRaspbianイメージをマウント

以下の手順で用意したイメージを元にします.

raspbian-stretch-lite_latest.imgが元のイメージで,今回devuan_ascii.imgとしてコピーしたものを使います.

$ cp ./raspbian-stretch-lite_latest.img ./devuan_ascii.img
$ sudo kpartx -av ./devuan_ascii.img
add map loop0p1 (253:4): 0 85045 linear 7:0 8192
add map loop0p2 (253:5): 0 8129 linear 7:0 63
$ sudo mount /dev/mapper/loop0p2 /mnt
$ sudo mount /dev/mapper/loop0p1 /mnt/boot

QEMU User Emulatorが使えるようにqemu-user-staticをcp

これでQEMU User Emulatorが透過的に利用できます.

$ sudo cp -p /usr/bin/qemu-arm-static /mnt/usr/bin/

chroot用に/devと/procをbind mountしてchroot

$ sudo mount --bind /dev /mnt/dev
$ sudo mount --bind /dev/pts /mnt/dev/pts
$ sudo mount --bind /proc /mnt/proc
$ sudo chroot /mnt /bin/bash

Raspbian stretchを最新の状態にする

# apt update
# apt upgrade -y

Devuanリポジトリの鍵をインポート

Devuanリポジトリの鍵をインポートする.そのために必要なdirmngrpkgも導入.

# apt install dirmngr
# apt-key adv --recv-keys 94532124541922FB
Executing: /tmp/apt-key-gpghome.zqL0gcSbes/gpg.1.sh --recv-keys 94532124541922FB
gpg: key 94532124541922FB: public key "Devuan Repository (Primary Devuan signing key) <repository@devuan.org>" imported
gpg: Total number processed: 1
gpg:               imported: 1

source.listをDevuanのものに書き換え

Devuanのstableはjessieですが,元のRaspbianがstretchなのでそれに対応するAsciiを指定しています.
Devuan jessieを使いたい場合は,Raspbian jessieを元にするといいと思います.

Devuan Debian
Jessie(stable) Jessie(oldstable)
Ascii(development) Stretch(stable)
Beowulf(-) Buster(testing)
Ceres(unstable) Sid(unstable)
# vi /etc/apt/sources.list
# cat /etc/apt/sources.list|grep -v ^#
deb http://mirrordirector.raspbian.org/raspbian/ stretch rpi
deb http://auto.mirror.devuan.org/merged ascii main contrib non-free
deb http://auto.mirror.devuan.org/merged ascii-updates  main contrib non-free
deb http://auto.mirror.devuan.org/merged ascii-security main contrib non-free

Devuanのパッケージにupgrade

# apt update && apt upgrade
  :
274 upgraded, 7 newly installed, 0 to remove and 3 not upgraded.
Need to get 115 MB of archives.
After this operation, 25.0 MB disk space will be freed.
Do you want to continue? [Y/n] Y
  :
# apt dist-upgrade
Reading package lists... Done
Building dependency tree       
Reading state information... Done
Calculating upgrade... Done
The following packages were automatically installed and are no longer required:
  bluez bluez-firmware cgmanager libcgmanager0 systemd-shim
Use 'sudo apt autoremove' to remove them.
The following packages will be REMOVED:
  libpam-systemd mountall pi-bluetooth plymouth raspberrypi-sys-mods systemd systemd-sysv
The following NEW packages will be installed:
  eudev libeudev1 sysvinit-core
The following packages will be upgraded:
  init libudev1 udev
3 upgraded, 3 newly installed, 7 to remove and 0 not upgraded.
Need to get 1162 kB of archives.
After this operation, 9431 kB disk space will be freed.
Do you want to continue? [Y/n] Y
  :

chrootから抜けてイメージアンマウント

#念の為kpartx -dの前にfsckしておくといいかも?

# exit
$ sudo umount /mnt/proc
$ sudo umount /mnt/dev/pts
$ sudo umount /mnt/dev
$ sudo umount /mnt/boot
$ sudo umount /mnt
$ sudo kpartx -d /dev/mapper/loop0p1
$ sudo kpartx -d /dev/mapper/loop0p2
$ sync

SD cardにイメージを書き込んでRaspberry Piで起動

普通にddとかEtcherとかでSD cardに書き込みます.

$ time sudo dcfldd if=./devuan_ascii.img of=/dev/sdd;sync;sync
128000 blocks (4000Mb) written.
128000+0 records in
128000+0 records out

real    7m13.207s
user    0m0.823s
sys     0m9.211s

後はRaspberry Piで起動すればOK.今回はRaspberry Pi 2 Bで試しました.

Systemdとか居ません.

RAMの利用状況はこんな感じ

$ free
              total        used        free      shared  buff/cache   available
Mem:         949584       21916      879120         188       48548      879976
Swap:        102396           0      102396

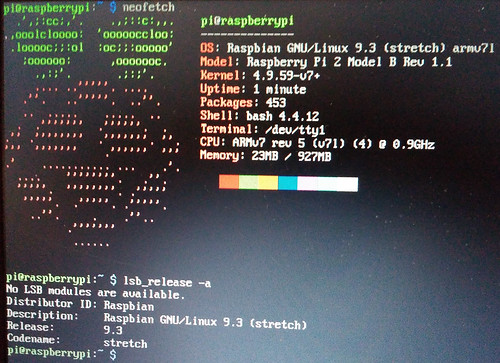
しかしneofetchとかではRaspbianのままですね.該当pkgのreinstallとかで更新できそうな気がしますが未検証.

IMG_20180123_001641

イメージ操作めんどくさいのでdebootstrapの方が楽かもしれない?

いやそれなら公式イメージのほうがいいか

Raspbianイメージを任意の広さに拡大する

Raspbian はSD cardに書き込んでRaspberry Piで起動するとraspi-configから簡単にパーティションサイズを拡大できます.しかし,パッケージのアップデートや導入に時間がかかるのでSD cardに書き込む前にこの辺りの処理は済ませておきたいです. chrootとQEMU User Emulatorを使えば出来るのですが,今度はDisk fullに……. ということでraspbianイメージを広げてみます.
※速度の速いストレージだと必要ない処理かもしれませんが,カスタマイズしたイメージを用意するとかにも使えます.
※ここではRaspbian Lite stretch 2017-11-29のイメージを元にしていますが,最終パーティションを広げるのであれば他の各種イメージでもほぼそのまま,途中のパーティションサイズを変更するのも応用でいけます.

今回は広げると行ってもオリジナルのファイルはそのままに,4GBほどのサイズのイメージを作ってそちらにデータをコピーしてそのイメージのサイズを広げることにします.

今回の環境は Debian sid amd64 環境です.Linux環境であればほぼ同じ手順で行けると思います.

4GBイメージを作成

4GBほどの容量のイメージを作成します.もっと大きい容量がいい人はcountを増やしましょう.
<追記>4GBにしてはちょっと大きかったかも.手持ちにカードの容量より少し小さいサイズにすると良いです.</追記>

$ dd if=/dev/zero of=./4gb.img bs=1M count=4000
$ ls -l ./4gb.img
-rw-r--r-- 1 mk mk 4194304000 Jan 19 21:28 ./4gb.img

losetupでデバイスマッピングをする

/dev/loop0に割り当てられた.

$ sudo losetup -f --show ./4gb.img
/dev/loop0

Raspbianイメージの用意とデバイスマッピング

/dev/loop1に割り当てられた.

$ unzip 2017-11-29-raspbian-stretch-lite.zip
$ sudo losetup -f --show ./2017-11-29-raspbian-stretch-lite.img 
/dev/loop1

Raspbianイメージを4GBのイメージにコピー

loop1(Raspbian)のイメージをloop0(4GB)にコピーしている.

$ sudo dd if=/dev/loop1 of=/dev/loop0 bs=1M
1772+0 records in
1772+0 records out
1858076672 bytes (1.9 GB, 1.7 GiB) copied, 161.929 s, 11.5 MB/s

Raspbianイメージを片付ける

$ sudo losetup -d /dev/loop1
$ rm ./2017-11-29-raspbian-stretch-lite.img

コピーしたイメージをfdiskで確認

Raspbianのパーティション情報が見えます.

$ sudo fdisk -l /dev/loop0 
Disk /dev/loop0: 3.9 GiB, 4194304000 bytes, 8192000 sectors
Units: sectors of 1 * 512 = 512 bytes
Sector size (logical/physical): 512 bytes / 512 bytes
I/O size (minimum/optimal): 512 bytes / 512 bytes
Disklabel type: dos
Disk identifier: 0x37665771

Device       Boot Start     End Sectors  Size Id Type
/dev/loop0p1       8192   93236   85045 41.5M  c W95 FAT32 (LBA)
/dev/loop0p2      94208 3629055 3534848  1.7G 83 Linux

fdiskでパーテションサイズを変更する

ここはわかりづらいですが,以下のような操作をしています.

  • d コマンドで 2つ目のパーテションを削除
  • n コマンドで 2つ目のパーテションを最大容量で作り直し
    • この時 First sector を削除前のものと合わせること
  • p コマンドで確認
  • w コマンドで書き込み
    • w コマンドで書き込むまではファイルシステムは変更されないので間違ってもやり直しできます.
$ sudo fdisk /dev/loop0

Welcome to fdisk (util-linux 2.30.2).
Changes will remain in memory only, until you decide to write them.
Be careful before using the write command.

Command (m for help): d
Partition number (1,2, default 2): 2

Partition 2 has been deleted.

Command (m for help): n
Partition type
   p   primary (1 primary, 0 extended, 3 free)
   e   extended (container for logical partitions)
Select (default p): p
Partition number (2-4, default 2): 2
First sector (2048-8191999, default 2048): 94208
Last sector, +sectors or +size{K,M,G,T,P} (94208-8191999, default 8191999): 8191999

Created a new partition 2 of type 'Linux' and of size 3.9 GiB.  
Partition #2 contains a ext4 signature.

Do you want to remove the signature? [Y]es/[N]o: N

Command (m for help): p

Disk /dev/loop0: 3.9 GiB, 4194304000 bytes, 8192000 sectors
Units: sectors of 1 * 512 = 512 bytes
Sector size (logical/physical): 512 bytes / 512 bytes
I/O size (minimum/optimal): 512 bytes / 512 bytes
Disklabel type: dos
Disk identifier: 0x37665771

Device       Boot Start     End Sectors  Size Id Type
/dev/loop0p1       8192   93236   85045 41.5M  c W95 FAT32 (LBA)
/dev/loop0p2      94208 8191999 8097792  3.9G 83 Linux

Command (m for help): w
The partition table has been altered.
Calling ioctl() to re-read partition table.
Re-reading the partition table failed.: 無効な引数です                                                                         

The kernel still uses the old table. The new table will be used at the next reboot or after you run partprobe(8) or kpartx(8).

fdiskに慣れていない場合はgparted等でGUIで操作したほうが直感的で解りやすいかもしれません(未検証) -> gksudo gparted /dev/loop0
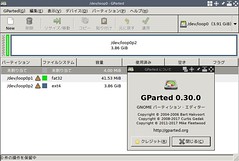
20180121_07:01:45-6347

kpartxでパーティションをマッピングする

上で使ったlosetupでも出来るのですが,オフセットを自分で計算して指定する必要がある

losetupを使う場合はfdiskのpコマンドの対象パーティーションの Start * Sector sizeをlosetupの-oに指定します.今回の例だと2つ目のパーティーションは 94208 * 512 になります.(未検証)

$ losetup -f –show -o `expr 94208 \* 512` /dev/loop0

ので今回はそのあたりを自動で行ってくれるkpartxを利用します.大抵は標準では入っていないので以下のエントリを参考に導入してから実行してください.

1つ目のパーティションが /dev/mapper/loop0p1 2つ目のパーティションが /dev/mapper/loop0p2 として設定されました.

$ sudo kpartx -av /dev/loop0
add map loop0p1 (253:4): 0 85045 linear 7:0 8192
add map loop0p2 (253:5): 0 8129 linear 7:0 63

ファイルシステムの修正

ファイルシステムが壊れているのでfsckで修正します.しかし,cleanと言われてしまうので,

$ sudo fsck -n /dev/mapper/loop0p2
fsck from util-linux 2.30.2
e2fsck 1.43.8 (1-Jan-2018)
rootfs: clean, 39394/110656 files, 256435/441856 blocks

一回resize2fsを叩いて怒られてから

$ sudo resize2fs /dev/mapper/loop0p2
resize2fs 1.43.8 (1-Jan-2018)
Please run 'e2fsck -f /dev/mapper/loop0p2' first.

fsckを実行し直します.

$ sudo e2fsck -f /dev/mapper/loop0p2
e2fsck 1.43.8 (1-Jan-2018)
Pass 1: Checking inodes, blocks, and sizes
Pass 2: Checking directory structure
Pass 3: Checking directory connectivity
Pass 4: Checking reference counts
Pass 5: Checking group summary information
rootfs: 39394/110656 files (0.1% non-contiguous), 256435/441856 blocks

パーティーションリサイズ

fsckが通ったら今度こそリサイズです.これで最大サイズに変更されます.

$ sudo resize2fs /dev/mapper/loop0p2
resize2fs 1.43.8 (1-Jan-2018)
Resizing the filesystem on /dev/mapper/loop0p2 to 1012224 (4k) blocks.

mountしてみる

広くなっているのがわかります :)

$ sudo mount -o ro /dev/mapper/loop0p2 /mnt
$ df /mnt
ファイルシス        1K-ブロック   使用  使用可 使用% マウント位置                                                              
/dev/mapper/loop0p2     3954560 966004 2769736   26% /mnt

後片付け

アンマウントしてloopデバイスも解除します.

$ sudo umount /mnt
$ sudo kpartx -d /dev/mapper/loop0p?
$ sudo losetup -d /dev/loop0 

QEMU User EmulatorでArm以外でapt upgradeする

この辺はまた別のエントリで書くつもりですがこんな感じでupgradeしたりしています.

$ sudo mount /dev/mapper/loop0p2 /mnt
$ sudo mount /dev/mapper/loop0p1 /mnt/boot
$ sudo mount --bind /dev /mnt/dev
$ sudo mount --bind /dev/pts /mnt/dev/pts
$ sudo mount --bind /proc /mnt/proc
$ sudo cp -p /usr/bin/qemu-arm-static /mnt/usr/bin/
$ sudo chroot /mnt /bin/bash
# apt update && apt upgrade -y

このイメージはオリジナルのRaspbianイメージと同じようにSD cardに書き込んで利用できます.
GNU socialのQvitter pluginの背景画像を変更

imgp3854

他の連合でも大抵規定値の同じ背景だし外から来た時目立つしという感じでなんとなく変えたくなったので非ログイン状態のQvitterサイト背景画像を変更してみました.

/plugins/Qvitter/README.md から

$config['site']['qvitter']['sitebackground'] = 'img/vagnsmossen.jpg';

/plugins/Qvitter/img/画像.jpg のような感じで対象の画像を置いて,

/config.php にこんな感じで設定.

$config['site']['qvitter']['sitebackground'] = 'img/画像.jpg';

フルパスはOKだけどFlickrのurlを直に書いたらダメだった.

img/画像.jpg
/img/画像.jpg
/plugins/Qvitter/img/画像.jpg
https://farm1.staticflickr.com/58/230823787_1515cd477c_b.jpg

README.md の形式で書いておくのが無難でしょうね.

ExifTool で任意の geotag 埋め込み

DSC_0241

撮影した写真への位置情報の書き込みにいつもは GPSロガーで記録したGPSログを使い,gpscorrelateコマンドを利用しています.

以下のスライドは2008年のものですが現在もそのままの手順で埋め込んでいます.

建物内などに入ったときなどGPSログが取れないので埋め込みも出来ていませんでした.でも今回建物内で撮影したのが分かっている写真にその場所の位置情報を埋め込みたいと思いました.

gpscorrelateコマンドのマニュアルを見た感じそれらしいオプションは見当たりませんでした.ダミーのGPSログを書くとかもちょっと考えたのですが,exiv2コマンドで座標指定でいけるのではとmanを見ると行けそうです.

       exiv2 -M"set Exif.GPSInfo.GPSLatitude 4/1 15/1 33/1" \
              -M"set Exif.GPSInfo.GPSLatitudeRef N" image.jpg
              Sets  the  latitude to 4 degrees, 15 minutes and 33 seconds north. The Exif standard stipulates that the GPS‐
              Latitude tag consists of three Rational numbers for the degrees, minutes and seconds of the latitude and GPS‐
              LatitudeRef contains either 'N' or 'S' for north or south latitude respectively.

しかし座標の度分秒変換が必要でちょっとめんどうです.
ExifToolを見ると変換なしで行けそうなのでこれで試してみました.(-geotag optionでgpscorrelateと同じこともできそう)

       -geotag TRKFILE
            Geotag images from the specified GPS track log file.  Using the -geotag option is equivalent to writing a value
            to the "Geotag" tag.  After the -geotag option has been specified, the value of the "Geotime" tag is written to
            define a date/time for the position interpolation.  If "Geotime" is not specified, the value is copied from
            "DateTimeOriginal#" (the "#" is added to copy the unformatted value, avoiding potential conflicts with the -d
            option).  For example, the following two commands are equivalent:

                exiftool -geotag trk.log image.jpg
                exiftool -geotag trk.log "-Geotime<DateTimeOriginal#" image.jpg

            When the "Geotime" value is converted to UTC, the local system timezone is assumed unless the date/time value
            contains a timezone.  Writing "Geotime" causes the following tags to be written (provided they can be
            calculated from the track log, and they are supported by the destination metadata format):  GPSLatitude,
            GPSLatitudeRef, GPSLongitude, GPSLongitudeRef, GPSAltitude, GPSAltitudeRef, GPSDateStamp, GPSTimeStamp,
            GPSDateTime, GPSTrack, GPSTrackRef, GPSSpeed, GPSSpeedRef, GPSImgDirection, GPSImgDirectionRef, GPSPitch and
            GPSRoll.  By default, tags are created in EXIF, and updated in XMP only if they already exist.  However,
            "EXIF:Geotime" or "XMP:Geotime" may be specified to write only EXIF or XMP tags respectively.  Note that
            GPSPitch and GPSRoll are non-standard, and require user-defined tags in order to be written.

すでに埋め込み済みのジオタグを参考にして,

$ exiftool -v IMGP5011.JPG|grep GPS
  | 12) GPSInfo (SubDirectory) -->
  | + [GPS directory with 11 entries]
  | | 0)  GPSVersionID = 2 0 0 0
  | | Warning = Tag ID 0x0000 out of sequence in GPS
  | | 1)  GPSVersionID = 2 3 0 0
  | | 2)  GPSLatitudeRef = N
  | | 3)  GPSLatitude = 31 19 18.23 (31/1 19/1 1823/100)
  | | 4)  GPSLongitudeRef = E
  | | 5)  GPSLongitude = 130 53 57.6 (130/1 53/1 5760/100)
  | | 6)  GPSAltitudeRef = 0
  | | 7)  GPSAltitude = 7.8833 (78833/10000)
  | | 8)  GPSTimeStamp = 7 10 37 (7/1 10/1 37/1)
  | | 9)  GPSMapDatum = WGS-84
  | | 10) GPSDateStamp = 2018:01:13

こんな感じかな?

  • GPSLongitudeRef=E -> 東経, 西経
  • GPSLongitude=130.86455555555557 -> 経度
  • GPSLatitudeRef=N -> 北緯, 南緯
  • GPSLatitude=31.386555555555553 -> 緯度
  • GPSAltitude=41.47 -> 海抜標高

実際にExifToolで埋め込んでみました.

$ exiftool -GPSLongitudeRef=E -GPSLongitude=130.86455555555557 -GPSLatitudeRef=N -GPSLatitude=31.386555555555553 -GPSAltitude=41.47 IMGP5021.JPG

座標系がないとまずいかなと思いましたがJOSMやGpsPruneにこの写真を読み込んでみると想定していた座標にプロットされました :)

20180117_00:01:45-2690020180116_05:01:42-30322

exiftoolは既定値ではIMGP5021.JPG_originalのようにオリジナルファイルのバックアップが作成されるので  問題なかったらこれは消しておきましょう.

$ rm *_original

Linux USER Manizx 2017冬号

コミックマーケット93 1日目「Linux Searhers」で頒布された「Linux USER Manizx 2017冬号」に1本記事を寄稿したのですが献本をいただきました :)

https://twitter.com/matoken/status/952848962137997312

ということでざっと一読した感想とか.

  • Raspbian の/rootをbtrfsにしてみた
    Btrfsが不安定ということですがamd64 環境では現在特に不安定には感じていないのでArmの問題かRaspberry Pi側の問題な気がします.
    Raspberry Pi 3 B + SSD 運用だと安定しそう?

  • microSD を複数同時に Copy!
    私は似たようなことにteeでddを繋いで利用しています.
    10portのセルフパワーのUSB HubにUSB-miroSD アダプタ8本刺しても問題なく動くんですね.

  • Raspberry Piを使った電子 FAX の試作
    以前は入会費,維持費0円でFax用の番号が貰えるサービスなんかもあったのですが最近は見当たらないのでFaxが必要な人にはとても良さそうですね.
    ハードウェアはRaspberry Piだけでmodem等も不要というのが魅力的です.
    #でもFax使う人には脱Faxしてほしかったり

  • UEFIで始める Linux From Scratch
    手持ちのマシンはUEFI未対応(ThinkPad X200)ですがこのQemuの手順だと遊べるのでは?と思ったので今度試してみようと思います.
    後,GNU corutilsのnproc知らなかったので参考になりました.

  • Linux ARMにVivaldiがやってきた
    自分の記事なので読んでませんが最近はARMではなくArmと表記するようです.
    それとVivaldiダウンロードページにUnsupportedとなっていますがArm版が記載されるようになりました.
    https://vivaldi.com/download/

  • PimoroniのpHATをプロキシ環境で使う
    Pimoroniは魅力的なpHATが色々あっていいですよね.
    このプロキシは環境によりつまずく人が多そうですね.参考になりました.
    #せめて自分のサービスにping飛ばしたらいいのに><

  • エアロジェルピザ窯DE-Aero(1/3)
    エアロゲル昔読んだ同人誌(つきなみCOMICS)に載って頭の片隅にかすかに…….
    今回のはコンパクトで(重量1/10!)予熱時間も短く普通のトースター的にも使えそうでいいですね.
    今庭のある家に住んでいるのでとりあえず持ち運びしない前提で耐熱レンガとピザストーンを買って積んでみたいなと.
    今度ホームセンターで探してみます.
    ところで電熱線はどのようなものを使ったのか気になりました.電気だと大分お手軽そう.

  • HeySiri!テレビつけて!
    前号と合わせて読むとGPIOやAC電源On/Off,赤外線制御と出来ていい感じですね.
    iPhone持っていないのでGoogle/Amazon辺りで真似してみたいです.
    #AGFAから逃れたいけどこの分野ではまだ無理かな…….

もしこれらの本が欲しい方は次は(受かれば)2018/04/22の「技術書典4」での頒布になると思います.

GNU social に Pleroma FE を導入してみる

OStatus の実装の一つに Pleroma というものがあります.

Mastodonともある程度APIの互換性があって一部のMastodon clientも利用できたりするらしいです. Elixir製で軽量,Raspberry Pi でも動くとのこと.ActivityPub に対応予定なのも良さそう.GNU social からの移行も出来るようになる予定とのことなのでこの辺りの実装が終わったら開発がとどおおっているように見える GNU social からの移行者が増えそうな気がします.( 自分はサブドメインに gnusocial とつけてしまったのを後悔.social とかにするんだった)

この辺の記事が参考になります.

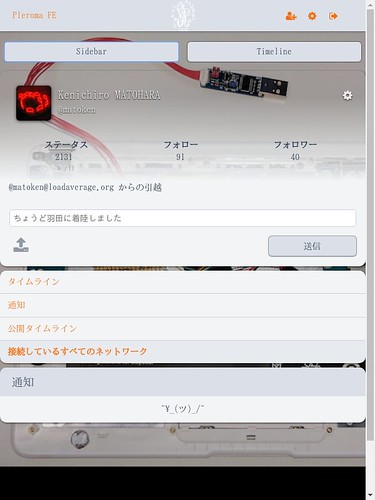
Pleroma はバックエンドとフロントエンドが別れていて GNU social( + Qvitter Plugin ) と Pleroma FE(フロントエンド) という組み合わせが可能です.この Pleroma FE の導入は簡単そうなので既存の GNU social の上に導入してみました.

導入

導入は一番手軽そうな以下の手順を真似しました.

前提条件として,GNU social が動いていて Qvitter plugin が有効になっている必要があります.Qvitter は GNU social に含まれているので設定ファイルで有効にするだけでOKなはずです.

$ grep Qvitter /var/www/gnusocial.matoken.org/config.php 
addPlugin('Qvitter');

<追記>
Qvitter は GNU social に含まれているのは勘違いでした.以下から導入してください.

</追記>

次に以下の Pipelines から最新のzipを入手して展開します.

$ wget 'https://git.pleroma.social/pleroma/pleroma-fe/-/jobs/974/artifacts/download' -O pleroma-fe.zip
$ unzip pleroma-fe.zip 

展開してできたdistディレクトリ中の index.html を pleroma.html に変更します.

$ mv dist/index.html dist/pleroma.html

dist以下をGNU social のディレクトリにコピーして完了.

$ sudo -u www-data rsync -av dist/* /var/www/gnusocial.matoken.org/

導入した GNU social にログインした状態で /pleroma.html にアクセスすると Pleroma FE になります. / にアクセスすると元の Qviter なので併用可能です.

見た目は Qvitter とそんなに変わりませんがこの辺が気に入っています.

  • アイコンのアニメーション対応
  • 設定することでタイムラインの自動更新が可能(Enable automatic streaming of new posts when scrolled to the top)
  • ‘#NSFW’ が R18 注意の画像に差し替わってそれをクリックしないと表示されなく出来る 20180106_00:01:53-18586

縦長の画面にすると Qvitter と同じで Sidebar / Timeline に別れるので自動スクロールを有効にしてサブモニタに Timeline を表示するようにしています.

20180107_14:01:52-1314220180107_14:01:40-13089

Qvitter では自動更新されないし,自動更新可能なクライアントもいくつか試してみましたがいい感じのものが見当たらなかったので今これで落ち着いています.

ちなみに Pleroma FE だけだと API などは GNU social のままなので注意.

ちょっとしたカスタマイズ

static/config.json を修正することでデフォルトの壁紙やロゴ,テーマなどの変更が可能です. 壁紙は /static/bg.jpg /static/bgalt.jpg の2つが用意されています. NSFW 画像は static/img/nsfw.9399fe3.png のようです. static/styles.json でテーマが設定可能です.

不具合とか?

  • 非ログイン状態で /Pleroma.html にアクセスすると認証の窓が出てくるけど正しい認証情報を入力してもログインできない?一旦GSでログインしておくと良い.(GNU social は
    nightry だし 認証系の2FA plugin も入れているのでそのせいかも
  • タイミングにより通知が更新されないことがある?左側の「通知」を押すとmentionは全部取得する.(お気に入りの再取得は無理?)
  • 設定で「Enable automatic streaming of new posts when scrolled to the top」を有効にしているのに Timeline が自動更新されない.一番上にスクロールしている必要がある.上部のロゴ近辺をクリックすると一番上にジャンプする.

Androidで通信できなくなってしまい困る

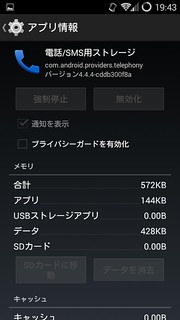
手元の端末(CyanogenMod 11)をいじって使わなさそうなアプリケーションを無効にしていたのですが,再起動したら3G通信ができなくなってしまいました.とりあえずそれっぽい物を有効化していったけど1つを除いて有効化しても通信できない.そしてその残り1つは有効化がグレーアウトして押せないボタンになっています. アプリケーションは「電話/SMS用ストレージ com.adnroid.providers.telephony」というもの.

Screenshot_2018-01-09-19-43-11

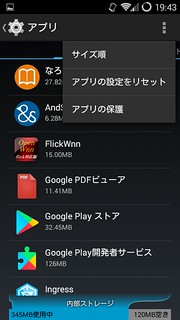
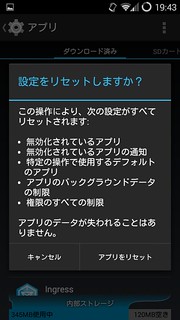
これはもしかしてファクトリーリセットしないといけない?と思ったのですが,「設定」->「アプリ」の右上の「︙」->「アプリの設定をリセット」->「アプリをリセット」で元に戻せました.

Screenshot_2018-01-09-19-43-53Screenshot_2018-01-09-19-44-01

またやりそうなのでメモ.

WordPress Disqus Pluginのエラーを修正

このblogの下の方にこんなエラーが出てコメントのフォームが出てきません.
hostのOSをDebian jessieからDebian stretchにdist-upgradeしてWordPressのVersionが上がったせいでしょう.

4.1+dfsg-1+deb8u15 → 4.7.5+dfsg-2+deb9u1

Notice: get_currentuserinfo の使用はバージョン 4.5.0 から非推奨になっています! 代わりに wp_get_current_user() を使ってくださ
い。 in /usr/share/wordpress/wp-includes/functions.php on line 3830

spamが酷くてDisqusのコメントシステムをつかっているのですがそれがコケているような感じです.
Plugin の version が古いのかと確認してみると最新の 2.87

とりえずエラーメッセージのとおり修正したら動きました.

diff

$ sudo -u www-data diff -u plugins/disqus-comment-system/disqus.php.org plugins/disqus-comment-system/disqus.php
--- plugins/disqus-comment-system/disqus.php.org        2017-10-04 06:16:02.520645362 +0900
+++ plugins/disqus-comment-system/disqus.php    2018-01-08 02:00:35.729022200 +0900
@@ -1382,7 +1382,7 @@
         return array();
     }
     global $current_user, $dsq_api;
-    get_currentuserinfo();
+    wp_get_current_user();
     if ($current_user->ID) {
         $avatar_tag = get_avatar($current_user->ID);
         $avatar_data = array();

利用者多いしDisqus公式のものなので別のもっといい方法がある気がします.