新しいマシンの設定するときに調べ直したメモ.
http://www.adel.nursat.kz/apg/
siteには2017-07-26現在接続できない
http://web.archive.org/web/20161019161749/http://www.adel.nursat.kz/apg/
よく使うオプション
-
-a パスワードアルゴリズムの指定
-
0 発音可能
-
1 ランダム
-
-
-n パスワード生成数
-
-m パスワード最低文字長
-
-x パスワード最大文字長
-
-M 文字の種類を指定
-
S 必ず記号を利用
-
s 記号を利用
-
N 必ず数字を利用
-
n 数字を利用
-
C 必ず英大文字を利用
-
c 英大文字を利用
-
L 必ず英小文字を利用
-
l 英小文字を利用
-
-
-E 指定した文字を利用しない(複数指定可能)
記号のみ
$ apg -Ms -a1
#/^>,\../
\^./\{~<
%(_/_%_]]`
=..,;[$('
"$$$"<!]~
-%\?`_++<<
$ apg -MS -a1
,/.>[@;%@`
@,$(_/*_.
``'"}=*%#
[#|,'@?"-
,?];"]]&?@
[)'$@>'{/}
数字のみ
$ apg -Mn -a1
14683511
97138910
5192942105
3010244799
381484337
493808346
$ apg -MN -a1
5426157541
03163967
98161665
369810970
38523677
249810992
英大文字のみ
$ apg -Mc -a1
GBUDJODXIH
RMEUJNHKQM
OJHCTVJR
HPWKCOLD
ZAPCGYWCNA
WIOKVXDTZW
$ apg -MC -a1
KOQOVOSAJB
IWWQSBTL
IPUFNTGP
GMKFKXIJKT
OWVNYNFL
QLVOAUEMSU
英子文字のみ
$ apg -Ml -a1
uviqxdrc
tukfvlona
mzmwjjhe
jtssfdla
qmzjxlet
rzzxjvnyr
$ apg -ML -a1
wivxbkdpe
xnvdepbhro
wclwdrofjk
dorabarzdc
zedblcjp
ibwmgwwrv
記号数字英大文字小文字を必ず含む
$ apg -MSNCL
8dromKaix"
in2OfKain;
{on1Woan
Peow9Ot_
|owpIpVap9
7OnryubAp`
パスワード長最低11文字
$ apg -MSNCL -m11
DiOfnu1Miv>
@okshEcWew0
cosh1olbIm^
forkow0Oll^
'Obpiugtut1
ItEdd`dros0
パスワード文字長11〜16文字
apg -MSNCL -m11 -x16
bywax|biggIp3
yik7henvecJavUj"
8lawhasBokPyft^
yijTysFeg5oj%
8quactArnyobpec?
abGaj9etsyic)
覚え方も併記
$ apg -MSNCL -m11 -l
rawd9<FriWa romeo-alfa-whiskey-delta-NINE-LESS_THAN-Foxtrot-romeo-india-Whiskey-alfa
`shnoandOg1 GRAVE-sierra-hotel-november-oscar-alfa-november-delta-Oscar-golf-ONE
Rudwem9Gon! Romeo-uniform-delta-whiskey-echo-mike-NINE-Golf-oscar-november-EXCLAMATION_POINT
8OjsewJerj, EIGHT-Oscar-juliett-sierra-echo-whiskey-Juliett-echo-romeo-juliett-COMMA
mayng1WiUb^ mike-alfa-yankee-november-golf-ONE-Whiskey-india-Uniform-bravo-CIRCUMFLEX
Dams9Odcan- Delta-alfa-mike-sierra-NINE-Oscar-delta-charlie-alfa-november-HYPHEN
パスワードの生成数を20に
$ apg -MSNCL -m11 -l -n20
3OcMu7twad` THREE-Oscar-charlie-Mike-uniform-SEVEN-tango-whiskey-alfa-delta-GRAVE
Fed8Twygub; Foxtrot-echo-delta-EIGHT-Tango-whiskey-yankee-golf-uniform-bravo-SEMICOLON
Re^SwibTim9 Romeo-echo-CIRCUMFLEX-Sierra-whiskey-india-bravo-Tango-india-mike-NINE
~trirv2Dosh TILDE-tango-romeo-india-romeo-victor-TWO-Delta-oscar-sierra-hotel
Rot%slocOv1 Romeo-oscar-tango-PERCENT_SIGN-sierra-lima-oscar-charlie-Oscar-victor-ONE
5Knu.BijKue FIVE-Kilo-november-uniform-PERIOD-Bravo-india-juliett-Kilo-uniform-echo
!olf6Fobviv EXCLAMATION_POINT-oscar-lima-foxtrot-SIX-Foxtrot-oscar-bravo-victor-india-victor
_HemJefGej4 UNDERSCORE-Hotel-echo-mike-Juliett-echo-foxtrot-Golf-echo-juliett-FOUR
8drydOdlec| EIGHT-delta-romeo-yankee-delta-Oscar-delta-lima-echo-charlie-VERTICAL_BAR
mud2FridOn= mike-uniform-delta-TWO-Foxtrot-romeo-india-delta-Oscar-november-EQUAL_SIGN
ic:GrubFek6 india-charlie-COLON-Golf-romeo-uniform-bravo-Foxtrot-echo-kilo-SIX
playb(Blos4 papa-lima-alfa-yankee-bravo-LEFT_PARENTHESIS-Bravo-lima-oscar-sierra-FOUR
KajCedd<od8 Kilo-alfa-juliett-Charlie-echo-delta-delta-LESS_THAN-oscar-delta-EIGHT
Num>ObAind4 November-uniform-mike-GREATER_THAN-Oscar-bravo-Alfa-india-november-delta-FOUR
0Quoorc=gro ZERO-Quebec-uniform-oscar-oscar-romeo-charlie-EQUAL_SIGN-golf-romeo-oscar
Ocweecs_El4 Oscar-charlie-whiskey-echo-echo-charlie-sierra-UNDERSCORE-Echo-lima-FOUR
Jirk,Kneip7 Juliett-india-romeo-kilo-COMMA-Kilo-november-echo-india-papa-SEVEN
Marb?Bluch1 Mike-alfa-romeo-bravo-QUESTION_MARK-Bravo-lima-uniform-charlie-hotel-ONE
gabGon:Jep9 golf-alfa-bravo-Golf-oscar-november-COLON-Juliett-echo-papa-NINE
#utvabVert2 CROSSHATCH-uniform-tango-victor-alfa-bravo-Victor-echo-romeo-tango-TWO
指定した文字を含めない
$ apg -MSNCL -m11 -E1l!
Mobad3ubUj,
Ji3vin@Oraj
rap&OnIarb4
banip4UvAd(
Deugh[ixEn8
mojAw{osev5
aliasに設定
aliasに設定しておくと便利.
以下はbashに設定した例
$ echo 'alias apg="apg -MSNCL -m11"' | tee -a ~/.bashrc
alias apg="apg -MSNCL -m11"
設定反映(もしくはログインし直し)
$ source ~/.bashrc
$ alias | grep apg
alias apg='apg -MSNCL -m11'
動作確認
$ apg
EcsAr)Gruk9
Toym7Blyft%
phiet'ijEg4
wimDu[Neeb4
niUds/Odav2
notCeit!oc6
オプションを追加することも出来る
$ apg -l
6Drowm`twup SIX-Delta-romeo-oscar-whiskey-mike-GRAVE-tango-whiskey-uniform-papa
twar1mu^Mel tango-whiskey-alfa-romeo-ONE-mike-uniform-CIRCUMFLEX-Mike-echo-lima
Upumwik?Oc4 Uniform-papa-uniform-mike-whiskey-india-kilo-QUESTION_MARK-Oscar-charlie-FOUR
cyx4Odcaff) charlie-yankee-x_ray-FOUR-Oscar-delta-charlie-alfa-foxtrot-foxtrot-RIGHT_PARENTHESIS
6drebIt/quo SIX-delta-romeo-echo-bravo-India-tango-SLASH-quebec-uniform-oscar
5Ofdiatilg' FIVE-Oscar-foxtrot-delta-india-alfa-tango-india-lima-golf-APOSTROPHE
一時的にaliasを無効に
$ \apg
stintun0Oc? (stint-un-ZERO-Oc-QUESTION_MARK)
FlewUcyibr&Op0 (Flew-Uc-yibr-AMPERSAND-Op-ZERO)
Ont3okDeadGeg~ (Ont-THREE-ok-Dead-Geg-TILDE)
reginkAl#twew5 (reg-ink-Al-CROSSHATCH-twew-FIVE)
"4KnapavAvTil (QUOTATION_MARK-FOUR-Knap-av-Av-Til)
Frol9Swec\ (Frol-NINE-Swec-BACKSLASH)
環境
$ apg -v
APG (Automated Password Generator)
version 2.2.3 (PRNG: X9.17/SHA-1)
Copyright (c) 1999, 2000, 2001, 2002, 2003 Adel I. Mirzazhanov
$ apt show apg
Package: apg
Version: 2.2.3.dfsg.1-4
Priority: optional
Section: admin
Origin: Ubuntu
Maintainer: Ubuntu Developers <ubuntu-devel-discuss@lists.ubuntu.com>
Original-Maintainer: Marc Haber <mh+debian-packages@zugschlus.de>
Bugs: https://bugs.launchpad.net/ubuntu/+filebug
Installed-Size: 137 kB
Depends: libc6 (>= 2.14)
Homepage: http://www.adel.nursat.kz/apg/
Task: ubuntu-desktop, ubuntu-usb, edubuntu-desktop, edubuntu-usb, ubuntu-gnome-desktop, ubuntu-touch, ubuntukylin-desktop, ubun
tu-budgie-desktop
Supported: 9m
Download-Size: 50.2 kB
APT-Manual-Installed: no
APT-Sources: http://jp.archive.ubuntu.com/ubuntu artful/main amd64 Packages
Description: 自動パスワード生成器 - スタンドアロン版
APG (Automated Password Generator) is the tool set for random password generation. It generates some random words of required
type and prints them to standard output. This binary package contains only the standalone version of apg. Advantages:
* Built-in ANSI X9.17 RNG (Random Number Generator)(CAST/SHA1)
* Built-in password quality checking system (now it has support for Bloom
filter for faster access)
* Two Password Generation Algorithms:
1. Pronounceable Password Generation Algorithm (according to NIST
FIPS 181)
2. Random Character Password Generation Algorithm with 35
configurable modes of operation
* Configurable password length parameters
* Configurable amount of generated passwords
* Ability to initialize RNG with user string
* Support for /dev/random
* Ability to crypt() generated passwords and print them as additional output.
* Special parameters to use APG in script
* Ability to log password generation requests for network version
* Ability to control APG service access using tcpd
* Ability to use password generation service from any type of box (Mac,
WinXX, etc.) that connected to network
* Ability to enforce remote users to use only allowed type of password
generation
The client/server version of apg has been deliberately omitted.
.
Please note that there are security flaws in pronounceable password
generation schemes (see Ganesan / Davis "A New Attack on Random
Pronounceable Password Generators", in "Proceedings of the 17th National
Computer Security Conference (NCSC), Oct. 11-14, 1994 (Volume 1)",
http://csrc.nist.gov/publications/history/nissc/ 1994-17th-NCSC-
proceedings-vol-1.pdf, pages 203-216)
.
apg has not seen upstream attention since 2003, upstream is not answering
e-mail, and the upstream web page does not look like it is in good working
order. The Debian maintainer plans to discontinue apg maintenance as soon
as an actually maintained software with a compariable feature set becomes
available.
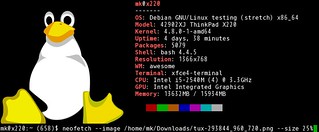
$ neofetch
.-/+oossssoo+/-. mk@x200
`:+ssssssssssssssssss+:` -------
-+ssssssssssssssssssyyssss+- Model: 74574PJ ThinkPad X200
.ossssssssssssssssssdMMMNysssso. OS: Ubuntu Artful Aardvark (development branch) x86_64
/ssssssssssshdmmNNmmyNMMMMhssssss/ Kernel: 4.11.0-10-generic
+ssssssssshmydMMMMMMMNddddyssssssss+ Uptime: 2 days, 18 hours, 10 minutes
/sssssssshNMMMyhhyyyyhmNMMMNhssssssss/ Packages: 4274
.ssssssssdMMMNhsssssssssshNMMMdssssssss. Shell: bash 4.4.12
+sssshhhyNMMNyssssssssssssyNMMMysssssss+ Resolution: 1280x800
ossyNMMMNyMMhsssssssssssssshmmmhssssssso WM: awesome
ossyNMMMNyMMhsssssssssssssshmmmhssssssso Theme: Ambiance [GTK3]
+sssshhhyNMMNyssssssssssssyNMMMysssssss+ Icons: Ubuntu-mono-dark [GTK3]
.ssssssssdMMMNhsssssssssshNMMMdssssssss. Terminal: tilix
/sssssssshNMMMyhhyyyyhdNMMMNhssssssss/ CPU: Intel 2 Duo P8400 (2) @ 2.267GHz
+sssssssssdmydMMMMMMMMddddyssssssss+ GPU: Intel® GM45 Express Chipset
/ssssssssssshdmNNNNmyNMMMMhssssss/ GPU: Intel® GM45 Express Chipset
.ossssssssssssssssssdMMMNysssso. Memory: 7083MiB / 7878MiB
-+sssssssssssssssssyyyssss+-
`:+ssssssssssssssssss+:`
.-/+oossssoo+/-.