backspace.fm 🏛️でドリキンさんがf.luxがいいと言っているのを聞いて以前Linux環境でブルーライトカット系のアプリを少し試したのを思い出しました.
その時はdebianでf.luxは自分でリポジトリを登録するのが面倒でパッケージの用意されているgnome-shell-extension-redshiftとredshiftを試してみたのでした.f.luxインスパイアらしいし.
これらはf.luxと同じようにネットワーク情報から位置情報を取得し,端末の場所の太陽の位置により色温度を変化させるアプリケーションです.夜は色温度を低くしてブルーライトを軽減させます.これによりブルーライトを睡眠前に受ける量が減って寝つきやすくなったり睡眠の質が良くなるかもという効果を期待しています.
しかし,gnome-shell-extension-redshiftはうまく有効にならず,redshiftは位置情報の取得に失敗して手動で動作させていたのでした.
今回もdebian環境でredshift-gtkを試してみました.これは実体はredshiftでタスクトレイに常駐するものです.一時的にon/offすることも簡単に出来るので便利です.
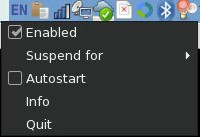
実行するとタスクトレイに電球と月のアイコンが表示されます.クリックすると以下のようなメーニューが.
 🏛️
🏛️
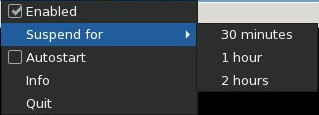
画像編集などで一時的に機能を切りたい場合などサスペンドする機能もあります.
 🏛️
🏛️
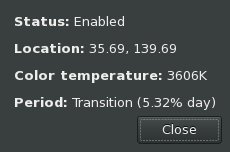
インフォメーションの表示.朝6時頃なので色温度がだんだん高くなっていくところです.
 🏛️
🏛️
設定ファイルの作成
規定値で動作させてもだいたい問題ないのですが,カスタマイズしたかったり位置情報が誤った場所のものになっている場合など設定を変更したくなることがあります.
redshiftをコマンドで実行する場合はオプションが指定できますが,redshift-gtkの場合は設定ファイルで指定可能です.
場所は~/.config/redshift.confです.;以降はコメントとして扱われるようです.
メインとなる[redshift]セクションの説明です.
- temp-day : 昼間の色温度,規定値は5500
- temp-night : 夜間の色温度,規定値は3700
- transition : スムーズな遷移の無効有効の設定(0 or 1)
- brightness-day : 昼間のブライトネス設定(0.1~1.0)
- brightness-night : 夜間のブライトネス設定(0.1~1.0)
- gamma : ガンマ値の設定(0.1~10.0)
- adjustment-method : 調整方法の選択
$ redshift -m list
Available adjustment methods:
drm
randr
vidmode
dummy
Specify colon-separated options with `-m METHOD:OPTIONS'.
Try `-m METHOD:help' for help.
- location-provider : ロケーションプロバイダの指定.
listオプションで確認できます.現在はgeoclue2とmanualが選べるようです.
$ redshift -l list
Available location providers:
geoclue2
manual
Specify colon-separated options with`-l PROVIDER:OPTIONS'.
Try `-l PROVIDER:help' for help.
adjustment-methodを指定した場合それぞれのセクションでオプションを指定可能です.
内容は$ redshift -m randr:helpのようにメソッド名:helpで確認できます.
[redshift]
:
adjustment-method=randr
:
[randr]
screen=1
location-providerをmanualにした場合[manual]セクションで緯度経度を指定します.度.分のみで秒まで指定するとエラーとなります.
以下は鹿児島県の場合です.
[manual]
lat=31.33
lon=130.33
ということで今こんな感じで使っています.
; Global settings for redshift
[redshift]
; Set the day and night screen temperatures
temp-day=5700
temp-night=3600
; Enable/Disable a smooth transition between day and night
; 0 will cause a direct change from day to night screen temperature.
; 1 will gradually increase or decrease the screen temperature
transition=1
; Set the screen brightness. Default is 1.0
;brightness=0.9
; It is also possible to use different settings for day and night since version 1.8.
brightness-day=0.9
brightness-night=0.7
; Set the screen gamma (for all colors, or each color channel individually)
gamma=0.8
;gamma=0.8:0.7:0.8
; Set the location-provider: 'geoclue2', 'manual'
; type 'redshift -l list' to see possible values
; The location provider settings are in a different section.
location-provider=manual
; Set the adjustment-method: 'drm', 'randr', 'vidmode', 'dummy'
; type 'redshift -m list' to see all possible values
; The adjustment method settings are in a different section.
adjustment-method=randr
; Configuration of the adjustment-method
; type 'redshift -m METHOD:help' to see the settings
; ex: 'redshift -m randr:help'
; In this example, randr is configured to adjust screen 0.
; Note that the numbering starts from 0, so this is actually the second screen.
[randr]
screen=0
; Configuration of the location-provider:
; type 'redshift -l PROVIDER:help' to see the settings
; e.g. 'redshift -l manual:help'
[manual]
; kagoshima, japan
lat=31.33
lon=130.33
問題点?
redshiftを動かしているとブライトネスもこれで管理されます.手動で設定してもすぐにredshiftの設定に戻ります.バッテリー駆動中でブライトネスを下げてバッテリーの持ちを良くしようというような場合は困ります.とりあえずredshiftもブライトネスも手動設定して回避しています.
redshift-gtkを終了した状態で手動設定
$ redshift -O 3500
$ xrandr --output LVDS1 --brightness 0.3
それと夜ふかしさんのためにブルーライトカットの時間をずらす機能はないかなと思ったのですが見当たりませんでした.これは位置情報をmanualで設定して時差のある場所を設定するようにしたら実現できそうです.
 🏛️
🏛️ 🏛️
🏛️ 🏛️
🏛️