最近またポインティングデバイスにApple Wireless Trackpadを利用するようになりましたが持ち運びには少し嵩張ります.マウスを持ち運ぶのもかさばります.
Ubuntu TouchでHDMI接続時にタッチデバイスになるというのを見てAndroid端末をタッチデバイスにすることが出来るのでは?それなら荷物増え無いしいいかもと思って少し調べてみました.
Bluetooth利用のBlink
BlinkはBluetooth接続かつPC側でデーモンを動かす必要があります.
先ずBluetoothペアリングをしておき,PC側でデーモンを導入します.
必要パッケージの導入
$ sudo apt install bluez python-bluez xdotoolsudo apt-get install bluez python-bluez xdotool
デーモンの導入
$ git clone https://github.com/drpain/blink-server.git ~/.blink
以下のようにしてデーモンを起動するのですが,この記事を書いている時点でのDebian stretch testing amd64では以下のようなエラーとなります.
$ sudo ~/.blink/bluetooth_server.py
Traceback (most recent call last):
  File "/home/mk/.blink/bluetooth_server.py", line 25, in <module>
    profiles         = [ SERIAL_PORT_PROFILE ]
  File "/usr/lib/python2.7/dist-packages/bluetooth/bluez.py", line 176, in advertise_service
    raise BluetoothError (str (e))
bluetooth.btcommon.BluetoothError: (2, 'No such file or directory')
GuihubのHELPを参考に*/etc/bluetooth/main.conf*を以下のように修正します.
diff --git a/bluetooth/main.conf b/bluetooth/main.conf
index 372fd8c..2f7cc4a 100644
--- a/bluetooth/main.conf
+++ b/bluetooth/main.conf
@@ -64,6 +64,9 @@
 # 'false'.
 #FastConnectable = false

+# "drpain/blink-server: This is the server you would need to be able to run the Blink Android Application." https://github.com/drpain/blink-server
+DisablePlugins = pnat
+
 #[Policy]
 #
 # The ReconnectUUIDs defines the set of remote services that should try
設定を反映するためにbluetoothdを再起動してサーバを再起動します.
$ sudo service bluetooth restart
サーバは要rootのようです.
この状態でAndroid側からクライアントPCを選択して接続すればok.
$ sudo ~/.blink/bluetooth_server.py
READY FOR CONNECTIONS, RFCOMM channel 1
('INBOUND CONNECTION ', ('68:76:4F:3B:D1:E0', 1))
COMMAND RECEIVED [{"action":"mouse-move","x":null,"y":null}]
['xdotool', 'mousemove_relative', '--', 'None', 'None']
COMMAND RECEIVED [{"action":"mouse-move","x":-1,"y":0}]
['xdotool', 'mousemove_relative', '--', '-1', '0']
COMMAND RECEIVED [{"action":"mouse-move","x":0,"y":0}]
['xdotool', 'mousemove_relative', '0', '0']
COMMAND RECEIVED [{"action":"mouse-move","x":-1,"y":0}]
['xdotool', 'mousemove_relative', '--', '-1', '0']
上の方のモード切替スイッチをタップして規定の「Swipe Area」から「Mouse」にします.「Mouse Area」で操作するとxdotoolのログが大量に出つつ操作できます.
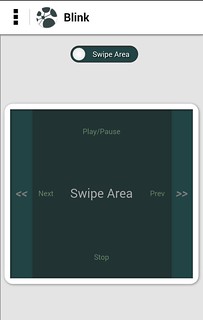
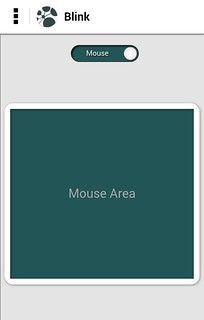
操作は少し解りづらくてこんな感じです.
タップ→左クリック
タップ, ホールド, リリース → 右クリック
中クリックやドラッグは多分未実装で使えません.
カーソル移動はちらつきますがとりあえず使える感じです.
でも導入に要設定変更&要rootなのが面倒ですね.