Raspbian はSD cardに書き込んでRaspberry Piで起動するとraspi-configから簡単にパーティションサイズを拡大できます.しかし,パッケージのアップデートや導入に時間がかかるのでSD cardに書き込む前にこの辺りの処理は済ませておきたいです. chrootとQEMU User Emulatorを使えば出来るのですが,今度はDisk fullに……. ということでraspbianイメージを広げてみます.
※速度の速いストレージだと必要ない処理かもしれませんが,カスタマイズしたイメージを用意するとかにも使えます.
※ここではRaspbian Lite stretch 2017-11-29のイメージを元にしていますが,最終パーティションを広げるのであれば他の各種イメージでもほぼそのまま,途中のパーティションサイズを変更するのも応用でいけます.
今回は広げると行ってもオリジナルのファイルはそのままに,4GBほどのサイズのイメージを作ってそちらにデータをコピーしてそのイメージのサイズを広げることにします.
今回の環境は Debian sid amd64 環境です.Linux環境であればほぼ同じ手順で行けると思います.
4GBイメージを作成
4GBほどの容量のイメージを作成します.もっと大きい容量がいい人はcountを増やしましょう.
<追記>4GBにしてはちょっと大きかったかも.手持ちにカードの容量より少し小さいサイズにすると良いです.</追記>
$ dd if=/dev/zero of=./4gb.img bs=1M count=4000
$ ls -l ./4gb.img
-rw-r--r-- 1 mk mk 4194304000 Jan 19 21:28 ./4gb.img
losetupでデバイスマッピングをする
/dev/loop0に割り当てられた.
$ sudo losetup -f --show ./4gb.img
/dev/loop0
Raspbianイメージの用意とデバイスマッピング
/dev/loop1に割り当てられた.
$ unzip 2017-11-29-raspbian-stretch-lite.zip
$ sudo losetup -f --show ./2017-11-29-raspbian-stretch-lite.img
/dev/loop1
Raspbianイメージを4GBのイメージにコピー
loop1(Raspbian)のイメージをloop0(4GB)にコピーしている.
$ sudo dd if=/dev/loop1 of=/dev/loop0 bs=1M
1772+0 records in
1772+0 records out
1858076672 bytes (1.9 GB, 1.7 GiB) copied, 161.929 s, 11.5 MB/s
Raspbianイメージを片付ける
$ sudo losetup -d /dev/loop1
$ rm ./2017-11-29-raspbian-stretch-lite.img
コピーしたイメージをfdiskで確認
Raspbianのパーティション情報が見えます.
$ sudo fdisk -l /dev/loop0
Disk /dev/loop0: 3.9 GiB, 4194304000 bytes, 8192000 sectors
Units: sectors of 1 * 512 = 512 bytes
Sector size (logical/physical): 512 bytes / 512 bytes
I/O size (minimum/optimal): 512 bytes / 512 bytes
Disklabel type: dos
Disk identifier: 0x37665771

Device       Boot Start     End Sectors  Size Id Type
/dev/loop0p1       8192   93236   85045 41.5M  c W95 FAT32 (LBA)
/dev/loop0p2      94208 3629055 3534848  1.7G 83 Linux
fdiskでパーテションサイズを変更する
ここはわかりづらいですが,以下のような操作をしています.
dコマンドで 2つ目のパーテションを削除nコマンドで 2つ目のパーテションを最大容量で作り直し- この時 First sector を削除前のものと合わせること
pコマンドで確認wコマンドで書き込みwコマンドで書き込むまではファイルシステムは変更されないので間違ってもやり直しできます.
$ sudo fdisk /dev/loop0

Welcome to fdisk (util-linux 2.30.2).
Changes will remain in memory only, until you decide to write them.
Be careful before using the write command.

Command (m for help): d
Partition number (1,2, default 2): 2

Partition 2 has been deleted.

Command (m for help): n
Partition type
   p   primary (1 primary, 0 extended, 3 free)
   e   extended (container for logical partitions)
Select (default p): p
Partition number (2-4, default 2): 2
First sector (2048-8191999, default 2048): 94208
Last sector, +sectors or +size{K,M,G,T,P} (94208-8191999, default 8191999): 8191999

Created a new partition 2 of type 'Linux' and of size 3.9 GiB.
Partition #2 contains a ext4 signature.

Do you want to remove the signature? [Y]es/[N]o: N

Command (m for help): p

Disk /dev/loop0: 3.9 GiB, 4194304000 bytes, 8192000 sectors
Units: sectors of 1 * 512 = 512 bytes
Sector size (logical/physical): 512 bytes / 512 bytes
I/O size (minimum/optimal): 512 bytes / 512 bytes
Disklabel type: dos
Disk identifier: 0x37665771

Device       Boot Start     End Sectors  Size Id Type
/dev/loop0p1       8192   93236   85045 41.5M  c W95 FAT32 (LBA)
/dev/loop0p2      94208 8191999 8097792  3.9G 83 Linux

Command (m for help): w
The partition table has been altered.
Calling ioctl() to re-read partition table.
Re-reading the partition table failed.: 無効な引数です

The kernel still uses the old table. The new table will be used at the next reboot or after you run partprobe(8) or kpartx(8).
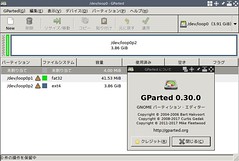
fdiskに慣れていない場合はgparted等でGUIで操作したほうが直感的で解りやすいかもしれません(未検証) ->
gksudo gparted /dev/loop0
🏛️
kpartxでパーティションをマッピングする
上で使ったlosetupでも出来るのですが,オフセットを自分で計算して指定する必要がある
losetupを使う場合はfdiskのpコマンドの対象パーティーションの Start * Sector sizeをlosetupの-oに指定します.今回の例だと2つ目のパーティーションは
94208 * 512になります.(未検証)$ losetup -f –show -o `expr 94208 \* 512` /dev/loop0
ので今回はそのあたりを自動で行ってくれるkpartxを利用します.大抵は標準では入っていないので以下のエントリを参考に導入してから実行してください.
1つ目のパーティションが /dev/mapper/loop0p1 2つ目のパーティションが /dev/mapper/loop0p2 として設定されました.
$ sudo kpartx -av /dev/loop0
add map loop0p1 (253:4): 0 85045 linear 7:0 8192
add map loop0p2 (253:5): 0 8129 linear 7:0 63
ファイルシステムの修正
ファイルシステムが壊れているのでfsckで修正します.しかし,cleanと言われてしまうので,
$ sudo fsck -n /dev/mapper/loop0p2
fsck from util-linux 2.30.2
e2fsck 1.43.8 (1-Jan-2018)
rootfs: clean, 39394/110656 files, 256435/441856 blocks
一回resize2fsを叩いて怒られてから
$ sudo resize2fs /dev/mapper/loop0p2
resize2fs 1.43.8 (1-Jan-2018)
Please run 'e2fsck -f /dev/mapper/loop0p2' first.
fsckを実行し直します.
$ sudo e2fsck -f /dev/mapper/loop0p2
e2fsck 1.43.8 (1-Jan-2018)
Pass 1: Checking inodes, blocks, and sizes
Pass 2: Checking directory structure
Pass 3: Checking directory connectivity
Pass 4: Checking reference counts
Pass 5: Checking group summary information
rootfs: 39394/110656 files (0.1% non-contiguous), 256435/441856 blocks
パーティーションリサイズ
fsckが通ったら今度こそリサイズです.これで最大サイズに変更されます.
$ sudo resize2fs /dev/mapper/loop0p2
resize2fs 1.43.8 (1-Jan-2018)
Resizing the filesystem on /dev/mapper/loop0p2 to 1012224 (4k) blocks.
mountしてみる
広くなっているのがわかります :)
$ sudo mount -o ro /dev/mapper/loop0p2 /mnt
$ df /mnt
ファイルシス        1K-ブロック   使用  使用可 使用% マウント位置
/dev/mapper/loop0p2     3954560 966004 2769736   26% /mnt
後片付け
アンマウントしてloopデバイスも解除します.
$ sudo umount /mnt
$ sudo kpartx -d /dev/mapper/loop0p?
$ sudo losetup -d /dev/loop0
QEMU User EmulatorでArm以外でapt upgradeする
この辺はまた別のエントリで書くつもりですがこんな感じでupgradeしたりしています.
$ sudo mount /dev/mapper/loop0p2 /mnt
$ sudo mount /dev/mapper/loop0p1 /mnt/boot
$ sudo mount --bind /dev /mnt/dev
$ sudo mount --bind /dev/pts /mnt/dev/pts
$ sudo mount --bind /proc /mnt/proc
$ sudo cp -p /usr/bin/qemu-arm-static /mnt/usr/bin/
$ sudo chroot /mnt /bin/bash
# apt update && apt upgrade -y
このイメージはオリジナルのRaspbianイメージと同じようにSD cardに書き込んで利用できます.
One thought to “Raspbianイメージを任意の広さに拡大する”