TermuxはAndroid上でLinux環境を構築するアプリケーションです.他に標準のLinuxディストリビューションがchroot環境で動作するソフトウェアが色々ある(Debian no root等)ので独自パッケージ管理なTermuxにはあまり惹かれていなかったのですが,API経由でAndroidデバイスの操作が出来るということを知り試してみました.
termux-audio-info
オーディオ情報の取得
  $ termux-audio-info -h
  Usage: termux-audio-info
  Get information about audio capabilities.
  $ termux-audio-info
  {
    "PROPERTY_OUTPUT_SAMPLE_RATE": "48000",
    "PROPERTY_OUTPUT_FRAMES_PER_BUFFER": "960",
    "STREAM_MUSIC_VOLUME": 1,
    "STREAM_MUSIC_MAXVOLUME": 15,
    "BLUETOOTH_A2DP_IS_ON": false,
    "WIREDHEADSET_IS_CONNECTED": false,
    "AUDIOTRACK_NATIVE_OUTPUT_SAMPLE_RATE": 48000
  }
termux-battery-status
バッテリー情報の取得
$ termux-battery-status -h
Usage: termux-battery-status
Get the status of the device battery.
$ termux-battery-status
{
  "health": "GOOD",
  "percentage": 70,
  "plugged": "PLUGGED_USB",
  "status": "CHARGING",
  "temperature": 36.900001525878906
}
termux-brightness
輝度の調整?0や255を指定しても動作が解らなかった
$ termux-brightness
Usage: termux-brightness brightness
Set the screen brightness between 0 and 255
$ termux-brightness 0
$ termux-brightness 255
termux-call-log
通話履歴の取得
$ termux-call-log -h
Usage: termux-call-log [-d] [-l limit] [-o offset]
List call log history
  -l limit   offset in call log list (default: 10)
  -o offset  offset in call log list (default: 0)
$ termux-call-log
termux-camera-info
カメラ情報が取得できる.カメラIDや解像度など.
$ termux-camera-info -h
Usage: termux-camera-info
Get information about device camera(s).
$ termux-camera-info
[
  {
    "id": "0",
    "facing": "back",
    "jpeg_output_sizes": [
      {
        "width": 5248,
        "height": 3936
      },
      {
        "width": 5248,
        "height": 2952
      },
      {
        "width": 3840,
        "height": 2160
      },
      {
        "width": 3264,
        "height": 2448
      },
      {
        "width": 2048,
        "height": 1536
      },
      {
        "width": 1920,
        "height": 1080
      },
      {
        "width": 1280,
        "height": 720
      },
      {
        "width": 640,
        "height": 480
      },
      {
        "width": 480,
        "height": 320
      },
      {
        "width": 320,
        "height": 240
      }
    ],
    "focal_lengths": [
      4.900000095367432
    ],
    "auto_exposure_modes": [
      "CONTROL_AE_MODE_ON",
      "CONTROL_AE_MODE_ON_AUTO_FLASH",
      "CONTROL_AE_MODE_ON_ALWAYS_FLASH",
      "CONTROL_AE_MODE_ON_AUTO_FLASH_REDEYE"
    ],
    "physical_size": {
      "width": 6.219269752502441,
      "height": 4.663866996765137
    },
    "capabilities": [
      "backward_compatible"
    ]
  },
  {
    "id": "1",
    "facing": "front",
    "jpeg_output_sizes": [
      {
        "width": 1920,
        "height": 1080
      },
      {
        "width": 1600,
        "height": 1200
      },
      {
        "width": 1280,
        "height": 720
      },
      {
        "width": 640,
        "height": 480
      },
      {
        "width": 480,
        "height": 320
      },
      {
        "width": 320,
        "height": 240
      }
    ],
    "focal_lengths": [
      1.809999942779541
    ],
    "auto_exposure_modes": [
      "CONTROL_AE_MODE_ON"
    ],
    "physical_size": {
      "width": 2.1837236881256104,
      "height": 1.2063192129135132
    },
    "capabilities": [
      "backward_compatible"
    ]
  }
]
termux-camera-photo
カメラを使って写真撮影が出来る.引数にカメラID(option)や写真ファイル名(必須)が指定できる.写真はJPEG形式
$ termux-camera-photo -h

Usage: termux-camera-photo [-c camera-id] output-file
Take a photo and save it to a file in JPEG format.
  -c camera-id  ID of the camera to use (see termux-camera-info), default: 0
$ termux-camera-photo termix_photo.jpg
termux-clipboard-get
クリップボードの文字列を取得
$ termux-clipboard-get -h
Usage: termux-clipboard-get
Get the system clipboard text.
termux-clipboard-set
クリップボードに文字列を格納
$ termux-clipboard-set -h
Usage: termux-clipboard-set [text]
Set the system clipboard text. The text to set is either supplied as arguments or read from stdin if no arguments are given.
$ termux-clipboard-set hello
$ termux-clipboard-get
hello
termux-contact-list
全てのコンタクトリストが表示される
$ termux-contact-list -h
Usage: termux-contact-list
List all contacts.
$ termux-contact-list
[
  {
    "name": "MATOHARA Kenichiro",
    "number": "0X0-XXXX-XXXX"
  },
     :
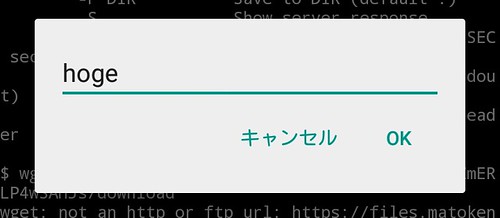
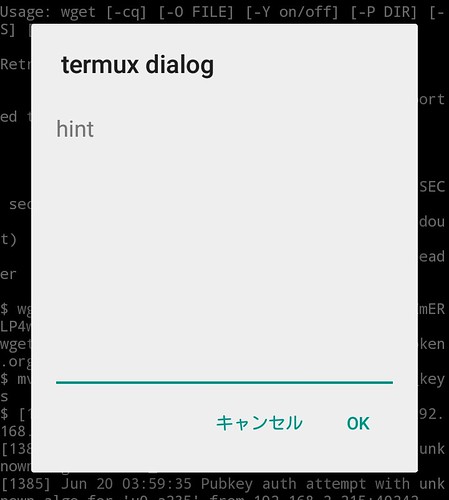
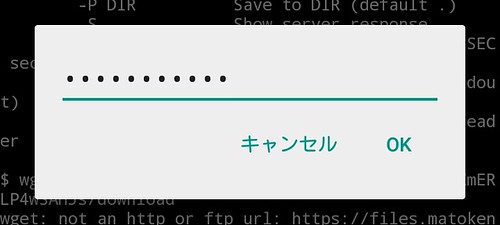
termux-dialog
ダイヤログを表示してその結果を取得できる.パスワード文字列などの指定も可能.
$ termux-dialog -h
Usage: termux-dialog [-i hint] [-m] [-p] [-t title]
Show a text entry dialog.
  -i hint   the input hint to show when the input is empty
  -m        use a textarea with multiple lines instead of a single
  -p        enter the input as a password
  -t title  the title to show for the input prompt
$ echo `termux-dialog`
hoge

$ echo `termux-dialog -i hint -m -t termux\ dialog`|od -xc
0000000   h   o   g   e       f   u   g   a  \n
        6f68 6567 6620 6775 0a61
0000012

$ echo `termux-dialog -p`
passwordddd

termux-download
指定したURLからダウンロードが出来る.Androidのダウンロードアプリに渡される.(単にファイル取得ならwgetが入っている)
$ termux-download -h
Usage: termux-download [-d description] [-t title] url-to-download
Download a resource using the system download manager.
  -d description  description for the download request notification
  -t title        title for the download request notification
termux-fingerprint
指紋認証を行う?(未確認)
$ termux-fingerprint -h
Usage: termux-fingerprint
Use fingerprint sensor on device to check for authentication
NOTE: Only available on Marshmallow and later
$ termux-fingerprint
{
  "errors": [
    "ERROR_UNSUPPORTED_OS_VERSION"
  ],
  "failed_attempts": 0,
  "auth_result": "AUTH_RESULT_UNKNOWN"
termux-infrared-frequencies
赤外線通信情報を取得?(未確認)
$ termux-infrared-frequencies -h
Usage: termux-infrared-frequencies
Query the infrared transmitter's supported carrier frequencies.
$ termux-infrared-frequencies
[]
termux-infrared-transmit
赤外通信で送信する?(未確認)
$ termux-infrared-transmit -h
Usage: termux-infrared-transmit -f frequency pattern
Transmit an infrared pattern. The pattern is specified in comma-separated on/off intervals, such as '20,50,20,30'. Only patterns shorter than 2 seconds will be transmitted.
  -f frequency  IR carrier frequency in Hertz
termux-location
位置情報を取得.GPSを利用すると時間が掛かる.位置情報が取得できない場合はタイムアウト後何も帰ってこない.タイムアウトは65秒前後.
$ termux-location -h
usage: termux-location [-p provider] [-r request]
Get the device location.
  -p provider  location provider [gps/network/passive] (default: gps)
  -r request   kind of request to make [once/last/updates] (default: once)
$ termux-location -p gps
$ termux-location -p network
{
  "latitude": 31.2529767,
  "longitude": 130.8509959,
  "altitude": 0.0,
  "accuracy": 19.31999969482422,
  "bearing": 0.0,
  "speed": 0.0,
  "elapsedMs": 39,
  "provider": "network"
}
$ termux-location -p passive
{
  "latitude": 34.77000045776367,
  "longitude": 138.4600067138672,
  "altitude": 0.0,
  "accuracy": 976974.0625,
  "bearing": 81.0,
  "speed": 0.0,
  "elapsedMs": 5,
  "provider": "fused"
}
termux-media-player
メディアの再生,操作
$ termux-media-player -h
termux-media-player: Invalid cmd: '-h'
Usage: termux-media-player cmd [args]

help        Shows this help
info        Displays current playback information
play        Resumes playback if paused
play <file> Plays specified media file
pause       Pauses playback
stop        Quits playback
$ termux-media-player play
No previous track to resume!
Please supply a new media file
$ termux-media-player play /storage/sdcard1/Android/data/com.bambuna.podcastaddict/files/podcast/エッジのたたないポッドキャスト/MzoRbgzFVe_3248.mp3
Now Playing: MzoRbgzFVe_3248.mp3
$ termux-media-player pause
Paused playback
$ termux-media-player play
Resumed playback
Track: MzoRbgzFVe_3248.mp3
Current Position: 00:27 / 13:39
$ termux-media-player info
Status: Playing
Track: MzoRbgzFVe_3248.mp3
Current Position: 01:10 / 13:39
$ termux-media-player info
No track currently!
$ termux-media-player play photo.jpg

Prepare failed.: status=0x1
termux-media-scan
メディアをスキャンする?
$ termux-media-scan -h
Usage: termux-media-scan [-v] [-r] file [file...]
Scan the specified file(s) and add it to the media content provider.
  -r  scan directories recursively
  -v  verbose mode
$ termux-media-scan -r /storage/sdcard1/Android/data/com.bambuna.podcastaddict/files/podcast/エッジのたたないポッドキャスト
Finished scanning 2 file(s)
$ termux-media-scan -r -v /storage/sdcard1/Android/data/com.bambuna.podcastaddict/files/podcast/エッジのたたないポッドキャスト
/storage/sdcard1/Android/data/com.bambuna.podcastaddict/files/podcast/エッジのたたないポッドキャスト
/storage/sdcard1/Android/data/com.bambuna.podcastaddict/files/podcast/エッジのたたないポッドキャスト/MzoRbgzFVe_3248.mp3
Finished scanning 2 file(s)
$ termux-media-player info
No track currently!
termux-microphone-record
録音をする.出力ファイル形式は3GPPのよう
$ termux-microphone-record -h
Usage: termux-microphone-record [args]
Record using microphone on your device

-h           Shows this help
-d           Start recording w/ defaults
-f <file>    Start recording to specific file
-l <limit>   Start recording w/ specified limit (in seconds)
-i           Get info about current recording
-q           Quits recording
$ termux-microphone-record -d -f termux-record.mp3 -l 10
Recording started: /data/data/com.termux/files/home/termux-record
Max Duration: 00:10
$ termux-microphone-record -i
{
  "isRecording": true,
  "outputFile": "\/data\/data\/com.termux\/files\/home\/termux-record"
}
$ termux-microphone-record -i
{
  "isRecording": false
}
file ./termux-record
./termux-record: ISO Media, MPEG v4 system, 3GPP
$ mv ./termux-record ./termux-record.3gpp
$ termux-media-player play ./termux-record.3gpp
Now Playing: termux-record.3gpp
termux-notification
通知を出力する.タイトル,メッセージ以外にもバイブレーションやサウンド,LEDなども操作できる.
$ termux-notification -h
Usage: termux-notification [options]
Display a system notification. Context text is read from stdin or specified using --content.
  --action action          action to execute when pressing the notification
  --button1 text           text to show on the first notification button
  --button1-action action  action to execute on the first notification button
  --button2 text           text to show on the second notification button
  --button2-action action  action to execute on the second notification button
  --button3 text           text to show on the third notification button
  --button3-action action  action to execute on the third notification button
  --content content        content to show in the notification. Read from stdin not specified here.
  --id id                  notification id (will overwrite any previous notification with the same id)
  --led-color rrggbb       color of the blinking led as RRGGBB (default: none)
  --led-on milliseconds    number of milliseconds for the LED to be on while it's flashing (default: 800)
  --led-off milliseconds   number of milliseconds for the LED to be off while it's flashing (default: 800)
  --on-delete action       action to execute when the the notification is cleared
  --priority prio          notification priority (high/low/max/min/default)
  --sound                  play a sound with the notification
  --title title            notification title to show
  --vibrate pattern        vibrate pattern, comma separated as in 500,1000,200
$ termux-notification --title hoge --content fuga

termux-notification-remove
termux-notification -idで指定したidのメッセージを削除する.
$ termux-notification-remove -h
Usage: termux-notification-remove notification-id
Remove a notification previously shown with termux-notification --id.
$ termux-notification --content hoge --id tm01
$ termux-notification-remove tm01
termux-sensor
センサーの値を取得する.センサーの値は定期的に表示される(既定値は多分1秒間隔)
$ termux-sensor -h
Usage: termux-sensor
Get information about types of sensors as well as live data
  -h, help           Show this help
  -a, all            Listen to all sensors (WARNING! may have battery impact)
  -c, cleanup        Perform cleanup (release sensor resources)
  -l, list           Show list of available sensors
  -s, sensors [,,,]  Sensors to listen to (can contain just partial name)
  -d, delay [ms]     Delay time in milliseconds before receiving new sensor update
$ termux-sensor -l
{
  "sensors": [
    "BMA2X2 Accelerometer\/Temperature\/Double-tap",
    "AK8963 Magnetometer",
    "AK8963 Magnetometer Uncalibrated",
    "BMG160 Gyroscope",
    "BMG160 Gyroscope Uncalibrated",
    "APDS-9930\/QPDS-T930 Proximity & Light",
    "APDS-9930\/QPDS-T930 Proximity & Light",
    "Gravity",
    "Linear Acceleration",
    "Rotation Vector",
    "Step Detector",
    "Step Counter",
    "Significant Motion Detector",
    "Game Rotation Vector",
    "GeoMagnetic Rotation Vector",
    "Orientation"
  ]
}
$ termux-sensor -s "BMA2X2 Accelerometer\/Temperature\/Double-tap"
No valid sensors were registered!
$ termux-sensor -s "AK8963 Magnetometer"
{
  "AK8963 Magnetometer": {
    "values": [
      -11.248207092285156,
      -37.157630920410156,
      23.89850616455078
    ]
  }
}
{
  "AK8963 Magnetometer": {
    "values": [
      16.16058349609375,
      -33.7738037109375,
      -13.971900939941406
    ]
  }
}
{
  "AK8963 Magnetometer": {
    "values": [
      3.6207199096679688,
      -38.532447814941406,
      -17.789649963378906
    ]
  }
}
^CCaught interrupt.. Finishing...
Performing sensor cleanup
Sensor cleanup successful!
$ termux-sensor -s "AK8963 Magnetometer Uncalibrated"
{
  "AK8963 Magnetometer Uncalibrated": {
    "values": [
      -18.68438720703125,
      -71.844482421875,
      195.37200927734375,
      -26.05126953125,
      -30.462646484375,
      221.81549072265625
    ]
  }
}
{
  "AK8963 Magnetometer Uncalibrated": {
    "values": [
      -18.6492919921875,
      -70.87860107421875,
      196.197509765625,
      -26.05126953125,
      -30.462646484375,
      221.81549072265625
    ]
  }
}
^CCaught interrupt.. Finishing...
Performing sensor cleanup
Sensor cleanup successful!
$ termux-sensor -s "BMG160 Gyroscope"
{
  "BMG160 Gyroscope": {
    "values": [
      8.544921875E-4,
      8.087158203125E-4,
      8.544921875E-4
    ]
  }
}
^CCaught interrupt.. Finishing...
Performing sensor cleanup
Sensor cleanup successful!
$ termux-sensor -s "BMG160 Gyroscope Uncalibrated"
{
  "BMG160 Gyroscope Uncalibrated": {
    "values": [
      -0.006317138671875,
      0.002044677734375,
      0,
      -0.006103517021983862,
      0.0012359619140625,
      -8.544921875E-4
    ]
  }
}
^CCaught interrupt.. Finishing...
Performing sensor cleanup
Sensor cleanup successful!
$ termux-sensor -s "APDS-9930\/QPDS-T930 Proximity & Light"
No valid sensors were registered!
$ termux-sensor -s "Gravity"
{
  "Gravity": {
    "values": [
      1.4136531352996826,
      -1.045373558998108,
      9.647754669189453
    ]
  }
}
^CCaught interrupt.. Finishing...
Performing sensor cleanup
Sensor cleanup successful!
$ termux-sensor -s "Linear Acceleration"
{
  "Linear Acceleration": {
    "values": [
      -0.0018668174743652344,
      0.005246162414550781,
      0.001544952392578125
    ]
  }
}
^CCaught interrupt.. Finishing...
Performing sensor cleanup
Sensor cleanup successful!
$ termux-sensor -s "Rotation Vector"
{
  "Rotation Vector": {
    "values": [
      0.07332251220941544,
      -0.0574394166469574,
      0.9877411723136902,
      0.12526708841323853,
      0.1745329201221466
    ]
  }
}
^CCaught interrupt.. Finishing...
Performing sensor cleanup
Sensor cleanup successful!
$ termux-sensor -s "Step Detector"
{}
^CCaught interrupt.. Finishing...
Performing sensor cleanup
Sensor cleanup successful!
$ termux-sensor -s "Step Counter"
{
  "Step Counter": {
    "values": [
      0
    ]
  }
}
^CCaught interrupt.. Finishing...
Performing sensor cleanup
Sensor cleanup successful!
$ termux-sensor -s "Significant Motion Detector"
{}
{}
^CCaught interrupt.. Finishing...
Performing sensor cleanup
Sensor cleanup successful!
$ termux-sensor -s "Game Rotation Vector"
{
  "Game Rotation Vector": {
    "values": [
      -0.04727154225111008,
      -0.08051935583353043,
      0.005690218415111303,
      0.9956152439117432
    ]
  }
}
^CCaught interrupt.. Finishing...
Performing sensor cleanup
Sensor cleanup successful!
$ termux-sensor -s "GeoMagnetic Rotation Vector"
{
  "GeoMagnetic Rotation Vector": {
    "values": [
      0.07260913401842117,
      -0.05879773199558258,
      0.9851652383804321,
      0.14394499361515045,
      0.1745329201221466
    ]
  }
}
^CCaught interrupt.. Finishing...
Performing sensor cleanup
Sensor cleanup successful!
$ termux-sensor -s "Orientation"
{
  "Orientation": {
    "values": [
      194.80770874023438,
      5.517017364501953,
      9.214399337768555
    ]
  }
}
^CCaught interrupt.. Finishing...
Performing sensor cleanup
Sensor cleanup successful!
termux-share
引数に指定されたファイルを共有する.
$ termux-share -h
Usage: termux-share [-a action] [-c content-type] [-d] [-t title] [file]
Share a file specified as argument or the text received on stdin if no file argument is given.
  -a action        which action to performed on the shared content:
                     edit/send/view (default:view)
  -c content-type  content-type to use (default: guessed from file extension,
                     text/plain for stdin)
  -d               share to the default receiver if one is selected
                     instead of showing a chooser
  -t title         title to use for shared content (default: shared file name)
$ termux-share photo.jpg
termux-sms-inbox
受信済のSMSメッセージを読み込む.(未確認.SIMなし端末で試したら0件表示された)
$ termux-sms-inbox -h
Usage: termux-sms-inbox [-d] [-l limit] [-n] [-o offset]
List received SMS messages.
  -d         show dates when messages were created
  -l limit   offset in sms list (default: 10)
  -n         show phone numbers
  -o offset  offset in sms list (default: 0)
$ termux-sms-inbox
termux-sms-send
smsメッセージを送信する.(未確認)
$ termux-sms-send -h
Usage: termux-sms-send -n number[,number2,number3,...] [text]
Send a SMS message to the specified recipient number(s). The text to send is either supplied as arguments or read from stdin if no arguments are given.
  -n number(s)  recipient number(s) - separate multiple numbers by commas
$ termux-sms-send -n 電話番号 message
termux-speech-to-text
音声認識した結果を表示する.端末上では空行しか見えないがodに流すと文字列が帰っているのが解る.多分英語のみ?
$ termux-speech-to-text -h
Usage: termux-speech-to-text
Converts speech to text, sending partial matches to stdout.
$ termux-speech-to-text


$ termux-speech-to-text|od -xc
0000000  \n  \n  \n   H   u   d   l  \n
        0a0a 480a 6475 0a6c
0000010
termux-storage-get
システムに指定したファイルを渡して開く?反応がない.
$ termux-storage-get -h
Usage: termux-storage-get output-file
Request a file from the system and output it to the specified file.
$ termux-storage-get photo.jpg
termux-telephony-call
指定した番号に電話を掛ける(mobile回線は未確認だが,電話のみでもアプリ選択画面にはなるのでWi-FiのみでもSIPなどで電話することは多分可能)
$ termux-telephony-call -h
Usage: termux-telephony-call <number>
Call a telephony number.
$ termux-telephony-call 電話番号
termux-telephony-cellinfo
電話基地局情報を取得?
$ termux-telephony-cellinfo -h
Usage: termux-telephony-cellinfo
Get information about all observed cell information from all radios on the device including the primary and neighboring cells.
$ termux-telephony-cellinfo
[
  {
    "type": "wcdma",
    "registered": true,
    "asu": 6,
    "dbm": -101,
    "level": 2,
    "cid": 249053510,
    "lac": 25994,
    "mcc": 440,
    "mnc": 10,
    "psc": 33
  }
]
termux-telephony-deviceinfo
テレフォニーデバイス情報を取得?
$ termux-telephony-deviceinfo -h
Usage: termux-telephony-deviceinfo
Get information about the telephony device.
$ termux-telephony-deviceinfo
{
  "data_activity": "none",
  "data_state": "disconnected",
  "device_id": "357931051XXXXXXX",
  "device_software_version": "81",
  "phone_type": "gsm",
  "network_operator": "",
  "network_operator_name": "",
  "network_country_iso": "",
  "network_type": "unknown",
  "network_roaming": false,
  "sim_country_iso": "",
  "sim_operator": "",
  "sim_operator_name": "",
  "sim_serial_number": null,
  "sim_subscriber_id": null,
  "sim_state": "absent"
}
termux-toast
Toast(一時的なポップアップ)メッセージを表示する
$ termux-toast -h
Usage: termux-toast [-s] [text]
Show text in a Toast (a transient popup). The text to show is either supplied as arguments or read from stdin if no arguments are given.
 -s  only show the toast for a short while
$ termux-toast hello

termux-torch
トーチをon/offする?手元の環境では反応がなかった.
$ termux-torch -h
Illegal parameter: -h
Usage: termux-torch [on | off]
Toggle LED Torch on device
$ termux-torch on
^C
termux-tts-engines
テキスト読み上げエンジン(tts)の一覧を表示する
$ termux-tts-engines -h
Usage: termux-tts-engines
Get information about the available text-to-speech (TTS) engines. The name of an engine may be given to the termux-tts-speak command using the -e option.
$ termux-tts-engines
[
  {
    "name": "com.google.android.tts",
    "label": "Googleテキスト読み上げエンジン",
    "default": false
  },
  {
    "name": "jp.kddilabs.n2tts",
    "label": "KDDILABS N2 TTS",
    "default": true
  }
]
termux-tts-speak
テキスト読み上げを行う.日本語に対応したttsであれば日本語も問題ない.標準入力からも受け付けるので記事や小説の読み上げも簡単.
$ termux-tts-speak こんにちは
$ echo '吾輩は猫である' | termux-tts-speak
$ w3m -dump https://www.aozora.gr.jp/cards/000148/files/789_14547.html | termux-tts-speak
termux-vibrate
バイブレートを実行.長さの指定やサイレントモードでも強行するモードもある.
$ termux-vibrate -h
Usage: termux-vibrate [-d duration] [-f]
Vibrate the device.
  -d duration  the duration to vibrate in ms (default:1000)
  -f           force vibration even in silent mode
$ termux-vibrate
termux-volume
ボリュームの変更.手元の環境では0〜15で数字が大きいほど音量が大きくなった.16以上を指定しても15と同じ動きになった.
$ termux-volume -h
Invalid argument count
Usage: termux-volume stream volume
Change volume of audio stream
Valid audio streams are: alarm, music, notification, ring, system, call
Call w/o arguments to show information about each audio stream
$ termux-volume music 5
termux-wallpaper
壁紙を設定.位置合わせや切り抜き指定は出来ない.-uが便利.
$ termux-wallpaper -h
Change wallpaper on your device

Usage: termux-wallpaper cmd [args]
-h         show this help
-f <file>  set wallpaper from file
-u <url>   set wallpaper from url resource
-l         set wallpaper for lockscreen (Nougat and later)
$ termux-wallpaper -u https://www.nasa.gov/sites/default/files/styles/full_width_feature/public/thumbnails/image/pia22422.jpg
Wallpaper set successfully!
termux-wifi-connectioninfo
Wi-Fi接続情報を表示.
$ termux-wifi-connectioninfo -h
Usage: termux-wifi-connectioninfo
Get information about the current wifi connection.
$ termux-wifi-connectioninfo
{
  "bssid": "10:6f:3f:XX:XX:XX",
  "frequency_mhz": 2462,
  "ip": "192.168.2.211",
  "link_speed_mbps": 54,
  "mac_address": "68:76:4f:XX:XX:XX",
  "network_id": 0,
  "rssi": -51,
  "ssid": "home-ap",
  "ssid_hidden": false,
  "supplicant_state": "COMPLETED"
}
termux-wifi-enable
Wi-Fiの有効無効設定.
$ termux-wifi-enable -h
Usage: termux-wifi-enable [true | false]
Toggle Wi-Fi On/Off
$ termux-wifi-enable false

$ termux-wifi-enable true
termux-wifi-scaninfo
Wi-Fiスキャン結果を表示.
$ termux-wifi-scaninfo -h
Usage: termux-wifi-scaninfo
Get information about the last wifi scan.
$ termux-wifi-scaninfo
[
  {
    "bssid": "12:6f:3f:XX:XX:XX",
    "frequency_mhz": 2462,
    "rssi": -55,
    "ssid": "home-guest",
    "timestamp": 2978153233
  },
  {
    "bssid": "10:6f:3f:XX:XX:XX",
    "frequency_mhz": 2462,
    "rssi": -54,
    "ssid": "home-ap",
    "timestamp": 2978153243
  },
  {
    "bssid": "10:6f:3f:XX:XX:XX",
    "frequency_mhz": 2447,
    "rssi": -78,
    "ssid": "matohara",
    "timestamp": 2978153249
  }
]
Androidアプリケーションを作成しなくてもちょっとしたことならこのAPIの組み合わせで遊ぶことができそうです.(bash+Zenityみたいな?ちょっとちがうか)
Termux:Task/Boot等と組み合わせると更に活用の幅は広がりそうです.(未確認)