crontab の実行タイミングをわかりやすく表示してくれる cronv を試す

ちょっと試したら少し嵌ったのでメモがてら.

build
$ go get github.com/takumakanari/cronv/cronv
$ go build -o ./cronv github.com/takumakanari/cronv/cronv
Usage
$ ./cronv -h
Usage:
  Cronv v0.4.1 [OPTIONS]

Application Options:
  -o, --output=    path to .html file to output (default: ./crontab.html)
  -d, --duration=  duration to visualize in N{suffix} style. e.g.) 1d(day)/1h(hour)/1m(minute) (default: 6h)
      --from-date= start date in the format '2006/01/02' to visualize (default: 2019/05/25)
      --from-time= start time in the format '15:04' to visualize (default: 02:50)
  -t, --title=     title/label of output (default: Cron Tasks)
  -w, --width=     Table width of output (default: 100)

Help Options:
  -h, --help       Show this help message
実行
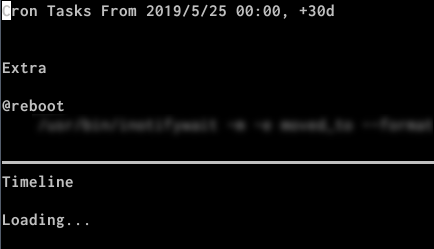
$ crontab -l | ./cronv

2019-06-01 ADD: 以下のtab が含まれているときにエラーとなる問題は修正されました😖

しかし,missing field(s) とか syntax error in year field: とかのエラーになってしまう.

$ printf "* * * * *\tcommand\n"
* * * * *       command
$ printf "* * * * *\tcommand\n" | ./cronv
panic: Failed to analyze cron '* * * * *        command': syntax error in year field: 'command'

goroutine 1 [running]:
panic
        ../../../src/libgo/go/runtime/panic.go:554
main.main
        /home/mk/go/src/github.com/takumakanari/cronv/cronv/main.go:33

タブ区切りをやめてスペース区切りにするとエラーが出ない

$ printf "* * * * * command\n" | ./cronv
[Cron Tasks] 1 tasks.
[Cron Tasks] './crontab.html' generated.

ということでとりあえずタブをスペースに変換することにした.

$ crontab -l | tr -s '\t' ' ' | ./cronv
[Cron Tasks] 8 tasks.
[Cron Tasks] './crontab.html' generated.

作成された crontab.html を w3m で……ほとんど表示されない.

20190525 03 36 35 001

もう少しリッチな JavaScript の動くウェブブラウザで開くとOK.
これからの6時間分の様子が見える.

20190525 03 00 01 001

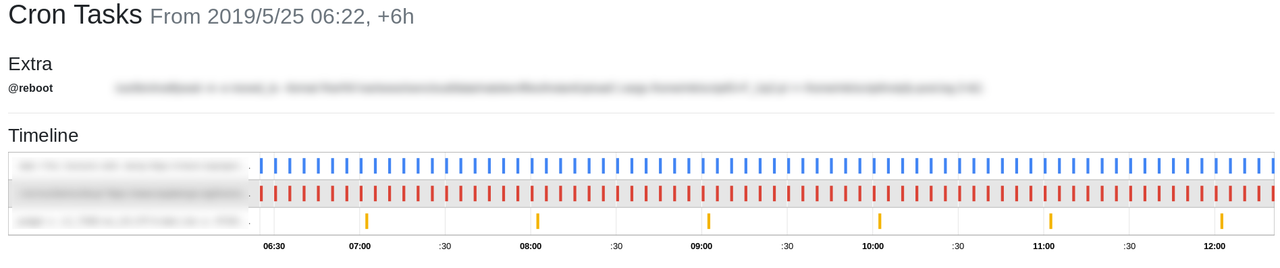
-d, --duration option で表示する時間間隔が指定できる.
開始日時は,--fron-date, --from-time option で指定できる.
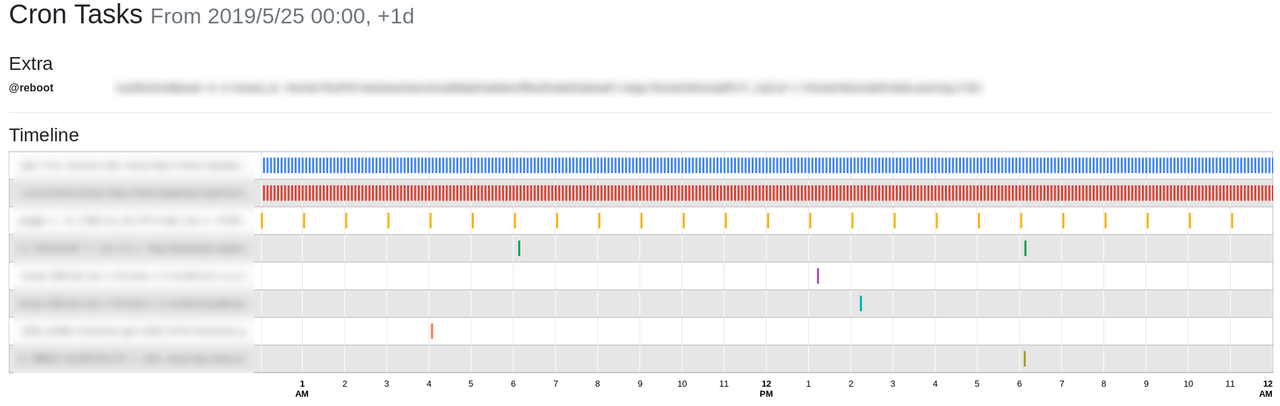
以下の例では 2019-05-25 00:00:00 から1日分の表示になる.

$ crontab -l | tr -s '\t' ' ' | ./cronv -d 1d --from-date=2019/05/25 --from-time=00:00

20190525 02 58 37 001

ちなみに1ヶ月も試したが,ウェブブラウザで表示するのにとても時間が掛かった.

環境
$ dpkg-query -W cron gccgo-go
cron    3.0pl1-128.1ubuntu1
gccgo-go        2:1.10~4ubuntu1
$ lsb_release -d
Description:    Ubuntu 18.04.2 LTS
$ uname -m
x86_64

Android で Wi-Fi 経由の adb を有効にして backup

Android 端末側でUSB デバッグを有効にしてUSB接続する.
デバイスが認識されているか確認.

$ adb devices
List of devices attached
PM1LHMA861102833        device

no permissions と言われた場合

$ adb devices
List of devices attached
PM1LHMA861102833        no permissions (user in plugdev group; are your udev rules wrong?); see [http://developer.android.com/tools/device.html]

は以下のようにして udev のルルーを追加する.VID/PID(以下の例では2e18, c032)部分はdmesgやlsusbで確認して自分の端末のIDに書き換える.

$ echo '# Essential PH-1
> SUBSYSTEM=="usb", ATTR{idVendor}=="2e17", ATTR{idProduct}=="c032", MODE="0666", GROUP="adbandy"' | sudo tee /etc/udev/rules.d/51-android.rules
# Essential PH-1
SUBSYSTEM=="usb", ATTR{idVendor}=="2e17", ATTR{idProduct}=="c032", MODE="0666", GROUP="adbandy"

その後USB を接続し直して確認し直す.

HostPC の adb コマンドで tcpip コマンドで接続できるようにして,connect コマンドで Android 端末の ip を指定して接続します.
5555 はポート番号で 5555 が規定値.既定値から変更した場合は,connect コマンドの ip の後ろにポート番号の指定が必要になります.

$ adb tcpip 5555
$ adb connect 192.168.1.200
connected to 192.168.1.200:5555

この状態でusb 接続を解除して devides コマンドに居ます :)
後は普通に使えます.

$ adb devices
List of devices attached
192.168.1.200:5555      device
$ adb logcat|head -1
--------- beginning of crash
^C

そして本命のバックアップ.

$ time adb backup -f ./PH-1.ab -all
Now unlock your device and confirm the backup operation...

real   26m2.104s
user    0m0.171s
sys     0m5.725s

用事が終わったら切断しておいたほうが安心ですね.

$ adb disconnect 192.168.1.200
disconnected 192.168.1.200
$ adb devices
List of devices attached
環境(Android)
mata:/ $ getprop ro.bootimage.build.fingerprint
essential/mata/mata:9/PQ1A.190105.058/496:user/release-keys
mata:/ $ getprop ro.build.version.security_patch
2019-05-05
mata:/ $ getprop ro.product.cpu.abilist
arm64-v8a,armeabi-v7a,armeabi
環境(HostPC)
$ dpkg-query -W adb
adb     1:8.1.0+r23-5
$ lsb_release -dr
Description:    Debian GNU/Linux 10 (buster)
Release:        10
$ uname -m
x86_64

ドイツの格安VPS(Contabo VPS 300) を借りてセットアップ済サーバのOSを入れ替える

追記)Contabo のアフェリエイトリンクを貼っておきます.Contabo のサービスを申し込む場合は以下のバナーから申し込んでくれると嬉しいです.


今利用しているさくらのVPSのdiskがいっぱいになってしまいました.現在100GBですが,鹿児島市の航空写真のH30版を入手したのでもう50GBは欲しい.できればもう100GB.

オブジェクトストレージだとそこそこ安そうだけどさくらは申込み停止中.

新規お申し込み停止のお知らせ
100GiB以下 540円

ConoHaは受付中みたい.

容量は100GB単位で追加でき、月額450円/100GBでご利用いただけます。

Amazon S3 はどうだろうと計算すると今の転送量だと4000円/月以上しそう(◞‸◟)

海外だとどうだろうと VPS 比較サイトの VPS Comp を見ると,ドイツの Contabo VPS 300 というストレージ 300GB のサービスが 3.99€/月と格安です.日本円で500円位でしょうか.

安いのでちょっと不安ですが契約してみました.セットアップ料金として別途 4.99€が必要でした.このフィーは申込期間が1ヶ月の場合で,3ヶ月,6ヶ月と伸びるごとに安くなって12ヶ月で無料になります.

20190509 23 05 06 1787

契約には別途ライセンスの写真を送る必要がありました.日本語の住基ネットカードの表面のみの写真を送りましたが受け付けてもらえました.

するとすぐにアクセスのための情報がやってきました.アクセス手段はssh と VNC です.
申込時に指定したディストリビューションでセットアップ済ですが,自分で用意したイメージでセットアップしたり暗号化FSなども利用したいです.

さくらのVPS では自分で用意した ISO イメージでセットアップできました.

しかし,Contabo ではこの方法は使えないようです.
Webのコントロールパネルを見ると,Rescue system から SystemRescueCD, Debian Live, CroneZilla が使えるようです.

20190510 09 05 38 16982

今回は,ディスクに空き領域を作成してそこに起動イメージとセットアップCD イメージを置いてセットアップ済イメージのGRUB からそれを起動してセットアップすることにしました.
(はじめ / の領域に置いて初期化しなければ行けるのではと試しましたがパーティションの設定で d-i に怒られたので別パーティションに)

ということでまずはWebコンソールから Debian Live で起動して,VNC で接続して Install 済のイメージをいじって500MB ほどの空きパーティションを作成しました. / が1GB ほどあったのでこれをおおまかに半分に分割しました.ext4 でフォーマットもして mount します.
(案外VNCももたつかず操作できた)

20190510 15 05 09 16332
20190510 15 05 01 16995

mount した領域に vmlinux, initrd, Debian Install CD を入れます.
今回はこの辺をダウンロードしました.

http://cdimage.debian.org/cdimage/weekly-builds/amd64/iso-cd/debian-testing-amd64-netinst.iso
http://cdimage.debian.org/cdimage/weekly-builds/amd64/iso-cd/SHA512SUMS
http://cdimage.debian.org/cdimage/weekly-builds/amd64/iso-cd/SHA512SUMS.sign
http://http.us.debian.org/debian/dists/buster/main/installer-amd64/20190410/images/hd-media/vmlinuz
http://http.us.debian.org/debian/dists/buster/main/installer-amd64/20190410/images/hd-media/initrd.gz

再起動してプリインストールイメージの GRUB で c を押して GRUB の command-line に入ります.
そしてこんな感じでさっきダウンロードしたイメージで起動します.

grub>  imsmod part_msdos
grub>  insmod ext2
grub>  set root='hd0,msdos2'
grub>  linux /vmlinux
grub>  initrd /initrd.gz
grub>  boot

うまく起動すれば後はいつもの d-i なのでよしなに…….セットアップが終わったらもったいないのでパーティションを操作してセットアップに使った領域をくっつけておきます.

リモートのサーバで暗号化FS を使うといちいちコンソールのVNC を立ち上げないといけなくて面倒という場合には Debian の場合 dropbear-initramfs を導入するとinitramfs で dropbrar(sshd) を利用できるようになり,ssh 経由でロック解除できます.自動化することも可能.

dropbear-initramfs pkg を導入して,/usr/share/doc/dropbear-initramfs/README.initramfs を見ると良いです.

$ sudo apt install dropbear-initramfs
$ sudo install -m 600 /dev/null /etc/dropbear-initramfs/authorized_keys
$ cat ~/.ssh/id_cdsa_remote.pub | sudo tee -a /etc/dropbear-initramfs/authorized_keys
$ sudo update-initramfs -u -k all

UnixBench 測ってみました.500円にしては案外性能いいような.#自宅サーバ(HP ProLiant MicroServer)は 400前後なのに……

Benchmark Run: Sun May 12 2019 22:42:16 - 23:10:29
2 CPUs in system; running 2 parallel copies of tests

Dhrystone 2 using register variables       56736299.4 lps   (10.0 s, 7 samples)
Double-Precision Whetstone                     9687.1 MWIPS (9.2 s, 7 samples)
Execl Throughput                               5257.7 lps   (29.7 s, 2 samples)
File Copy 1024 bufsize 2000 maxblocks        859332.6 KBps  (30.0 s, 2 samples)
File Copy 256 bufsize 500 maxblocks          245855.2 KBps  (30.0 s, 2 samples)
File Copy 4096 bufsize 8000 maxblocks       2105320.9 KBps  (30.0 s, 2 samples)
Pipe Throughput                             1607890.0 lps   (10.0 s, 7 samples)
Pipe-based Context Switching                 342078.2 lps   (10.0 s, 7 samples)
Process Creation                              11453.5 lps   (30.0 s, 2 samples)
Shell Scripts (1 concurrent)                   9834.5 lpm   (60.0 s, 2 samples)
Shell Scripts (8 concurrent)                   1400.3 lpm   (60.1 s, 2 samples)
System Call Overhead                        1160557.8 lps   (10.0 s, 7 samples)

System Benchmarks Index Values               BASELINE       RESULT    INDEX
Dhrystone 2 using register variables         116700.0   56736299.4   4861.7
Double-Precision Whetstone                       55.0       9687.1   1761.3
Execl Throughput                                 43.0       5257.7   1222.7
File Copy 1024 bufsize 2000 maxblocks          3960.0     859332.6   2170.0
File Copy 256 bufsize 500 maxblocks            1655.0     245855.2   1485.5
File Copy 4096 bufsize 8000 maxblocks          5800.0    2105320.9   3629.9
Pipe Throughput                               12440.0    1607890.0   1292.5
Pipe-based Context Switching                   4000.0     342078.2    855.2
Process Creation                                126.0      11453.5    909.0
Shell Scripts (1 concurrent)                     42.4       9834.5   2319.5
Shell Scripts (8 concurrent)                      6.0       1400.3   2333.9
System Call Overhead                          15000.0    1160557.8    773.7
                                                                   ========
System Benchmarks Index Score                                        1682.8

回線速度も測ってみましたが流石に遅いですね.

近所
$ speedtest-cli --list|head -6|tail -5|cut -d\) -f1|xargs -I{} -n1 speedtest-cli --server {} |egrep '^Hosted|^Download:|Upload:'
Hosted by noris network AG (Nuremberg) [6.35 km]: 15.333 ms
Download: 98.64 Mbit/s
Upload: 4.02 Mbit/s
Hosted by 10G-Server.com (Nuremberg) [7.56 km]: 9.801 ms
Download: 98.59 Mbit/s
Upload: 4.04 Mbit/s
Hosted by Contabo GmbH (Nuremberg) [7.56 km]: 0.764 ms
Download: 99.14 Mbit/s
Upload: 4.04 Mbit/s
Hosted by Maltechx.de (Nuremberg) [7.56 km]: 8.903 ms
Download: 98.27 Mbit/s
Upload: 4.04 Mbit/s
Hosted by TempleServers (Nuremberg) [7.56 km]: 11.996 ms
Download: 98.20 Mbit/s
Upload: 4.08 Mbit/s
東京
$ speedtest-cli --list|grep -i tokyo|cut -d\) -f1|xargs -I{} -n1 speedtest-cli --server {} |egrep '^Hosted|^Download:|Upload:'
Hosted by OPEN Project (via 20G SINET) (Tokyo) [9281.34 km]: 259.654 ms
Download: 57.46 Mbit/s
Upload: 3.67 Mbit/s
Hosted by GLBB Japan (Tokyo) [9281.34 km]: 314.77 ms
Download: 40.50 Mbit/s
Upload: 3.72 Mbit/s
Hosted by i3D.net (Tokyo) [9281.34 km]: 811.767 ms
Download: 48.99 Mbit/s
Upload: 3.71 Mbit/s
Hosted by GIAM PING VIETPN.COM (Tokyo) [9281.34 km]: 309.393 ms
Download: 45.06 Mbit/s
Upload: 3.62 Mbit/s
Hosted by Rakuten Mobile , Inc (Tokyo) [9281.34 km]: 236.677 ms
Download: 61.32 Mbit/s
Upload: 2.45 Mbit/s
Hosted by Love4Taylor (Tokyo) [9281.34 km]: 263.325 ms
Download: 59.33 Mbit/s
Upload: 3.68 Mbit/s

暫く運用して問題無さそうなら国内のサーバを1つ閉じてこちらと役割分担する感じにしようと思います.

nanoを消したDebianでエディタの警告が出るのを修正

vim使うのでnanoを消しているのですが警告が出ています.

$ sudo crontab -e
/usr/bin/sensible-editor: 25: /usr/bin/sensible-editor: /bin/nano: not found
/usr/bin/sensible-editor: 28: /usr/bin/sensible-editor: nano: not found
/usr/bin/sensible-editor: 31: /usr/bin/sensible-editor: nano-tiny: not found
crontab: installing new crontab

fallback?でvimに切り替わるので実害はないのですが気持ち悪い.
警告を出している sensible-editor を確認.

$ man sensible-editor|more
SENSIBLE-EDITOR(1)                                         General Commands Manual                                         SENSIBLE-EDITOR(1)

NAME
       sensible-editor, sensible-pager, sensible-browser - sensible editing, paging, and web browsing

SYNOPSIS
       sensible-editor [OPTIONS...]
       sensible-pager [OPTIONS...]
       sensible-browser url

DESCRIPTION
       sensible-editor,  sensible-pager and sensible-browser make sensible decisions on which editor, pager, and web browser to call, respec‐
       tively.  Programs in Debian can use these scripts as their default editor, pager, or web browser or emulate their behavior.

SEE ALSO
       Documentation of the EDITOR, VISUAL and PAGER variables in environ(7) and select-editor(1) for changing a user's default editor

STANDARD
       Documentation of behavior of sensible-utils under a debian system is available under section 11.4 of debian-policy  usually  installed
       under /usr/share/doc/debian-policy (you might need to install debian-policy)

Debian                                                           14 Nov 2010                                               SENSIBLE-EDITOR(1)

select-editor を実行するとインストール済のエディタを選択できる.

$ sudo select-editor

Select an editor.  To change later, run 'select-editor'.
  1. /usr/bin/vim.gtk3
  2. /usr/bin/vim.nox
  3. /usr/bin/vim.basic
  4. /usr/bin/mcedit
  5. /usr/bin/vim.tiny
  6. /usr/bin/vscodium

Choose 1-6 [1]: 2

警告が出なくなりました :)

$ sudo crontab -e
crontab: installing new crontab

環境

$ dpkg-query -W sensible-utils cron vim
cron    3.0pl1-133
sensible-utils  0.0.12
vim     2:8.1.0875-2
$ lsb_release -dr
Description:    Debian GNU/Linux 10 (buster)
Release:        10
$ uname -m
x86_64

色々なプログラムで proxy を使えるようにする proxychains-ng を試す

proxychains-ng というものを見かけたので試してみます.ネットワーク関連の関数をフックして,SOCKS 4a, 5, HTTP proxy を利用できるようにします.
torsocks的な感じ.

とりあえずこんな感じで動きました

$ git clone https://github.com/rofl0r/proxychains-ng
$ cd proxychains-ng
$ ./configure && make

src/proxychains.confにtorの設定が書いてあるのでとりあえずそれで動かします.(tor daemon が動いている前提)
1回目はtimeoutに,2回目は成功.

$ ./proxychains4 -f src/proxychains.conf curl ifconfig.me/ip
  :
[proxychains] Strict chain  ...  127.0.0.1:9050  ...  ifconfig.me:80 <--socket error or timeout!
curl: (7) Couldn't connect to server
$ ./proxychains4 -f src/proxychains.conf curl ifconfig.me/ip
  :
[proxychains] Strict chain  ...  127.0.0.1:9050  ...  ifconfig.me:80  ...  OK
158.69.192.239

torsocksでは起動しないfirefox も起動した.

$ ./proxychains4 -f src/proxychains.conf firefox

Debian package にも proxychains4 という名前であった.こっちのほうが楽ですね.

$ apt show proxychains4
Package: proxychains4
Version: 4.13-4
Priority: optional
Section: net
Source: proxychains-ng
Maintainer: Boyuan Yang <byang@debian.org>
Installed-Size: 45.1 kB
Provides: proxychains, proxychains-ng
Depends: libproxychains4 (= 4.13-4), libc6 (>= 2.4)
Breaks: proxychains (<< 3.1-8)
Replaces: proxychains
Homepage: https://github.com/rofl0r/proxychains-ng
Download-Size: 14.1 kB
APT-Sources: http://ftp.jp.debian.org/debian sid/main amd64 Packages
Description: redirect connections through socks/http proxies (proxychains-ng)
 Proxychains is a UNIX program, that hooks network-related libc functions
 in dynamically linked programs via a preloaded DLL (dlsym(), LD_PRELOAD)
 and redirects the connections through SOCKS4a/5 or HTTP proxies.
 It supports TCP only (no UDP/ICMP etc).
 .
 This project, proxychains-ng, is the continuation of the unmaintained
 proxychains project (known as proxychains package in Debian).
$ sudo apt install proxychains4
$ $ proxychains4 curl ifconfig.me/ip
[proxychains] config file found: /etc/proxychains4.conf
[proxychains] preloading /usr/lib/x86_64-linux-gnu/libproxychains.so.4
[proxychains] DLL init: proxychains-ng 4.13
[proxychains] Strict chain  ...  127.0.0.1:9050  ...  ifconfig.me:80  ...  OK
94.230.208.147

環境

$ lsb_release -dr
Description:    Debian GNU/Linux 10 (buster)
Release:        10
$ uname -m
x86_64

apt upgrade で ping(inetutils-ping) が壊れていると言われて失敗する

Debian sid amd64 環境で,apt upgrade するとこんなエラーで失敗しました.

$ sudo apt upgrade
Reading package lists... Done
Building dependency tree     
Reading state information... Done    
Calculating upgrade... Done          
Some packages could not be installed. This may mean that you have
requested an impossible situation or if you are using the unstable
distribution that some required packages have not yet been created
or been moved out of Incoming.         
The following information may help to resolve the situation:

The following packages have unmet dependencies:
 inetutils-ping : Conflicts: ping
E: Broken packages 

ping コマンドはあるし実行も出来る.reinstall してみましたがエラーは解消されず.

$ sudo apt install --reinstall inetutils-ping                                                                     
Reading package lists... Done
Building dependency tree
Reading state information... Done
The following package was automatically installed and is no longer required:
  python-newt
Use 'sudo apt autoremove' to remove it.
0 upgraded, 0 newly installed, 1 reinstalled, 0 to remove and 57 not upgraded.
Need to get 0 B/226 kB of archives.
After this operation, 0 B of additional disk space will be used.
(Reading database ... 472864 files and directories currently installed.)
Preparing to unpack .../inetutils-ping_2%3a1.9.4-7_amd64.deb ...
Unpacking inetutils-ping (2:1.9.4-7) over (2:1.9.4-7) ...
Setting up inetutils-ping (2:1.9.4-7) ...
Processing triggers for man-db (2.8.5-2) ...

一時的に削除してみました.

$ sudo apt remove inetutils-ping
Reading package lists... Done
Building dependency tree       
Reading state information... Done
The following package was automatically installed and is no longer required:
  python-newt
Use 'sudo apt autoremove' to remove it.
The following packages will be REMOVED:
  inetutils-ping
0 upgraded, 0 newly installed, 1 to remove and 57 not upgraded.
After this operation, 358 kB disk space will be freed.
Do you want to continue? [Y/n] 
(Reading database ... 472864 files and directories currently installed.)
Removing inetutils-ping (2:1.9.4-7) ...
Processing triggers for man-db (2.8.5-2) ...

削除した後 apt upgrade を試すと通りました.

$ sudo apt upgrade

その後 ping を install し直したあと upgrade を試すとエラーは出なくなりました.

$ sudo apt install inetutils-ping
$ sudo apt upgrade>/dev/null 2>&1;echo $?
0

原因がよくわからないですね…….

環境

$ dpkg-query -W apt inetutils-ping
apt     1.8.0
inetutils-ping  2:1.9.4-7
$ lsb_release -dr
Description:    Debian GNU/Linux 10 (buster)
Release:        10
$ uname -m
x86_64