国立国会図書館がNDLラボでNDLOCR-Lite を公開しました.
元々NDLOCR が公開されていましたがCUDA 対応のNVIDIA GPU が必須でした.今回のNDLOCR-Lite はdGPU の無いPC でも動作するようなので試してみました.
NDLOCR-Liteは、NDLOCRの軽量版を目指して開発したOCRであり、ノートパソコン等の一般的な家庭用コンピュータやOS環境で、図書や雑誌といった資料のデジタル化画像からテキストデータが作成できるOCRです。
GPU(Graphics Processing Unit。画像描画等の高度な並列計算を処理する装置。)を必要とせず、軽量なOCR処理が可能です。
また、NDLOCRが不得意としていた英文や手書き文字等についても実験的に対応しています。
実際のリポジトリはこちら.
類似のものにNDL古典籍OCR-Lite というものもあります.これもdGPU の必要ないOCR で自分では読めない古典をOCR で読めるようになったりして面白いです.
以下は以前 #kagokug で発表した関連資料です.
OCRで画像文字を文字データに 鹿児島Linux勉強会 2022.05 で発表
ビデオや画像などに書かれた文字をOCR するScript やNDLOCR の紹介最近試したLinuxのOCRツール(NDL古典籍OCR-Lite/YomiToku) 鹿児島Linux勉強会 2024.12 で発表
DL古典籍OCR-Lite の紹介など
NDLOCR 要NVIDIA GPU
NDL古典籍OCR-LiteのようにNDLOCR-Liteが出ないかな?
このときこんなことを書いていましたが実現しました :)
GUI版を試す
Windows版は以下に使い方があります.自分はLinux版を試しましたが起動後の操作は同じだと思います.
GitHub のReleases から最新のバイナリを入手します.v1.1.0 時点ではLinux amd64 / macOS arm64, amd64 / Windows(amd64?) が用意されているようです.ここではLinux版.
$ wget -c https://github.com/ndl-lab/ndlocr-lite/releases/download/1.1.0/ndlocr_lite_v1.1.0_linux.tar.gz (1)
$ sha512sum ndlocr_lite_v1.1.0_linux.tar.gz (2)
61faed1fc843266095852697bbf29a721db4fb5a054f6d66ae8850301d22a4b1e29535eed150e439f7fd35760a17790a39cf0d45afd7c0ed72e7a3928e47ed93  ndlocr_lite_v1.1.0_linux.tar.gz
$ fuse-archive ndlocr_lite_v1.1.0_linux.tar.gz (3)
$ file ndlocr_lite_v1.1.0_linux/linux/ndlocr_lite_gui (4)
ndlocr_lite_v1.1.0_linux/linux/ndlocr_lite_gui: ELF 64-bit LSB pie executable, x86-64, version 1 (SYSV), dynamically linked, interpreter /lib64/ld-linux-x86-64.so.2, BuildID[sha1]=55e769c1bfe893353a55cdddbe7066033dc540bf, for GNU/Linux 3.2.0, not stripped
$ ndlocr_lite_v1.1.0_linux/linux/ndlocr_lite_gui (5)
バイナリアーカイブを入手
hash
fuse-archive でアドホックに展開
ファイル形式を確認
NDLOCR-Lite 実行
NDL古典籍OCR-Lite と同じように扱える感じです.画像ファイル,画像ファイルの格納されたディレクトリから一括処理などが可能です.
その他,画面の指定した範囲をキャプチャしてOCR するキャプチャモードも便利です.ただ,このモードのキャプチャはi3 wm では別のworkspace はキャプチャできなさそうで少し使い勝手が悪いです.
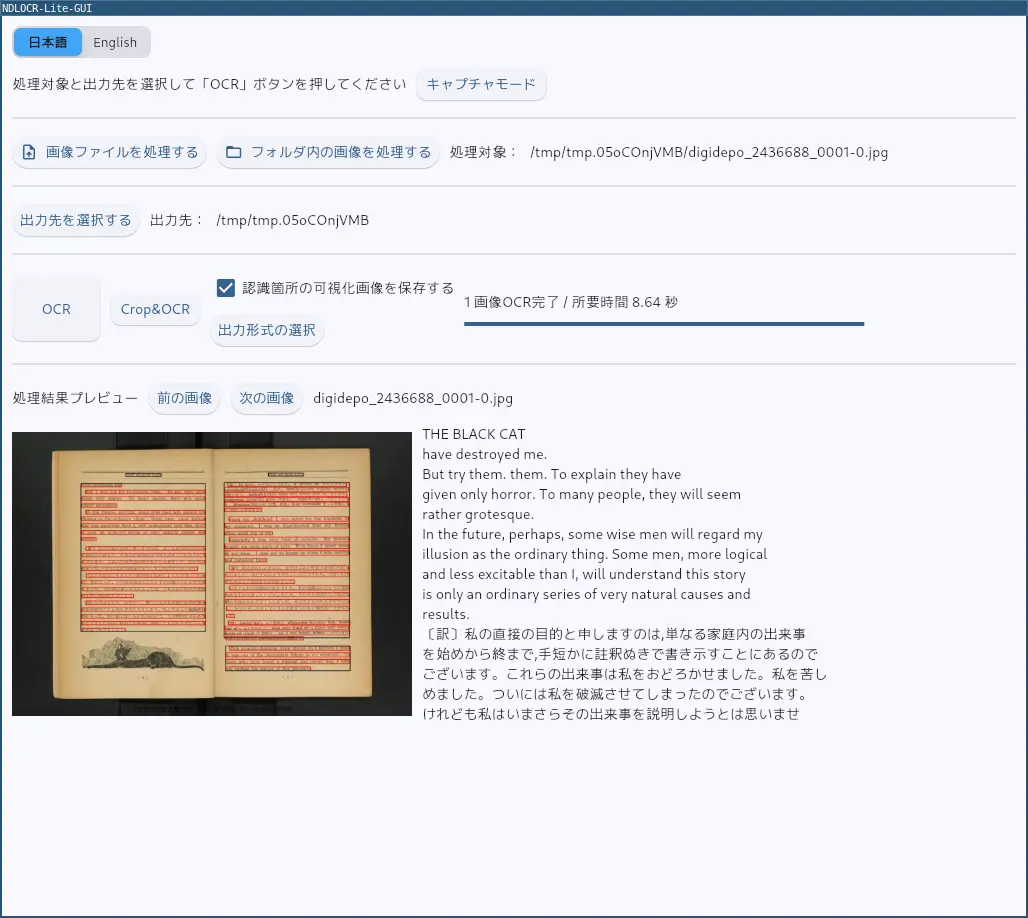
Note | 画像の出典:納谷友一 訳註『黒猫』,健文社,1952. 国立国会図書館デジタルコレクション https://dl.ndl.go.jp/pid/2436688 |
CLI版を使う
CLI版はPython 3.10+ が必要です.今回はDebian sid amd64 のパッケージで導入したPython 3.13.12 を利用しました.
README.md にはpip での導入と,uv での導入が紹介されています.頻繁に使う場合はuv の方がいいかもしれませんがお好みの方で.
$ git clone https://github.com/ndl-lab/ndlocr-lite
$ cd ndlocr-lite
$ python -m venv venv
$ source venv/bin/activate
$ pip install -r requirements.txt
$ python3 src/ocr.py -h
usage: ocr.py [-h] [--sourcedir SOURCEDIR] [--sourceimg SOURCEIMG] --output OUTPUT [--viz VIZ] [--det-weights DET_WEIGHTS] [--det-classes DET_CLASSES] [--det-score-threshold DET_SCORE_THRESHOLD] [--det-conf-threshold DET_CONF_THRESHOLD]
              [--det-iou-threshold DET_IOU_THRESHOLD] [--simple-mode SIMPLE_MODE] [--rec-weights30 REC_WEIGHTS30] [--rec-weights50 REC_WEIGHTS50] [--rec-weights REC_WEIGHTS] [--rec-classes REC_CLASSES] [--device {cpu,cuda}]

Arguments for NDLkotenOCR-Lite

options:
  -h, --help            show this help message and exit
  --sourcedir SOURCEDIR
                        Path to image directory
  --sourceimg SOURCEIMG
                        Path to image directory
  --output OUTPUT       Path to output directory
  --viz VIZ             Save visualized image
  --det-weights DET_WEIGHTS
                        Path to deim onnx file
  --det-classes DET_CLASSES
                        Path to list of class in yaml file
  --det-score-threshold DET_SCORE_THRESHOLD
  --det-conf-threshold DET_CONF_THRESHOLD
  --det-iou-threshold DET_IOU_THRESHOLD
  --simple-mode SIMPLE_MODE
                        Read line with one model(Setting this option to True will slow down processing, but it simplifies the architecture and may slightly improve accuracy.)
  --rec-weights30 REC_WEIGHTS30
                        Path to parseq-tiny onnx file
  --rec-weights50 REC_WEIGHTS50
                        Path to parseq-tiny onnx file
  --rec-weights REC_WEIGHTS
                        Path to parseq-tiny onnx file
  --rec-classes REC_CLASSES
                        Path to list of class in yaml file
--device {cpu,cuda} Device use (cpu or cuda)$ git clone https://github.com/ndl-lab/ndlocr-lite
$ cd ndlocr-lite
$ uv tool install .
$ which ndlocr-lite
/home/matoken/.local/bin/ndlocr-lite
$ ndlocr-lite --help
usage: ndlocr-lite [-h] [--sourcedir SOURCEDIR] [--sourceimg SOURCEIMG] --output OUTPUT [--viz VIZ] [--det-weights DET_WEIGHTS] [--det-classes DET_CLASSES] [--det-score-threshold DET_SCORE_THRESHOLD]
[--det-conf-threshold DET_CONF_THRESHOLD] [--det-iou-threshold DET_IOU_THRESHOLD] [--simple-mode SIMPLE_MODE] [--rec-weights30 REC_WEIGHTS30] [--rec-weights50 REC_WEIGHTS50] [--rec-weights REC_WEIGHTS]
[--rec-classes REC_CLASSES] [--device {cpu,cuda}]
Arguments for NDLkotenOCR-Lite
options:
-h, --help show this help message and exit
--sourcedir SOURCEDIR
Path to image directory
--sourceimg SOURCEIMG
Path to image directory
--output OUTPUT Path to output directory
--viz VIZ Save visualized image
--det-weights DET_WEIGHTS
Path to deim onnx file
--det-classes DET_CLASSES
Path to list of class in yaml file
--det-score-threshold DET_SCORE_THRESHOLD
--det-conf-threshold DET_CONF_THRESHOLD
--det-iou-threshold DET_IOU_THRESHOLD
--simple-mode SIMPLE_MODE
Read line with one model(Setting this option to True will slow down processing, but it simplifies the architecture and may slightly improve accuracy.)
--rec-weights30 REC_WEIGHTS30
Path to parseq-tiny onnx file
--rec-weights50 REC_WEIGHTS50
Path to parseq-tiny onnx file
--rec-weights REC_WEIGHTS
Path to parseq-tiny onnx file
--rec-classes REC_CLASSES
Path to list of class in yaml file
--device {cpu,cuda} Device use (cpu or cuda)もしcuda 対応GPU のある環境であればコマンドラインオプションに --device cuda を渡すことで速くなると思います.
cli版実行例
--sourcedir (ディレクトリ内の複数画像)か --sourceimg (1つの画像ファイル)で処理対象ディレクトリか処理対象ファイルを指定, --output で結果の出力先を指定,--viz True で可視化画像を有効にして実行(オプション)
$ time ndlocr-lite --sourcedir . --output . --viz True
[INFO] Intialize Model
[INFO] Inference Image
69
[INFO] Saving result on ./viz_digidepo_2436688_0001-0.jpg
Total calculation time (Detection + Recognition): 13.220851182937622
  :
real    2m15.882s
user    10m16.273s
sys     0m5.189s
$ ls
digidepo_2436688_0001-0.jpg   digidepo_2436688_0001-4.json  digidepo_2436688_0001-8.txt
digidepo_2436688_0001-0.json  digidepo_2436688_0001-4.txt   digidepo_2436688_0001-8.xml
digidepo_2436688_0001-0.txt   digidepo_2436688_0001-4.xml   digidepo_2436688_0001-9.jpg
digidepo_2436688_0001-0.xml   digidepo_2436688_0001-5.jpg   digidepo_2436688_0001-9.json
digidepo_2436688_0001-1.jpg   digidepo_2436688_0001-5.json  digidepo_2436688_0001-9.txt
digidepo_2436688_0001-1.json  digidepo_2436688_0001-5.txt   digidepo_2436688_0001-9.xml
digidepo_2436688_0001-1.txt   digidepo_2436688_0001-5.xml   viz_digidepo_2436688_0001-0.jpg
digidepo_2436688_0001-1.xml   digidepo_2436688_0001-6.jpg   viz_digidepo_2436688_0001-1.jpg
digidepo_2436688_0001-2.jpg   digidepo_2436688_0001-6.json  viz_digidepo_2436688_0001-2.jpg
digidepo_2436688_0001-2.json  digidepo_2436688_0001-6.txt   viz_digidepo_2436688_0001-3.jpg
digidepo_2436688_0001-2.txt   digidepo_2436688_0001-6.xml   viz_digidepo_2436688_0001-4.jpg
digidepo_2436688_0001-2.xml   digidepo_2436688_0001-7.jpg   viz_digidepo_2436688_0001-5.jpg
digidepo_2436688_0001-3.jpg   digidepo_2436688_0001-7.json  viz_digidepo_2436688_0001-6.jpg
digidepo_2436688_0001-3.json  digidepo_2436688_0001-7.txt   viz_digidepo_2436688_0001-7.jpg
digidepo_2436688_0001-3.txt   digidepo_2436688_0001-7.xml   viz_digidepo_2436688_0001-8.jpg
digidepo_2436688_0001-3.xml   digidepo_2436688_0001-8.jpg   viz_digidepo_2436688_0001-9.jpg
digidepo_2436688_0001-4.jpg   digidepo_2436688_0001-8.json
ここでのファイル群は以下のようになっています.
- digidepo_2436688_0001-“${N}”.jpg
OCR 対象画像
- digidepo_2436688_0001-“${N}”.json, digidepo_2436688_0001-“${N}”.txt, digidepo_2436688_0001-“${N}”.xml
OCR 結果
- viz_digidepo_2436688_0001-“${N}”.jpg
可視化画像(オプション)
国立国会図書館からダウンロードしたpdf の10コマ(20ページ分)をImagemagick でjpeg 画像に変換したものに対して実行したところ2分16秒ほど掛かりました.1画像あたり13.6秒,1ページあたり6.8秒ほど.英語日本語混じりでも精度良さそうです.
OCR 環境は,LENOVO ThinkPad L13 (G1), CPU: Intel® Core™ i7-10510U CPU @ 1.80GHz, RAM: DDR4 16GB, SSD: NVMe TOSHIBA KXG6AZNV512G にDebian sid amd64 を導入した環境です.
スキャンした画像データはこんな感じ(1コマ2ページ分)
$ file viz_digidepo_2436688_0001-0.jpg
viz_digidepo_2436688_0001-0.jpg: JPEG image data, JFIF standard 1.01, aspect ratio, density 1x1, segment length 16, baseline, precision 8, 2481x1761, components 3
GNU time の -f %M でRAM の利用量を見たところこの画像1枚の処理で600MB 近く,10枚で860MB 程でした.
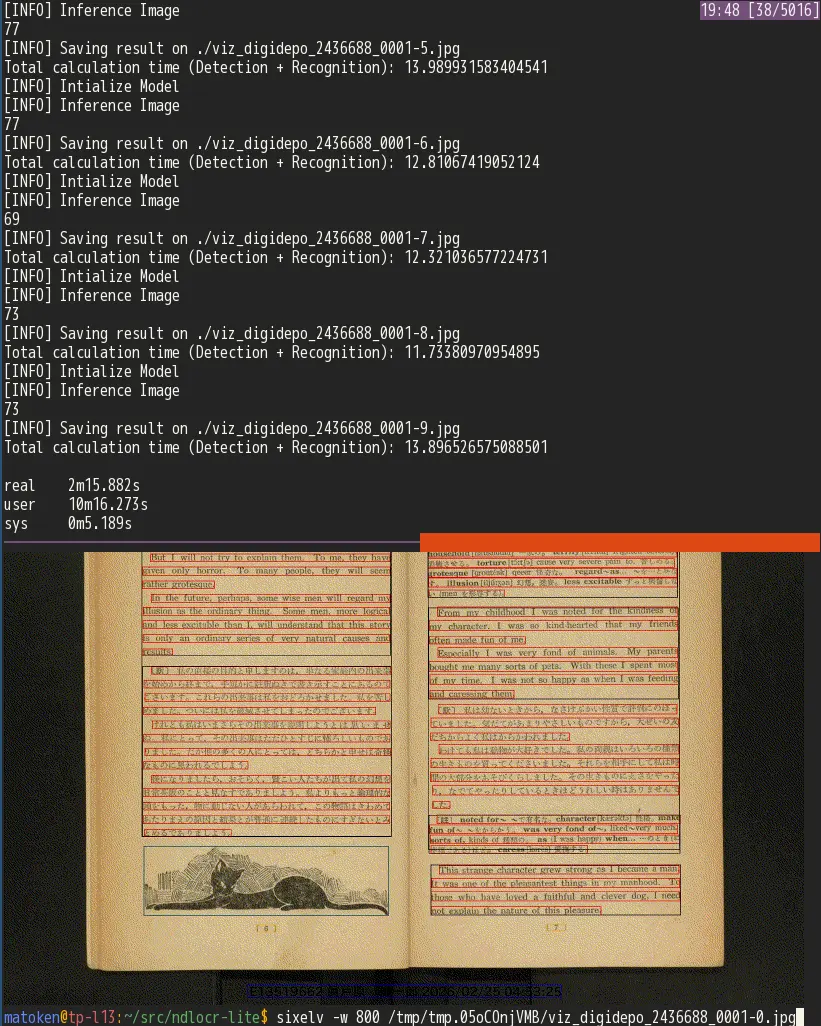
Note | 画像の出典:納谷友一 訳註『黒猫』,健文社,1952. 国立国会図書館デジタルコレクション https://dl.ndl.go.jp/pid/2436688 |
Linuxデスクトップでキャプチャモード
NDLOCR-Lite GUI版にはキャプチャモードがあり便利そうですが,NDLOCR-Lite を起動しておく必要があります.
同じようなことを以前から tesseract-ocr でやっていました.これはデスクトップ環境に登録したショートカットでスクリーンキャプチャとOCR を行い,クリップボードに結果を返すものでした.これをNDLOCR-Lite で動くように書き換えてみました.
$ cat ~/bin/ndlocr-lite.bash
#!/bin/bash

TMPDIR=$(mktemp -d)
IMAGEFILE="$(mktemp).png"
import png:"${IMAGEFILE}" (1)
#sixelv "${IMAGEFILE}"
convert "${IMAGEFILE}" sixel: (2)
ndlocr-lite --sourceimg "${IMAGEFILE}" --output "${TMPDIR}" (3)

if [ $? ]; then
  cat "${TMPDIR}"/*.txt | pee cat "xsel -b" (4)
  notify-send 'ocr📋️(primary)' (5)
else
  notify-send 'ocr error'
  exit 1
fi

rm "${IMAGEFILE}" (6)
rm -r "${TMPDIR}"
Imagemagick のimport コマンドで任意の場所をキャプチャ
デバッグ用に画像出力
NDLOCR-Lite で文字起こし
クリップボードに格納
notify-send でデスクトップに通知
実行するとこんな感じ.動画内のスライドをキャプチャしています.解像度が低いといまいちですが解像度が高いといい感じです.termial で叩くとデバッグ用にSixel でキャプチャ画像も出すようにしました.
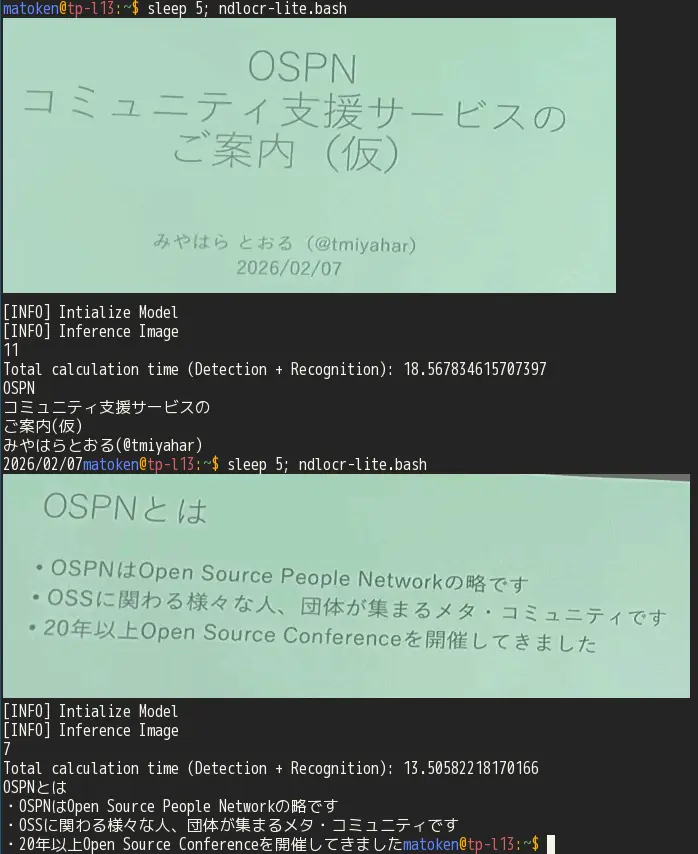
Note | 画像の出典:オープンソースカンファレンス2026 Tokyo/Spring 2日目ライトニングトークのオープニングより https://www.youtube.com/watch?v=xtb3ZFb6WvA |
このbash script をWindowManager に登録しておきます.以下はi3 wm で Super+Shift+o で呼び出せるようにしています.
~/.config/i3/config
$ grep ocr ~/.config/i3/config
#OCR https://gitlab.com/matoken/kagolug-2022.05/-/blob/main/slide/ocr.adoc
bindsym $mod+Shift+o exec --no-startup-id ~/bin/ndlocr-lite.bash
ということで便利に使えそうです.
国立国会図書館の遠隔送信サービスで閲覧可能な書籍などを小さなスマートフォンなどの端末で読むのはいまいちと思っていたのですが,これで文字起こしして読んでみるのもありかもしれません,
環境
$ git log --pretty=oneline -1
4f0748be4244a2e36d4dd43af05d6eebded3d56d (HEAD -> master, origin/master, origin/HEAD) Merge pull request #13 from mattn/fallback-line
$ pipx list | grep uv
   package uv 0.10.7, installed using Python 3.13.3
    - uv
    - uvx
$ dpkg-query -W python3 python3-venv
python3 3.13.9-3
python3-venv    3.13.9-3
$ lsb_release -dr
Description:    Debian GNU/Linux forky/sid
Release:        n/a
$ arch
x86_64
Likes
Reposts