wgetライクにbittorrentを取得するtget

wgetコマンドのような使い勝手のBittorrentクライアントのtgetを試してみました. node製MITライセンスのアプリケーションです.

導入はnpmで.tgetではなくt-getなので注意.

$ npm install -g t-get

torrentファイル,マグネットリンクの他torrent URLでもダウンロードできるようです. 実行すると以下のようなプログレスが表示されてダウンロードが始まります.行幅はハードコードされているようです.

$ tget https://downloads.raspberrypi.org/raspbian_latest.torrent
 downloading 1 files (1.4GB) [============================= ] 97% 64.0s 588.8KB/s 99 peers

ダウンロード完了時は以下のような感じ.ダウンロード完了後直ちに終了します.

$ tget https://downloads.raspberrypi.org/raspbian_latest.torrent
------------------
2016-11-25-raspbian-jessie.zip 1.4GB
------------------
 downloaded 1 files (1.4GB)

ファイルの保存先はカレントディレクトリで,カレントディレクトリに書き込めない場合はエラーにならずファイルが消えてしまうようです.

便利だけどアップロード関係なく終了してしまうのでBittorrentへの貢献度は低そうです. ちなみに最近はリモートのTransmissionをfile serverで動作させて,Transmission-remote-gtkで操作しています.

Screenfetch的な情報表示コマンドのNeofetch

Screenfetch的な情報表示コマンドのNeofetch

よくデスクトップのキャプチャを取得するときに表示されているScreenfetchコマンドというものがあります.システムの情報とアスキーアートを素敵に表示してくれます. これににたものでNetfetchというものを見かけたので試してみました.こちらは画像も扱えるようです.

導入

以下のページに各種環境への導入方法が書かれています.

Debian sid/stretchにはパッケージがあるようなことが書かれていますが,

Neofetch is in Debian Unstable/Stretch's official repositories.

今はsidのみのようです.

ということでひとまずstretchではこんな感じで導入しました.

$ #-- /etc/apt/sources.list.d/neofetch を作る
$ sudo apt edit-sources neofetch
$ cat /etc/apt/sources.list.d/neofetch.list
deb http://dl.bintray.com/dawidd6/neofetch jessie main
$ #-- 鍵のインポート
$ wget "https://bintray.com/user/downloadSubjectPublicKey?username=bintray" -O Release-neofetch.key
$ gpg Release-neofetch.key
pub   rsa4096 2015-02-17 [SC]
      8756C4F765C9AC3CB6B85D62379CE192D401AB61
uid           Bintray (by JFrog) <bintray@bintray.com>
sub   rsa4096 2015-02-17 [E]
$ sudo apt-key add Release-neofetch.key
$ rm Release-neofetch.key
$ #-- pkg情報更新&pkg導入
$ sudo apt update
$ sudo apt install neofetch

早速実行

$ neofetch --help

    NEOFETCH

    USAGE: neofetch --option "value" --option "value"

    NOTE: There's also a config option for each flag below.

    Info:
    --disable infoname          Allows you to disable an info line from appearing
                                in the output.
                                NOTE: You can supply multiple args. eg.
                                'neofetch --disable cpu gpu disk shell'
                                NOTE: The arguments must all be lowercase.
    --os_arch on/off            Hide/Show OS architecture.
    --speed_type type           Change the type of cpu speed to display.
                                Possible values: current, min, max, bios,
                                scaling_current, scaling_min, scaling_max
                                NOTE: This only support Linux with cpufreq.
    --cpu_shorthand type        Shorten the output of CPU
                                Possible values: name, speed, tiny, on, off
    --cpu_cores type            Whether or not to display the number of CPU cores
                                Takes: logical, physical, off
                                NOTE: 'physical' doesn't work on BSD.
    --cpu_speed on/off          Hide/Show cpu speed.
    --cpu_temp on/off           Hide/Show cpu temperature.
                                NOTE: This only works on Linux and BSD.
                                NOTE: For FreeBSD-based systems, you need to enable coretemp
                                      kernel module.
    --distro_shorthand on/off   Shorten the output of distro (tiny, on, off)
                                NOTE: This option won't work in Windows (Cygwin)
    --kernel_shorthand on/off   Shorten the output of kernel
                                NOTE: This option won't work in BSDs (except PacBSD and PC-BSD)
    --uptime_shorthand on/off   Shorten the output of uptime (tiny, on, off)
    --refresh_rate on/off       Whether to display the refresh rate of each monitor
                                Unsupported on Windows
    --gpu_brand on/off          Enable/Disable GPU brand in output. (AMD/NVIDIA/Intel)
    --gtk_shorthand on/off      Shorten output of gtk theme/icons
    --gtk2 on/off               Enable/Disable gtk2 theme/icons output
    --gtk3 on/off               Enable/Disable gtk3 theme/icons output
    --shell_path on/off         Enable/Disable showing $SHELL path
    --shell_version on/off      Enable/Disable showing $SHELL version
    --ip_host url               Url to query for public IP
    --song_shorthand on/off     Print the Artist/Title on seperate lines
    --birthday_shorthand on/off Shorten the output of birthday
    --birthday_time on/off      Enable/Disable showing the time in birthday output
    --birthday_format format    Format the birthday output. (Uses 'date' cmd format)

    Text Formatting:
    --colors x x x x x x        Changes the text colors in this order:
                                title, @, underline, subtitle, colon, info
    --underline on/off          Enable/Disable the underline.
    --underline_char char       Character to use when underlining title
    --bold on/off               Enable/Disable bold text

    Color Blocks:
    --color_blocks on/off       Enable/Disable the color blocks
    --block_width num           Width of color blocks in spaces
    --block_height num          Height of color blocks in lines
    --block_range start end     Range of colors to print as blocks

    Bars:
    --bar_char 'elapsed char' 'total char'
                                Characters to use when drawing bars.
    --bar_border on/off         Whether or not to surround the bar with '[]'
    --bar_length num            Length in spaces to make the bars.
    --bar_colors num num        Colors to make the bar.
                                Set in this order: elapsed, total
    --cpu_display mode          Bar mode.
                                Takes: bar, infobar, barinfo, off
    --memory_display mode       Bar mode.
                                Takes: bar, infobar, barinfo, off
    --battery_display mode      Bar mode.
                                Takes: bar, infobar, barinfo, off
    --disk_display mode         Bar mode.
                                Takes: bar, infobar, barinfo, off

    Image:
    --image type                Image source. Where and what image we display.
                                Possible values: wall, ascii,
                                /path/to/img, /path/to/dir/, off
    --size 00px | --size 00%    How to size the image.
                                Possible values: auto, 00px, 00%, none
    --crop_mode mode            Which crop mode to use
                                Takes the values: normal, fit, fill
    --crop_offset value         Change the crop offset for normal mode.
                                Possible values: northwest, north, northeast,
                                west, center, east, southwest, south, southeast

    --xoffset px                How close the image will be to the left edge of the
                                window. This only works with w3m.
    --yoffset px                How close the image will be to the top edge of the
                                window. This only works with w3m.
    --bg_color color            Background color to display behind transparent image.
                                This only works with w3m.
    --gap num                   Gap between image and text.
                                NOTE: --gap can take a negative value which will
                                move the text closer to the left side.
    --clean                     Delete cached files and thumbnails.

    Ascii:
    --ascii value               Where to get the ascii from, Possible values:
                                distro, /path/to/ascii
    --ascii_colors x x x x x x  Colors to print the ascii art
    --ascii_distro distro       Which Distro's ascii art to print
                                NOTE: Arch and Ubuntu have 'old' logo varients.
                                NOTE: Use 'arch_old' or 'ubuntu_old' to use the old logos.
                                NOTE: Ubuntu has flavor varients.
                                NOTE: Change this to 'Lubuntu', 'Xubuntu', 'Ubuntu-GNOME'
                                or 'Ubuntu-Budgie' to use the flavors.
    --ascii_logo_size           Size of ascii logo.
                                Supported distros: Arch, Gentoo, Crux, OpenBSD.
    --ascii_bold on/off         Whether or not to bold the ascii logo.
    --logo | -L                 Hide the info text and only show the ascii logo.

    Screenshot:
    --scrot | -s /path/to/img   Take a screenshot, if path is left empty the screen-
                                shot function will use $scrot_dir and $scrot_name.
    --upload | -su /pth/t/img   Same as --scrot but uploads the scrot to a website.
    --image_host                Website to upload scrots to. Takes: imgur, teknik
    --scrot_cmd cmd             Screenshot program to launch

    Other:
    --config /path/to/config    Specify a path to a custom config file
    --config none               Launch the script without a config file
    --help                      Print this text and exit
    --version                   Show neofetch version
    -v                          Display error messages.
    -vv                         Display a verbose log for error reporting.

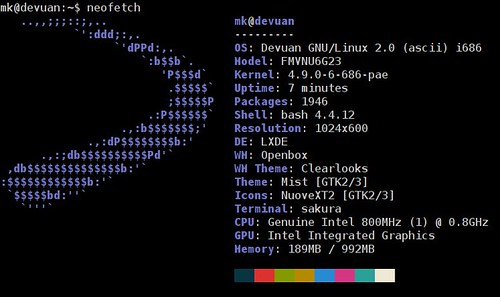
オプション結構多いです. とりあえず素で実行.

20161207_05:12:12-5188

情報もScreenfetchより増えています.

20161207_05:12:20-9093

次は画像を指定してみます.画像サイズが大きかったので25%に縮小もしています. 楽しい :)

20161207_05:12:35-3963

20161207_06:12:30-16979

画像の表示については環境によってうまく行く行かないがあるようです.うまく表示されない場合は以下のWikiを参照すると良さそうです.

コマンドラインで動作する絵文字検索ソフトウェアのemoj

PCで絵文字を入力するとき日本語入力システムがあればそれで入力できますが,英語圏では恐らく無理.てことでいくつかツールがあるのですが,コマンドラインで動作するemojを見つけたので試してみました.

導入はnpmか,

npm install emoj

snapで.

$ sudo snap install emoj

後はemojコマンドに引数を与えるか,emojコマンドを引数無しで実行してライブモードで利用します. 引数やライブモードで入力する文字列は表示したい絵文字に関連する単語を入力します.ライブモードはEnterでクリアされ,Ctrl + cでexitできます.表示された絵文字をコピー&ペーストして利用するようです.1つ目に出てくる絵文字をクリップボードにクリップする--copy/-cというオプションもあるようですが手元ではうまく動いていません.

$ emoj neko
🐱  👥  ↪  😻  ↔  🐈
$ emoj cat
🐱  🐈  😺  😻  😸  😼  😽
$ emoj

› sushi
🍣  🍱  🍙  🍤  😋  🍚  😍

asciicast

絵文字のフォントがない場合はNoto Fontsを利用するのが手っ取り早いと思います.

日本語入力システムを使う人やGUIを利用する人は日本語入力システムやemojione-pickerを使ったほうが便利かもしれません.

BluemanだけでNetworkManagerを使わずBluetooth tetheringを使う

最近の自転車移動でThinkpad X200を運んでいるのですがちょっと重い. PC使うかわからないようなときも持ち運んでいるのですが重いし壊しそうだしであまり良くない. 最近値崩れしたKINGJIM PORTABOOK(XMC10)や小さくて可愛いGPD-WINとかほしいのですがお金ない.てことで昔買ってあまり使っていないFujitsu FMV-U8250 + 外部キーボードで荷物の軽量化出来ないかなと.

ちなみにGPD-WINを日本で利用する人の技適問題は以下の辺りから買うと大丈夫のよう.(他は多分NG)

ということでとりあえずFujitsu FMV-U8250にUSB-Bluetoothアダプタを接続してBluetooth外部キーボードとBluetooth tetheringな環境を整えようと思ったのですが,OSをDevuan jessieにしてBluemanで繋ごうとすると,

Connection Failed: the name org.freedesktop.NetworkManager was not provided by ant .service files

というエラーで接続できませんでした. NetworkManagerに依存しているようです.

しかしいまのネットワークマネージャーはWicdでNetworkManagerは入っていません.どうにかならないかなーとBluemanの設定を見るとそれらしいものを発見.

  • View -> Local Service
  • NetworkのPAN SupportとDUN SupportをそれぞれBluemanに

blueman01

blueman02

これでNetworkManagerのない環境でもBluetooth tetheringで繋がるようになりました :)

ちなみにX200(9セルバッテリ)の重量は1.7kg近く,FMV-U8250(大容量バッテリ)はで700g近く+キーボード420g…….体積は結構減ってるけど案外軽くなってませんね.キーボードが案外重いです.使い勝手も大分落ちるし微妙?

マルチプラットホーム&スライドに特化したMarkdown WriterのMarpを試す

最近勉強会の発表資料はスライドにせずにMarkdownやAsciidocで書いてhtmlやpdfに書き出してました.これをSlideshareとかに置いているのですが,スライド形式に比べてアクセスが1桁少ないです. Markdownでスライドにする方法はいろいろあるのですが,1ページの分量がまちまちになってはみ出したりと言ったことをよくやってしまいあまりつかっていませんでした.

そんなところにプレゼンテーション向けのMarkdown Writerがあったので試してみました.

マルチプラットホームでElectron製です.PDFファイルへの書き出しも可能です.

雰囲気は以下の画像でだいたいわかるんじゃないかと思います.

https://yhatt.github.io/marp/images/marp-cast.gif

https://yhatt.github.io/marp/images/marp-cast.gif

左ペインでMarkdownを書いて右ページにプレビューが表示されます. プレビューは3種類選べますが,"1:1 slide/Slide List"のどちらかだとスライド形式でプレビューが表示されるのでレイアウトを確認しながら書くことができます.

試しにちょっと書いてみました. するとMarpのプレビュー,Evinceでは問題なかったのですが,SlideshareにPDFをアップロードすると背景画像やフッターが上下反転しています……. 試しにSpekerdeckにもアップロードしてみましたがこちらは問題なし. 恐らくSlideshareの問題ではないかと思います.

Electron製ということで降るmのマシンでは重いかなと思っていたのですが,Core2Duoのマシンでも試してみましたが一気にスクロールとかしなければ重く感じるところはなく実用範囲内に感じました.

Mumbleでリモート会議

先週ですが,FSIJ 月例会に参加していました. といっても東京に出て行ったわけではなくネットワーク開催だったので家からの参加です.

ということでMumbleというソフトウェアで音声チャット + Etherpad(ウェブブラウザベース)でテキスト交換という環境でした. Mumbleを前もって試していればよかったのだけど直前に入れてなかなか参加できず途中からの参加になりましたorz~

MumbleはDebian stretch amd64環境ではパッケージが存在する( mumble )のでこれを導入するだけでした.マルチプラットホームで各種環境向けにも存在して,Androidなどでも利用できるようです. – Mumble, the open source VoIP solutionPlumble – Mumble VOIP (Free) – Google Play の Android アプリPlumble – Mumble VOIP – Google Play の Android アプリ

今回使用機器は以下のような感じ.でしたが,スピーカーは試行錯誤している時に繋いだもので後で試すと本体のスピーカーで大丈夫でした.

  • PC : Thinkpad X220(Debian stretch amd64)
  • マイク : 3.5mmジャックに直接挿せるもの(型番不明)
  • スピーカー : ELECOM LBT-SPTR01AV(Bluetooth)

このときMumble利用時に嵌ったところをメモしておきます. – ヘッドホンとマイクが1つの端子の端末でマイクを繋ぐとヘッドホンもそちらを向いてしまって音が出なかった – Bluetothヘッドセットを繋ぐとそちらから音が出るようになったがマイクがうまく働かない – PulseAudio Volume Control (pavucontrol)で見るとマイクがミュートになっていたので解除してMumbleに割り当て – 伝送方式を"push to talk"にしたがpushがわからなかった -> ショートカットで適当なキーに割り当て(Mumble非アクティブ時も有効)

  • その他
    • Awesome WM環境ではMumbleが最小化してしまうと窓を復帰させる方法が今のところわからない.タスクトレイのアイコンをクリックしても出てこない.(Xfce4はアイコンクリックで出てくるよう)
    • 一回設定できればフォーカスがなくてもショートカットが効いて話せるのでとりあえず使えるけどチャットと誰が話しているかのアイコンの確認(唇アイコンが赤くなる)が出来ない(オーバーレイの設定でどうにかなりそう?)
    • アイコンを右クリックしてそのまま離すと丁度終了になってしまう…….
    • Mumbleの音声品質は16kbps/40kbps/72kbpsから選択可能(規定値は40k)
    • push to talkを使うとその時しか音声が飛ばないので周りの環境に左右されにくくて良い(キー入力の音や環境音が入りにくい)

最近はUstream.tv/Youtube Liveなどの動画配信やBBB(BigBlueButton)などの動画を使ったオンライン会議システムなどで中継ということが多いですが,手弁当の勉強会なんかだと回線などの問題でうまく行かなかったりすることが多いですが割り切って音声のみの中継にしてしまうのもありだなと感じました.

最近リモート参加した勉強会

形態素解析システムJUMAN++をちょっと試したメモ

京都大学 黒橋・河原研究室より2016-09-23にリリースされた新しい形態素解析システムだそうです.とりあえず手元の環境で動かしてみたのでそのメモです.

環境

Debian stretch amd64 / Ubuntu 16.10 amd64 で確認しました.どちらも以下の手順でOKでした.開発元ではCent OS 6.7で動作確認をしているようです.

build

必要なパッケージを導入してmake.

$ sudo apt install libboost-dev build-essential
$ wget http://lotus.kuee.kyoto-u.ac.jp/nl-resource/jumanpp/jumanpp-1.01.tar.xz
$ sha256sum jumanpp-1.01.tar.xz 0d587416a3eb7123638f9c1e30a649b72dfb483448839168dcb48be572c5919a  jumanpp-1.01.tar.xz
$ tar tvf ./jumanpp-1.01.tar.xz
$ tar xf ./jumanpp-1.01.tar.xz
$ ./configure --prefix=${HOME}/usr/local
$ make
$ make install

動作確認

適当に文章を入れてみたり.

$ ~/usr/local/bin/jumanpp
こんにちはJUMANPP++
こんにち こんにち こんにち 名詞 6 時相名詞 10 * 0 * 0 "代表表記:今日/こんにち カテゴリ:時間"
は は は 助詞 9 副助詞 2 * 0 * 0 NIL
JUMANPP JUMANPP JUMANPP 未定義語 15 その他 1 * 0 * 0 "品詞推定:名詞"
+ + + 未定義語 15 その他 1 * 0 * 0 "品詞推定:名詞"
EOS

青空文庫の古典を流し込んでみたり.

$ wget -O - http://www.aozora.gr.jp/cards/000160/files/2617_ruby_23916.zip | zcat | iconv -f SJIS -t UTF-8 - | ~/usr/local/bin/jumanpp
三十 三十 三十 名詞 6 数詞 7 * 0 * 0 "カテゴリ:数量"
年 ねん 年 接尾辞 14 名詞性名詞助数辞 3 * 0 * 0 "代表表記:年/ねん 準内容語 カテゴリ:時間"
後 ご 後 接尾辞 14 名詞性名詞接尾辞 2 * 0 * 0 "代表表記:後/ご 内容語"
の の の 助詞 9 接続助詞 3 * 0 * 0 NIL
世界 せかい 世界 名詞 6 普通名詞 1 * 0 * 0 "代表表記:世界/せかい カテゴリ:場所-その他"
      :

古典とかよりTwitterとかのほうがいいかもしれない.

$ curl 'https://twitter.com/search?f=tweets&vertical=default&q=lang%3Aja%20near%3A%22%E6%97%A5%E6%9C%AC%22%20within%3A15mi&src=typd&lang=ja' | grep 'class="TweetTextSize  js-tweet-text tweet-text"' | lynx -stdin -dump -nolist | ~/usr/local/bin/jumanpp

ちなみにちょっと試したいだけであれば導入しなくても以下のページで試せます.ラティス表示も楽しい.

USBGuardの初期デバイスを設定

USBGuardはそのままだとデーモン起動時に接続されていたデバイスは全て許可されるので不正なデバイスが起動時に既に取り付けられていた場合許可されてしまいます. そこで手動で利用可能デバイスをallowで設定に,そしてそれ以外をblockにした.blockでなくrejectの方がセキュリティは上がるけど許可したい場合面倒なのでとりあえずブロックに. これでallow設定されていないデバイスを繋ぐとblock.そのデバイスを利用したい場合は手動でallow-device usbguard-applet-qtでallowにすれば使えます.

※USBGuardは次のページの設定(ユーザ,グループ設定)が済んでいる前提です.

ルールファイルを作成

まずはgenerate-policyで現在の状態をファイルに書き出して編集します. ここでは内蔵カメラもblockにしています.

$ usbguard generate-policy > rules.conf
$ vi rules.conf
$ sudo cat /etc/usbguard/rules.conf
allow id 1d6b:0002 serial "0000:00:1a.0" name "EHCI Host Controller" hash "MwANH+QnAvclGgMNHjzanbOGkp3bPmwqoyAEZZ6QXTQ=" parent-hash "uvJm0y/N2iYeJgfKJsJqWKTJts/duhYZ7W2zzAYk7Y8=" with-interface 09:00:00
allow id 8087:0024 serial "" name "" hash "kv3v2+rnq9QvYI3/HbJ1EV9vdujZ0aVCQ/CGBYIkEB0=" parent-hash "MwANH+QnAvclGgMNHjzanbOGkp3bPmwqoyAEZZ6QXTQ=" via-port "3-1" with-interface 09:00:00
allow id 0a5c:21e6 serial "2016D8DA016E" name "BCM20702A0" hash "C4Os63DCRvIuWJYU/U+1PXrvWlXa2PmpRUQhp+C5eeE=" parent-hash "kv3v2+rnq9QvYI3/HbJ1EV9vdujZ0aVCQ/CGBYIkEB0=" with-interface { ff:01:01 ff:01:01 ff:01:01 ff:01:01 ff:01:01 ff:01:01 ff:01:01 ff:ff:ff fe:01:01 }
allow id 17ef:100a serial "" name "" hash "dMjTmGpj5dFGqH51kQpO/LVBQxE6JkwibVRJQkFCCuU=" parent-hash "kv3v2+rnq9QvYI3/HbJ1EV9vdujZ0aVCQ/CGBYIkEB0=" via-port "3-1.5" with-interface { 09:00:01 09:00:02 }
block id 04f2:b217 serial "" name "Integrated Camera" hash "BxFRAwzjkHO55cQGR8oMRm6bq+Ps2qQtU88jE1Uk5KE=" parent-hash "kv3v2+rnq9QvYI3/HbJ1EV9vdujZ0aVCQ/CGBYIkEB0=" via-port "3-1.6" with-interface { 0e:01:00 0e:02:00 0e:02:00 0e:02:00 0e:02:00 0e:02:00 0e:02:00 0e:02:00 0e:02:00 }
allow id 1d6b:0002 serial "0000:05:00.0" name "xHCI Host Controller" hash "IV7wk04gfQJink/IY4TiGVdcmTzuc09WcSe6k57kWrs=" parent-hash "3TIXKJ1dp4XFV6VxxWU11xbI0yLS0VmRZIaxdsLZDx4=" with-interface 09:00:00
allow id 1d6b:0003 serial "0000:05:00.0" name "xHCI Host Controller" hash "VlZK5oVuQQAlBH76Ekgc+KaZZDL0BAsF9tEf1ynb154=" parent-hash "3TIXKJ1dp4XFV6VxxWU11xbI0yLS0VmRZIaxdsLZDx4=" with-interface 09:00:00
allow id 1d6b:0002 serial "0000:00:1d.0" name "EHCI Host Controller" hash "WwvSEwd+7257rAqUGLMQjffF7zyqygmmLeQTYnR9QzQ=" parent-hash "FjkaT8Rp/Bh++KC4RQhk++hWack2wTDa1a1G5yXqYys=" with-interface 09:00:00
allow id 8087:0024 serial "" name "" hash "Zx7v0FMQEjScKSAFENAiobEs1OGPPB0YWR+yXDCVE04=" parent-hash "WwvSEwd+7257rAqUGLMQjffF7zyqygmmLeQTYnR9QzQ=" via-port "4-1" with-interface 09:00:00
block

ルールファイルを反映して動作確認

設定ファイルをコピーしてデーモンを再起動して反映.

$ sudo install -m 0600 -o root -g root rules.conf /etc/usbguard/rules.conf
$ sudo systemctl restart usbguard

これでallow設定されていないUSBデバイスを接続した状態で起動してもblockに,新しいUSBデバイスを接続してもblockになるようになります.

新しいデバイスを手動で許可する

設定されていないデバイスを利用したい場合は以下のようにlist-devicesでidを確認してallow-device usbguard-applet-qtでallowにして使えるようにします.

$ usbguard list-devices | grep block
15: block id 04f2:b217 serial "" name "Integrated Camera" hash "BxFRAwzjkHO55cQGR8oMRm6bq+Ps2qQtU88jE1Uk5KE=" parent-hash "kv3v2+rnq9QvYI3/HbJ1EV9vdujZ0aVCQ/CGBYIkEB0=" via-port "3-1.6" with-interface { 0e:01:00 0e:02:00 0e:02:00 0e:02:00 0e:02:00 0e:02:00 0e:02:00 0e:02:00 0e:02:00 }
20: block id 1004:631c serial "03a809c94b4befd4" name "LGE Android Phone" hash "0qSmncueL3SVg+z6yyVNMG2l+KxlAsMZWRfpPvCp0oU=" parent-hash "Zx7v0FMQEjScKSAFENAiobEs1OGPPB0YWR+yXDCVE04=" via-port "4-1.1" with-interface ff:ff:00
$ usbguard allow-device 20

20161010_00:10:37-11962

とりあえずこれで良さそうですが,たまにSSDを差し替えることがあります.そうすると前もって設定し直しておかないとデバイスが認識せず不味いことが起こりそうです.ということで設定ファイルにhostnameを付けてそれを使うようにしてみました.

hostごとの設定ファイルを作る

起動時に設定ファイルは指定できますが,ルールファイルは指定できないようです.両方のファイルをホストごとに用意します.

$ sudo cp -p /etc/usbguard/usbguard-daemon.conf /etc/usbguard/usbguard-daemon-`hostname`.conf
$ sudo vi /etc/usbguard/usbguard-daemon-x220.conf
$ diff /etc/usbguard/usbguard-daemon.conf /etc/usbguard/usbguard-daemon-x220.conf
10c10
< RuleFile=/etc/usbguard/rules.conf
---
> RuleFile=/etc/usbguard/rules-x220.conf
$ sudo cp -p /etc/usbguard/rules.conf /etc/usbguard/rules-`hostname`.conf

systemdの起動ファイルを修正してホスト名付きの設定ファイルを使うようにする

Systemdの設定ファイルを用意して設定ファイルをホスト名付きで呼ぶように修正しました.

$ sudo vi /etc/systemd/system/usbguard.service
$ cat /etc/systemd/system/usbguard.service
[Unit]
Description=USBGuard daemon
Wants=systemd-udevd.service local-fs.target
Documentation=man:usbguard-daemon(8)

[Service]
Type=simple
ExecStartPre=/bin/bash -c "/bin/systemctl set-environment hostname=$(/bin/hostname)"
ExecStart=/usr/sbin/usbguard-daemon -k -c /etc/usbguard/usbguard-daemon-${hostname}.conf
Restart=on-failure

[Install]
WantedBy=basic.target

起動し直して確認してみるとホスト名付きのファイルを呼んでいます.

$ sudo systemctl daemon-reload
$ sudo service usbguard restart
$ hostname
x220
$ ps -ef|grep -i usbguard-daemon
root     28545     1  0 00:05 ?        00:00:00 /usr/sbin/usbguard-daemon -k -c /etc/usbguard/usbguard-daemon-x220.conf

ちょっと面倒ですがとりあえずこれで行けそうです.

VirusTotalをコマンドラインから利用する

VirusTotalというオンラインスキャナがあります.不安なファイルなどをここでスキャンするとたくさん(現在は54)のエンジンでスキャンしてその結果を確認できます. 複数のエンジンを利用するのでチェック漏れが少ないので安心感があります.(絶対ではない)

このVirusTotalにはAPIやデスクトップアプリケーション(Win/Mac/Linux)があります.これを利用してコマンドラインからスキャナにファイルを投げたり結果を確認したりしてみます.

※利用するときデータをVirusTotalのサーバにアップロードする必要がありますが,アップロードされたデータはVirusTotalとの契約者が利用できるようになっているので人に見られたら困るものや仕事のファイルなどには利用しないほうがいいでしょう.もしそういうものをたくさんのエンジンでスキャンしたい場合はMetadefender Coreという製品などを検討するといいかもです.

導入

必要パッケージの導入

ビルドに必要なパッケージを導入します.Debian/Ubuntuでは以下のものが必要です.

$ sudo apt install build-essential automake autoconf libtool libjansson-dev libcurl4-openssl-dev git

build

sourceを入手してbuildします.

$ git clone https://github.com/VirusTotal/c-vtapi.git
$ cd c-vtapi
$ ./conigure --prefix=$HOME/usr/local
$ make
$ make install

続いてexampleをbuildします.(この中に簡易的なコマンドがあるのでこれを利用します.)

$ autoreconf -fi
$ ./configure --enable-examples
$ make

API Keyの入手

VirusTotalのコミニュティにサインアップして,API Keyを入手しておきます.

ファイルのアップロード

scanコマンドにapikeyとスキャン対象のファイルを指定してアップロードします.

$ ./examples/c/scan --apikey xxxxxxxxxxxxxxxxxxxxxxxxxxxxxxxxxxxxxxxxxxxxxxxxxxxxxxxxxxxxxxxx --filescan ~/Downloads/rootkitXperia_20140719.zip
 apikey: xxxxxxxxxxxxxxxxxxxxxxxxxxxxxxxxxxxxxxxxxxxxxxxxxxxxxxxxxxxxxxxx
progress_callback 0/0
   :
progress_callback 1736497/1736497
Response:
{
    "md5": "a3j0587afbba733d734b382f4c7fa15ed",
    "scan_id": "115fc4955cbfaa77982b6ced5fc1b5c901a707819c2ed7ed45d7e763c2bda841-1475839569",
    "sha1": "b586a6959843d5dd4004d585faf94d742e34eddc",
    "resource": "115fc4955cbfaa77982b6ced5fc1b5c901a707819c2ed7ed45d7e763c2bda841",
    "verbose_msg": "Scan request successfully queued, come back later for the report",
    "response_code": 1,
    "sha256": "115fc4955cbfaa77982b6ced5fc1b5c901a707819c2ed7ed45d7e763c2bda841",
    "permalink": "https://www.virustotal.com/file/115fc4955cbfaa77982b6ced5fc1b5c901a707819c2ed7ed45d7e763c2bda841/analysis/1475839569/"
}

スキャンの確認

scanコマンドにapikeyとhashを指定するとスキャン結果のレポートが確認できます.

$ ./examples/c/scan --apikey xxxxxxxxxxxxxxxxxxxxxxxxxxxxxxxxxxxxxxxxxxxxxxxxxxxxxxxxxxxxxxxx --report 115fc4955cbfaa77982b6ced5fc1b5c901a707819c2ed7ed45d7e763c2bda841
apikey: xxxxxxxxxxxxxxxxxxxxxxxxxxxxxxxxxxxxxxxxxxxxxxxxxxxxxxxxxxxxxxxx
progress_callback 0/0
:
progress_callback 366/366
Response:
{  
"scans": {
"Bkav": {
"detected": false,
"version": "1.3.0.8383",
"result": null,
"update": "20161007"
},
"Malwarebytes": {
"detected": false,
"version": "2.1.1.1115",
"result": null,
"update": "20161007"
},
"F-Secure": {
"detected": false,
"version": "11.0.19100.45",
"result": null,
"update": "20161007"
},
"MicroWorld-eScan": {
"detected": false,
"version": "12.0.250.0",
"result": null,
"update": "20161007"
},
"Antiy-AVL": {
"detected": false,
"version": "1.0.0.1",
"result": null,
"update": "20161007"
},
"K7AntiVirus": {
"detected": false,
"version": "9.242.21116",
"result": null,
"update": "20161007"
},
"AVware": {
"detected": false,
"version": "1.5.0.42",
"result": null,
"update": "20161007"
},
"Avira": { 
"detected": false,
"version": "8.3.3.4",
"result": null,
"update": "20161007"
},
"nProtect": {
"detected": false,
"version": "2016-10-07.02",
"result": null,
"update": "20161007"
},
"BitDefender": {
"detected": false,
"version": "7.2",
"result": null,
"update": "20161007"
},
"CMC": {
"detected": false,
"version": "1.1.0.977",
"result": null,
"update": "20161003"
},
"ViRobot": {
"detected": false,
"version": "2014.3.20.0",
"result": null,
"update": "20161007"
},
"McAfee": {
"detected": false,
"version": "6.0.6.653",
"result": null,
"update": "20161007"
},
"Kingsoft": {
"detected": false,
"version": "2013.8.14.323",
"result": null,
"update": "20161007"
},
"Baidu": {
"detected": false,
"version": "1.0.0.2",
"result": null,
"update": "20161001"
},
"Symantec": {
"detected": false,
"version": "20151.1.1.4",
"result": null,
"update": "20161007"
},
"CAT-QuickHeal": {
"detected": false,
"version": "14.00",
"result": null,
"update": "20161007"
},
"ALYac": { 
"detected": false,
"version": "1.0.1.9",
"result": null,
"update": "20161007"
},
"TheHacker": {
"detected": false,
"version": "6.8.0.5.1089",
"result": null,
"update": "20161007"
},
"Zillya": {
"detected": true,
"version": "2.0.0.3078",
"result": "Trojan.Towel.Linux.2",
"update": "20161007"
},
"DrWeb": {
"detected": false,
"version": "7.0.23.8290",
"result": null,
"update": "20161007"
},
"Rising": {
"detected": false,
"version": "28.0.0.1",
"result": null,
"update": "20161007"
},
"K7GW": {  
"detected": false,
"version": "9.242.21118",
"result": null,
"update": "20161007"
},
"AegisLab": {
"detected": true,
"version": "4.2",
"result": "Android.Exploit.Gen!c",
"update": "20161007"
},
"AVG": {
"detected": true,
"version": "16.0.0.4656",
"result": "Android/Exploit.B",
"update": "20161007"
},
"Qihoo-360": {
"detected": false,
"version": "1.0.0.1120",
"result": null,
"update": "20161007"
}
},
"response_code": 1,
"scan_id": "115fc4955cbfaa77982b6ced5fc1b5c901a707819c2ed7ed45d7e763c2bda841-1475839569",
"sha1": "b586a6959843d5dd4004d585faf94d742e34eddc",
"resource": "115fc4955cbfaa77982b6ced5fc1b5c901a707819c2ed7ed45d7e763c2bda841",
"total": 54,
"scan_date": "2016-10-07 11:26:09",
"permalink": "https://www.virustotal.com/file/115fc4955cbfaa77982b6ced5fc1b5c901a707819c2ed7ed45d7e763c2bda841/analysis/1475839569/",
"positives": 10,
"verbose_msg": "Scan finished, information embedded",
"sha256": "115fc4955cbfaa77982b6ced5fc1b5c901a707819c2ed7ed45d7e763c2bda841",
"md5": "a30587afbba733d734b382f4c7fa15ed"
}
Msg: Scan finished, information embedded
response code: 1

たまに使うのでですがブラウザがなくても利用できて便利そうです :)
ちなみにGUIもあるのでGUIで利用したい人はそちらもBUILDすると幸せになれるかもしれません.