LinuxとAndroidで動作するGoogle Keep代替を探す

Google Keepはメモアプリです.Evernoteに似ていますがもう少し機能が少ない感じ.

自分は主にTodoや買い物リストなどにKeepを利用しています.PCやAndroidで買い物をメモしてお店でAndroidのメモを見ながら買い物してチェックボックスをチェックしていく感じです.
メモの数もまだ少ないし使っている機能も少ないので代替になるものがあるのではと探してみました.

要件としてはこんな感じ

  • OSS
  • サーバ側はWebDAVなどでセルフホストが利用可能
    • 若しくはクラウドサービスを使うけどE2EEが利用可能
  • LinuxとAndroidで動作する
    • Android版では買い物メモをデスクトップウィジットで表示したい

Joplin

現在EvernoteとZim Wikiから乗り換えて作業メモなどに利用しています.サーバはNextcloudなどWebDAVが利用でき,単体でE2EEが可能です.
LinuxではAppimageやnodeでのcli版もあり,cli版はarmなどでも動作します.

既にあるノートを全部同期するのは大変,同期ディレクトリを分けることは出来ますがクライアントは1箇所しか登録できないので難しい.ノートブック単位で同期できればいいのですが今の所出来ないようです

それとAndroidでのウィジットはフレームワークでサポートされていないので今の所サポートされないようです(◞‸◟)

とりあえず見送りです.

Carnet

Google Keep代替のアプリのようです.Linux,Android,Webで利用でき,デスクトップ版はElectron製のAppimageが用意されていてGoogle Keepからのインポート機能も付いています.これはGoogle TakeoutでExportして展開したものを指定することでインポートできるようです.
同期先サーバはNextcloudかCarnetのサービスの https://carnet.live です.

今の所暗号化は未対応.

AndroidでのウィジットはIssueに上がっています.

Linux armで動作しない&暗号化未対応だけれどelectronではないLinuxアプリを開発中だし暗号化もウィジェットもIssueにあがっているので将来に期待しつつGoogle Keepをインポートして試してみようと思います.(Takeout待ち……)

add)
Web版はhttps://carnet.live だけかと思っていたのですが,NextcloudアプリのCarnetを導入することでNextcloudでWeb版が利用できます.

add)
インポートしてみました.

termux-APIのTermux-usbを少し試す

Androidでdeb系ぽいLinux環境を実現できるTermuxからAndroidを操作するAPIのTermux-APIのupdateがありました.

termux api usb 01

Add a USB API compatible with libusb – see https://wiki.termux.com/wiki/Termux-usb for more information.

なんだか気になる更新内容です.

早速試してみます.

まずはパッケージを最新にして関連パッケージを導入
$ pkg update
$ pkg install root-repo
$ pkg install termux-api
$ pkg install libusb
$ pkg install clang
termux-usb コマンドでデバイスを確認してアクセス許可を与える(ここではUSBメモリ)
$ termux-usb -l
[
  "/dev/bus/usb/001/004"
]
$ termux-usb -r /dev/bus/usb/001/004
Access granted.

アクセスの許可はAndroidの画面で操作が必要です.

termux api usb 02

ちなみに,USB Keyboardは認識できませんでした(Androidでは利用できているのに!)

lsusb的にusb情報を表示するプログラムのサンプルをコンパイルして実行
$ cat << __EOF__ > usbtest.c
> $ cat usbtest.c
> #include <stdio.h>
> #include <assert.h>
> #include <libusb-1.0/libusb.h>
>
> int main(int argc, char **argv) {
>     libusb_context *context;
>     libusb_device_handle *handle;
>     libusb_device *device;
>     struct libusb_device_descriptor desc;
>     unsigned char buffer[256];
>     int fd;
>     assert((argc > 1) && (sscanf(argv[1], "%d", &fd) == 1));
>     assert(!libusb_init(&context));
>     assert(!libusb_wrap_sys_device(context, (intptr_t) fd, &handle));
>     device = libusb_get_device(handle);
>     assert(!libusb_get_device_descriptor(device, &desc));
>     printf("Vendor ID: %04x\n", desc.idVendor);
>     printf("Product ID: %04x\n", desc.idProduct);
>     assert(libusb_get_string_descriptor_ascii(handle, desc.iManufacturer, buffer, 256) >= 0);
>     printf("Manufacturer: %s\n", buffer);
>     assert(libusb_get_string_descriptor_ascii(handle, desc.iProduct, buffer, 256) >= 0);
>     printf("Product: %s\n", buffer);
>     assert(libusb_get_string_descriptor_ascii(handle, desc.iSerialNumber, buffer, 256) >= 0);
>     printf("Serial No: %s\n", buffer);
>     libusb_exit(context);
> }
> __EOF__
$ gcc usbtest.c -lusb-1.0 -o usbtest
$ termux-usb -e ./usbtest /dev/bus/usb/001/004
Vendor ID: 13fe
Product ID: 3600
Manufacturer:
Product: USB DISK 2.0
Serial No: 07AC10081C16381A

てことでTermuxからlibusbが使えるようになったようです.

ちなみに,lsusbを実行するとこんな感じです.rootedな端末だと使えるんでしょうけど.

$ lsusb
lsusb: /sys/bus/usb/devices: Permission denied
$ tsudo lsusb
/data/data/com.termux/files/usr/bin/tsu: 146: exec: : Permission denied
環境
$ dpkg-query -W termux-api libusb clang
clang   8.0.1-4
libusb  1.0.23-rc1-1
termux-api      0.47
$ adb shell dumpsys package com.termux.api | grep -E 'versionCode|versionName'
    versionCode=38 minSdk=21 targetSdk=28
    versionName=0.38
$ adb shell dumpsys package com.termux | grep -E 'versionCode|versionName'
    versionCode=75 minSdk=21 targetSdk=28
    versionName=0.75
$ getprop ro.bootimage.build.fingerprint
essential/mata/mata:10/QP1A.190711.122/420:user/release-keys
$ getprop ro.build.version.security_patch
2019-09-05
$ getprop ro.product.cpu.abilist
arm64-v8a,armeabi-v7a,armeabi

ffmpegでgifからmp4に変換した動画がInstagramに投稿できない

先日のttygifで作成したanimation gifをInstagramに投稿しようとしたところ,animation gifは投稿できるけどanimationせず1枚目の画像が表示されるだけです.ffmpegでmp4に変換するだけで良さそうだけど投稿できません.白い動画でプログレスがずっと表示され,「次へ」を押すとアプリ自体が落ちてしまいます.動画は同端末のvlcなどでは問題なく再生できています.

IMG 20191005 195714

$ ffmpeg -i tty.gif tty.mp4

音声がないのがいけないのかな?と anullsrc フィルタで無音の音声トラックを追加してみても変わらず.

$ ffmpeg -f lavfi -i anullsrc -i tty.gif -shortest tty.mp4

手詰まりになって検索してみると以下のページを発見.

このページによると以下の条件で投稿できないようです.

  • 3秒以下の動画
  • Instagramが受け付けないカラーエンコーディングの利用

今回の動画は20秒ほどなので長さは問題無さそうです.

うまく行っていなかった動画を確認すると元記事と同様 yuv444p を使っているようです.

$ ffprobe tty.mp4 2>&1 | grep -E "Stream.*Video"
    Stream #0:0(und): Video: h264 (High 4:4:4 Predictive) (avc1 / 0x31637661), yuv444p, 802x750, 73 kb/s, 4.17 fps, 4.17 tbr, 12800 tbn, 8.33 tbc (default)

てことで,以下のようにカラーエンコーディングに yuv420p を指定して変換すると投稿できました.(音声トラックはあってもなくてもどちらでもOKだった)

$ ffmpeg -i tty.gif -pix_fmt yuv420p -filter_complex "scale=trunc(iw/2)*2:trunc(ih/2)*2" tty.mp4
$ ffprobe tty.mp4 2>&1 | grep -E "Stream.*Video"
    Stream #0:0(und): Video: h264 (High) (avc1 / 0x31637661), yuv420p, 1058x750, 97 kb/s, 16.08 fps, 16.08 tbr, 12352 tbn, 32.17 tbc (default)

この投稿をInstagramで見る

pfetch logo #unix

matokenさん(@matoken)がシェアした投稿 –

公式の文章があればいいんですが見つからず.以下が少し近い?

変換環境
$ dpkg-query -W ffmpeg
ffmpeg	7:4.1.4-1+b2
$ lsb_release -dr
Description:	Debian GNU/Linux bullseye/sid
Release:	unstable
$ uname -m
x86_64
投稿環境
$ adb shell dumpsys package com.instagram.android | grep -E 'versionCode|versionName'
    versionCode=175574628 minSdk=23 targetSdk=28
    versionName=113.0.0.39.122
$ adb shell getprop ro.bootimage.build.fingerprint
essential/mata/mata:10/QP1A.190711.122/420:user/release-keys
$ adb shell getprop ro.build.version.security_patch
2019-09-05
$ adb shell getprop ro.product.cpu.abilist
arm64-v8a,armeabi-v7a,armeabi

OsMo.mobiがDownしたのでPhoneTrackを使う

近頃はOsMoで検索すると,DJIのドローンやジンバルが出てくるようになっていますがOsMoはそういうものではなく,位置情報共有サービスです.スマートフォンにアプリを導入して共有URLで今自分の居る場所を共有できます.Glympseなどが類似サービスになると思います.

このOsMoですが,最近サーバがダウンして利用できなくなりました.(一応オフラインでローカルにログを取得することは可能)
OsMoのアプリ(OsMoDroid)を導入していると,telegramに誘導するメッセージが表示されるようになりました.

IMG 20190821 235148

20190824 20:08:03 4249

このチャンネルを覗くとサーバが(物理的に?)失われて,更にバックアップが05/15のものしか無いようで,そのデータで復旧を試みようとしているけど未だホスト先を探している状態のようです.
復旧までにはまだまだ掛かりそうなです.

Константин Гам, [22.08.19 02:57]
Что произошло? Сервер приложения OsMo и сайта повреждён, сгорел диск. Потеряны все данные пользователей. Из-за несработавшего бекапа, последняя полная копия проекта датируется 15 мая 2019 года.
Диск заменили, но требуется много работы по запуску проекта с нуля и дальнейшее накатывание копии от мая…​

Собираем на восстановление сервера осмо (часы + сервера + тонна кофе), 5200/60000 руб

VISA: 4083 9720 5573 2954
QIWI: +7 (921) 426-74-00

В комментарий указывайте email аккаунта, если есть или будущего. Всем кто донатит 1500+ рублей, максимальный PRO пожизненно.
Если комментарий недоступен, кидайте время и место платежа в почту osmo.mobi@gmail.com

OsMoが使えない間の代替サービスを探そうと思いましたが,そういえば以前PhoneTrackというアプリケーションを導入していたのを思い出しました.

PhoneTrackはNextcloudのアプリケーションとして導入して,位置情報アップロード用のURLを発行して各種アプリケーションで位置情報をアップロード,この情報を共有URLで共有することも出来ます.
対応アプリケーションも色々あります.私はOsmAnd+,Uloggerを利用しています.
以下はOsmAnd+での設定例です.

IMG 20190827 084323
IMG 20190827 084402

位置情報共有用のURLは長いのですが,QRcodeで読み取ることも出来ます :)

20190827 08:08:46 30083

長時間動かすことが多いので消費電力の少ない設定やアプリを探そうと思います.

Android で Wi-Fi 経由の adb を有効にして backup

Android 端末側でUSB デバッグを有効にしてUSB接続する.
デバイスが認識されているか確認.

$ adb devices
List of devices attached
PM1LHMA861102833        device

no permissions と言われた場合

$ adb devices
List of devices attached
PM1LHMA861102833        no permissions (user in plugdev group; are your udev rules wrong?); see [http://developer.android.com/tools/device.html]

は以下のようにして udev のルルーを追加する.VID/PID(以下の例では2e18, c032)部分はdmesgやlsusbで確認して自分の端末のIDに書き換える.

$ echo '# Essential PH-1
> SUBSYSTEM=="usb", ATTR{idVendor}=="2e17", ATTR{idProduct}=="c032", MODE="0666", GROUP="adbandy"' | sudo tee /etc/udev/rules.d/51-android.rules
# Essential PH-1
SUBSYSTEM=="usb", ATTR{idVendor}=="2e17", ATTR{idProduct}=="c032", MODE="0666", GROUP="adbandy"

その後USB を接続し直して確認し直す.

HostPC の adb コマンドで tcpip コマンドで接続できるようにして,connect コマンドで Android 端末の ip を指定して接続します.
5555 はポート番号で 5555 が規定値.既定値から変更した場合は,connect コマンドの ip の後ろにポート番号の指定が必要になります.

$ adb tcpip 5555
$ adb connect 192.168.1.200
connected to 192.168.1.200:5555

この状態でusb 接続を解除して devides コマンドに居ます :)
後は普通に使えます.

$ adb devices
List of devices attached
192.168.1.200:5555      device
$ adb logcat|head -1
--------- beginning of crash
^C

そして本命のバックアップ.

$ time adb backup -f ./PH-1.ab -all
Now unlock your device and confirm the backup operation...

real   26m2.104s
user    0m0.171s
sys     0m5.725s

用事が終わったら切断しておいたほうが安心ですね.

$ adb disconnect 192.168.1.200
disconnected 192.168.1.200
$ adb devices
List of devices attached
環境(Android)
mata:/ $ getprop ro.bootimage.build.fingerprint
essential/mata/mata:9/PQ1A.190105.058/496:user/release-keys
mata:/ $ getprop ro.build.version.security_patch
2019-05-05
mata:/ $ getprop ro.product.cpu.abilist
arm64-v8a,armeabi-v7a,armeabi
環境(HostPC)
$ dpkg-query -W adb
adb     1:8.1.0+r23-5
$ lsb_release -dr
Description:    Debian GNU/Linux 10 (buster)
Release:        10
$ uname -m
x86_64

プライバシーやセキュリティが守られるprotonVPNの無料プランを少し試す

セキュアなメールサービスの ProtonMail と同じ Proton Technologies AGの VPN サービスの ProtonVPN を少し試してみました.
存在は知っていましたが接続するには専用アプリのみが必要だと思いこんでいました.openVPN で接続できるようなので試してみました.

ここでの VPN は拠点間などではなくスマートフォンやPCを公衆無線LANなどで接続したとき向けの個人向けVPNとしての話です.

無料VPNサービスはいろいろ見つかりますが,無料の代わりに個人情報を収集して販売していたりプライバシーポリシーでそういうことをしないとしつつも実際は行っていたりと怪しいものが多いです.

知識のある人であれば自宅にSBCなどで低価格,低消費電力でVPNサーバを用意したり,VPNサービスより安い価格のVPSサービスにセットアップして利用するなどといったことが可能ですが,知識のない人にサーバを立ててもらうのは難しいです.(一旦設定した後も使い続ける間はOSやサービスのアップデートなども必要だし……)

ProtonVPN は有料プランの他に無料プランがあり,無料プランでもプライバシーやセキュリティが守られるとなっています.無料はお試し版という扱いですね.無料プランでは接続できるサーバが限られており,無料プランで接続できるサーバは事に比べて利用率が高くなっています.時間帯によっては100%になっているので速度は低下すると思います.

実際にプライバシーやセキュリティが守られるのかが不安ですが,もともとジャーナリストや活動家を守るために作られたものであったり,MozillaがFirefoxに向けてのVPNサービスにProtonVPNを選ぶなどそれなりに信頼できそうな気がします.(少なくとも今の時点では)

ProtonVPN アカウントの作成

ProtonVPN を利用するためにアカントを作成します.
手順は以下に書かれています.メールアカウントが別途必要です.また,ProtonMail のアカウントを使ってProtonVPN のアカウントを作成するとこも出来るようなので私は ProtonMail でアカウントを作成しました.

Network Manager を利用して ProtonVPN に接続

お手軽にNetwork Manager の openVPN プラグインを利用して接続します.
以下に手順があるので真似します.

(GUIのNetwork Manager 以外にも command-line や IKEv2 での接続方法もあるようです.)_

必要なパッケージを導入します.

$ sudo apt install openvpn network-manager-openvpn-gnome resolvconf

ProtonVPN の設定ファイルを入手します.

  • ProtonVPN のサイトでログイン
  • Download ページに移動
  • plathome で「Linux」を選択
  • protocol はそのまま「UDP」
  • 無料プランでは「Secure Core configs」,「Country configs」は利用できないので「Server configs」を選択.
  • 後は任意の接続でダウンロード
    • 今回は「Japan」の「Japan Free#2」をダウンロードした

続いてNetwork Manager の設定をします.

  • Network Manager のアイコンをクリックして,「VPN 接続(V)」->「VPN を設定(C)」を選択
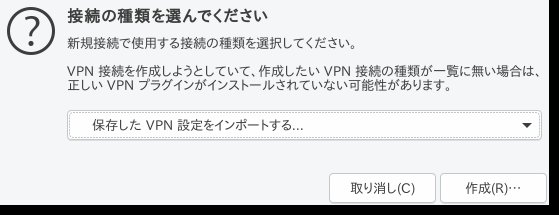
  • 「接続の種類を選んでください」というウィンドウで,「保存した VPN 設定をインポートする…」を選んで「作成(R)…」を押す
    20190306-22-03-15-15118.jpg
  • ProtonVPN のページでダウンロードした設定ファイルを指定してインポートする
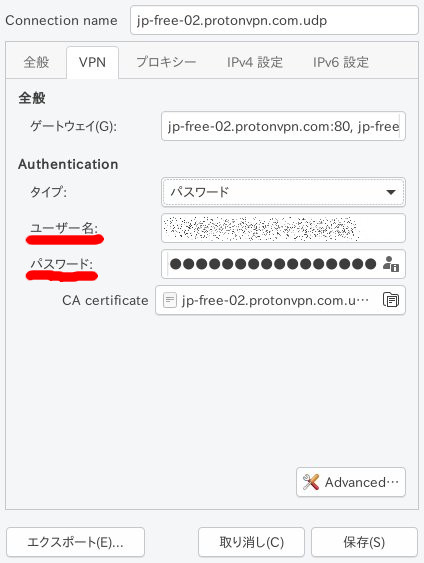
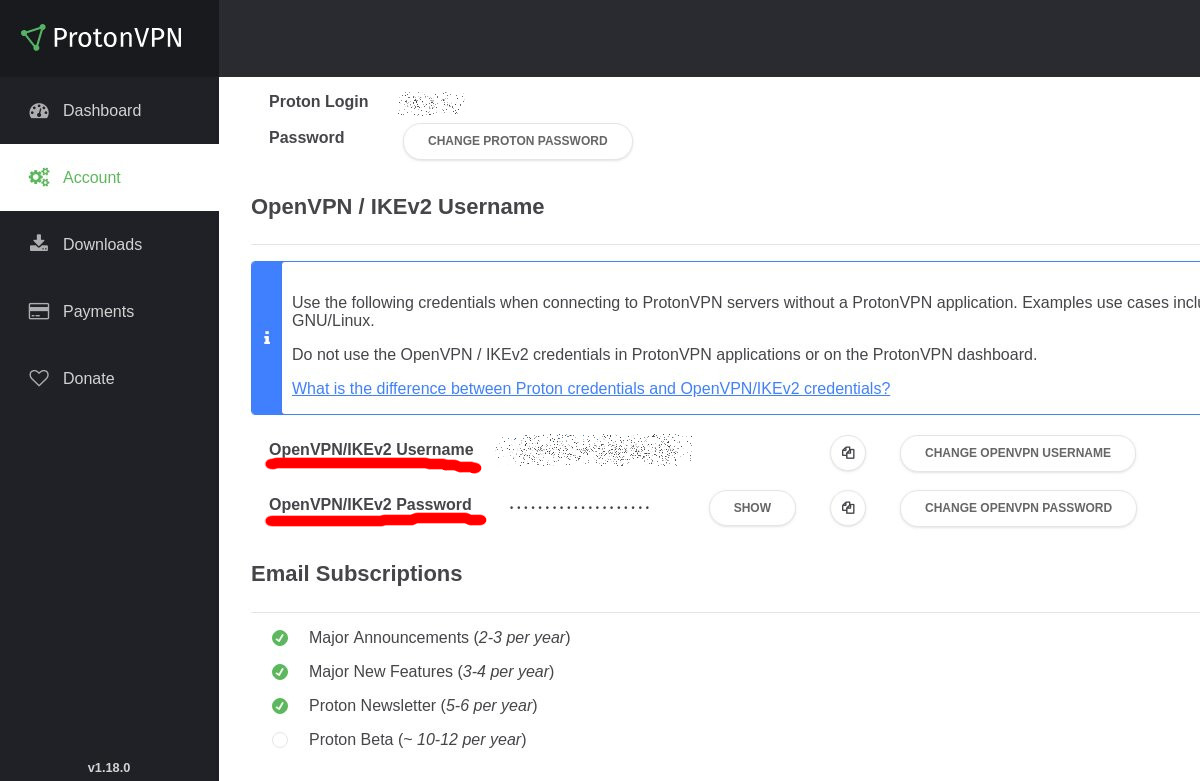
  • 次の設定画面のVPN タブで「ユーザ名」,「パスワード」を入力する.ユーザ名,パスワードは protonVPN のページで確認できる.(protonVPNサービスのものとは別で自動生成されている)
    20190306-22-03-21-8927.jpg
    20190306-22-03-05-17942.jpg

接続してみます.

  • Wi-Fi などのネットワークに接続した状態でNetwork Manager のアイコンをクリックして,「VPN 接続(V)」->設定したprotonVPN をクリック

リモートアドレスなどを確認するとVPN のものに変わっていました.

$ curl ifconfig.me/ip
185.242.4.204
$ dig | grep -i server:
;; SERVER: 10.8.8.1#53(10.8.8.1)
$ /sbin/ifconfig tun0
tun0: flags=4305<UP,POINTOPOINT,RUNNING,NOARP,MULTICAST>  mtu 1500
        inet 10.8.3.2  netmask 255.255.255.0  destination 10.8.3.2
        inet6 fe80::642a:6858:4f6:403  prefixlen 64  scopeid 0x20<link>
        unspec 00-00-00-00-00-00-00-00-00-00-00-00-00-00-00-00  txqueuelen 100  (不明なネット)
        RX packets 11489  bytes 8367918 (7.9 MiB)
        RX errors 0  dropped 0  overruns 0  frame 0
        TX packets 11204  bytes 2610990 (2.4 MiB)
        TX errors 0  dropped 0 overruns 0  carrier 0  collisions 0

$ whois 185.242.4.204
% This is the RIPE Database query service.
% The objects are in RPSL format.
%
% The RIPE Database is subject to Terms and Conditions.
% See -ripe.net - www.ripe.net/db/support/db-terms-conditions.pdf

% Note: this output has been filtered.
%       To receive output for a database update, use the "-B" flag.

% Information related to '185.242.4.0 - 185.242.4.255'

% Abuse contact for '185.242.4.0 - 185.242.4.255' is 'abuse@m247.ro'

inetnum:        185.242.4.0 - 185.242.4.255
netname:        M247-LTD-TOKYO
descr:          M247 LTD Tokyo Infrastructure
country:        JP
geoloc:         35.622214 139.7455763
admin-c:        GBXS24-RIPE
tech-c:         GBXS24-RIPE
status:         LIR-PARTITIONED PA
mnt-by:         GLOBALAXS-MNT
remarks:        ---- LEGAL CONCERNS ----
remarks:        For any legal requests, please send an email to
remarks:        ro-legal@m247.ro for a maximum 48hours response.
remarks:        ---- LEGAL CONCERNS----
created:        2018-01-17T11:32:30Z
last-modified:  2018-11-29T11:54:41Z
source:         RIPE

role:           GLOBALAXS TOKYO NOC
address:        2 Chome-1-17 Higashishinagawa, Shinagawa
address:        Tokyo 140-0002, Japan
abuse-mailbox:  abuse@m247.ro
nic-hdl:        GBXS24-RIPE
mnt-by:         GLOBALAXS-MNT
created:        2017-10-17T16:49:19Z
last-modified:  2018-07-18T11:04:41Z
source:         RIPE # Filtered

% Information related to '185.242.4.0/24AS9009'

route:          185.242.4.0/24
origin:         AS9009
mnt-by:         GLOBALAXS-MNT
created:        2018-01-17T11:33:29Z
last-modified:  2018-01-17T11:33:29Z
source:         RIPE

% This query was served by the RIPE Database Query Service version 1.92.6 (WAGYU)

速度については確認した回線がADSL で元々細いせいかVPN利用時,非利用時であまり変わりませんでした(400kB/s程).公衆無線LAN などでも試してみたいところです.

ちなみに,AndroidスマートフォンのProtonVPN を携帯回線で利用した状態で Wi-Fi 接続したら VPNのセッションは張り直されず Wi-Fi を利用しているつもりで携帯回線を使い続けていたということがありました.ちゃんと検証していないですが気をつけたほうが良さそうです.
OpenVPN Connect のほうがいいかも

Android環境

Android のバージョン:9
セキュリティパッチレベル: 2019年3月5日

Linux環境1

$ dpkg-query -W openvpn network-manager-openvpn-gnome resolvconf
network-manager-openvpn-gnome   1.8.10-1
openvpn 2.4.7-1
resolvconf      1.79
$ lsb_release -dr
Description:    Debian GNU/Linux buster/sid
Release:        unstable
$ uname -m
x86_64

Linux環境2
$ dpkg-query -W openvpn network-manager-openvpn-gnome resolvconf
network-manager-openvpn-gnome 1.8.10-1
openvpn 2.4.6-1ubuntu3
resolvconf 1.79ubuntu10
$ lsb_release -dr
Description: Ubuntu Disco Dingo (development branch)
Release: 19.04
$ uname -m
x86_64
Android 4.0 以降を DNS-over-HTTPS 対応にする Intra を少し試す

Alpabet の技術インキュベータのJigsawというところが作った Intra という Android アプリをリリースしました.

通常の DNS は暗号化されず改ざんが可能です.Intra は DNS を暗号化する DNS-over-HTTPS を Android 4.0 以降で利用できるようにするアプリです.

31226501238 7a637260f1
31226501848 d563502159
31226502538 db0efcae0a

VPN接続の確認がされる

31226505068 5cc4feeeb4

DNS保護状態

31226508208 857594ce32
31226510648 7047e8ef20

DNS-over-HTTPS サーバの既定値はGoogleで,Cloudflareも選択できる.その他のサーバも手動で指定できる

31226511688 8b413ac9b8

DNS は 8.8.8.8 の Google を見に行っているのがわかる

31226512688 975b1b6655

VPNが有効になっているが,IPはそのまま

45100103761 d9692f0075

ダッシュボード画面で最近のクエリの確認も出来る

30162180647 1f64018b79

試した環境は仮想環境のAndroid 8.1.0(x86_64), Intra 1.0.0

44189409735 9ecf88c2c2
44380132464 4d9cbeacae

自分は基本的に出先では VPN を利用しているので必要ないかなと思うのですが,お手軽に無料でかつ古いデバイスにも対応しているので良さそうですね.ちなみにこの機能は Android Pie には標準搭載されているそうです.

#Wi-FiなんかでDNS改ざんして認証画面に飛ばしたりするようなのはどういう動きになるんだろう?

ObscuraCamで顔写真に自動的にモザイクをかける(Android)

この記事で紹介されていたObscuraCamを試してみたところいい感じです.

画像の中の顔を認識してモザイクをかけてくれます.認識率は思ったよりも良さそうです.認識に漏れても簡単に手動でモザイクをかけることも出来ます.手動の場合,モザイクの他に黒塗りやマスク(ヒゲメガネ,スマイリー,マスクマン)も選べます.

New photo added to gallery
Screenshot_2018-07-13-21-22-14

イラストにも試してみましたがやはりあまり認識しません.でもおじさんは認識して以下の今井哲也(@imaitetsuya)さんのイラストだとそれぞれ蔵六と内藤だけモザイクに.

イベントとかで写真を撮ってすぐ投稿というときに良さそうです.

環境

  • LGL22
  • Android 4.4.2
  • ObscuraCam v4.0.1-alpha-1

Android端末をshellで操作できるTermux:APIで遊んでみた

※この記事は「鹿児島Linux勉強会 2018.06」で発表したものに社会性フィルタをかけて加筆修正したものです.鹿児島らぐでは月一回位をペースにオフ会を行っています.

TermuxはAndroid上でLinux環境を構築するアプリケーションです.他に標準のLinuxディストリビューションがchroot環境で動作するソフトウェアが色々ある(Debian no root等)ので独自パッケージ管理なTermuxにはあまり惹かれていなかったのですが,API経由でAndroidデバイスの操作が出来るということを知り試してみました.

入手先

API利用時にはAPIアプリも導入が必要

※互換性の問題があるのでF-DroidとGoogle Playのアプリは混在させてはいけないらしいので注意.

要件

Android 5.0 or newer.

Permissions

Permissions
android.permission.INTERNET
android.permission.WRITE_EXTERNAL_STORAGE
android.permission.WAKE_LOCK
android.permission.VIBRATE
android.permission.READ_EXTERNAL_STORAGE

api pkg導入

Termux上で実行

$ pkg install termux-api

APIを試す

はじめTermux:APIで紹介されているものを確認しました.

パッケージを確認すると他にもコマンドがあったのでそちらも確認し直しました.

dpkg -L termux-api|grep /bin/|cut -d\/ -f8|sort
termux-audio-info
termux-battery-status
termux-brightness
termux-call-log
termux-camera-info
termux-camera-photo
termux-clipboard-get
termux-clipboard-set
termux-contact-list
termux-dialog
termux-download
termux-fingerprint
termux-infrared-frequencies
termux-infrared-transmit
termux-location
termux-media-player
termux-media-scan
termux-microphone-record
termux-notification
termux-notification-remove
termux-sensor
termux-share
termux-sms-inbox
termux-sms-send
termux-speech-to-text
termux-storage-get
termux-telephony-call
termux-telephony-cellinfo
termux-telephony-deviceinfo
termux-toast
termux-torch
termux-tts-engines
termux-tts-speak
termux-vibrate
termux-volume
termux-wallpaper
termux-wifi-connectioninfo
termux-wifi-enable
termux-wifi-scaninfo

基本的にjson形式で結果は帰って来ます.使い方がわからない場合は-hオプションで簡易helpが表示されます.パーミッションを求められる場合はダイアログが表示されるので許可してあげる必要があります.(その回は失敗する)

SIMや赤外線通信の使えるAndroid 5以上の端末が手元にないのでその辺りの物は試せてません.

  • termux-audio-info

    オーディオ情報の取得

      $ termux-audio-info -h
      Usage: termux-audio-info
      Get information about audio capabilities.
      $ termux-audio-info  
      {
        "PROPERTY_OUTPUT_SAMPLE_RATE": "48000",
        "PROPERTY_OUTPUT_FRAMES_PER_BUFFER": "960",
        "STREAM_MUSIC_VOLUME": 1,
        "STREAM_MUSIC_MAXVOLUME": 15,
        "BLUETOOTH_A2DP_IS_ON": false,
        "WIREDHEADSET_IS_CONNECTED": false,
        "AUDIOTRACK_NATIVE_OUTPUT_SAMPLE_RATE": 48000
      }
    
  • termux-battery-status

    バッテリー情報の取得

    $ termux-battery-status -h
    Usage: termux-battery-status
    Get the status of the device battery.
    $ termux-battery-status
    {
      "health": "GOOD",
      "percentage": 70,
      "plugged": "PLUGGED_USB",
      "status": "CHARGING",
      "temperature": 36.900001525878906
    }
    
  • termux-brightness

    輝度の調整?0や255を指定しても動作が解らなかった

    $ termux-brightness
    Usage: termux-brightness brightness
    Set the screen brightness between 0 and 255
    $ termux-brightness 0
    $ termux-brightness 255
    
  • termux-call-log

    通話履歴の取得

    $ termux-call-log -h
    Usage: termux-call-log [-d] [-l limit] [-o offset]
    List call log history
      -l limit   offset in call log list (default: 10)
      -o offset  offset in call log list (default: 0)
    $ termux-call-log
    
  • termux-camera-info

    カメラ情報が取得できる.カメラIDや解像度など.

    $ termux-camera-info -h
    Usage: termux-camera-info
    Get information about device camera(s).
    $ termux-camera-info
    [
      {
        "id": "0",
        "facing": "back",
        "jpeg_output_sizes": [
          {
            "width": 5248,
            "height": 3936
          },
          {
            "width": 5248,
            "height": 2952
          },
          {
            "width": 3840,
            "height": 2160
          },
          {
            "width": 3264,
            "height": 2448
          },
          {
            "width": 2048,
            "height": 1536
          },
          {
            "width": 1920,
            "height": 1080
          },
          {
            "width": 1280,
            "height": 720
          },
          {
            "width": 640,
            "height": 480
          },
          {
            "width": 480,
            "height": 320
          },
          {
            "width": 320,
            "height": 240
          }
        ],
        "focal_lengths": [
          4.900000095367432
        ],
        "auto_exposure_modes": [
          "CONTROL_AE_MODE_ON",
          "CONTROL_AE_MODE_ON_AUTO_FLASH",
          "CONTROL_AE_MODE_ON_ALWAYS_FLASH",
          "CONTROL_AE_MODE_ON_AUTO_FLASH_REDEYE"
        ],
        "physical_size": {
          "width": 6.219269752502441,
          "height": 4.663866996765137
        },
        "capabilities": [
          "backward_compatible"
        ]
      },
      {
        "id": "1",
        "facing": "front",
        "jpeg_output_sizes": [
          {
            "width": 1920,
            "height": 1080
          },
          {
            "width": 1600,
            "height": 1200
          },
          {
            "width": 1280,
            "height": 720
          },
          {
            "width": 640,
            "height": 480
          },
          {
            "width": 480,
            "height": 320
          },
          {
            "width": 320,
            "height": 240
          }
        ],
        "focal_lengths": [
          1.809999942779541
        ],
        "auto_exposure_modes": [
          "CONTROL_AE_MODE_ON"
        ],
        "physical_size": {
          "width": 2.1837236881256104,
          "height": 1.2063192129135132
        },
        "capabilities": [
          "backward_compatible"
        ]
      }
    ]
    
  • termux-camera-photo

    カメラを使って写真撮影が出来る.引数にカメラID(option)や写真ファイル名(必須)が指定できる.写真はJPEG形式

    $ termux-camera-photo -h
    
    Usage: termux-camera-photo [-c camera-id] output-file
    Take a photo and save it to a file in JPEG format.
      -c camera-id  ID of the camera to use (see termux-camera-info), default: 0
    $ termux-camera-photo termix_photo.jpg
    
  • termux-clipboard-get

    クリップボードの文字列を取得

    $ termux-clipboard-get -h
    Usage: termux-clipboard-get
    Get the system clipboard text.
    
  • termux-clipboard-set

    クリップボードに文字列を格納

    $ termux-clipboard-set -h
    Usage: termux-clipboard-set [text]
    Set the system clipboard text. The text to set is either supplied as arguments or read from stdin if no arguments are given.
    $ termux-clipboard-set hello
    $ termux-clipboard-get
    hello
    
  • termux-contact-list

    全てのコンタクトリストが表示される

    $ termux-contact-list -h
    Usage: termux-contact-list
    List all contacts.
    $ termux-contact-list
    [
      {
        "name": "MATOHARA Kenichiro",
        "number": "0X0-XXXX-XXXX"
      },
         :
    
  • termux-dialog

    ダイヤログを表示してその結果を取得できる.パスワード文字列などの指定も可能.

    $ termux-dialog -h
    Usage: termux-dialog [-i hint] [-m] [-p] [-t title]
    Show a text entry dialog.
      -i hint   the input hint to show when the input is empty
      -m        use a textarea with multiple lines instead of a single
      -p        enter the input as a password
      -t title  the title to show for the input prompt
    
    $ echo `termux-dialog`
    hoge
    

    28037547727_edb2027c2c_o

    $ echo `termux-dialog -i hint -m -t termux\ dialog`|od -xc
    0000000   h   o   g   e       f   u   g   a  \n
            6f68 6567 6620 6775 0a61
    0000012
    

    28037548487_5ff4a35999_o

    $ echo `termux-dialog -p`
    passwordddd
    

    42188267074_de542c5ee6_o

  • termux-download

    指定したURLからダウンロードが出来る.Androidのダウンロードアプリに渡される.(単にファイル取得ならwgetが入っている)

    $ termux-download -h
    Usage: termux-download [-d description] [-t title] url-to-download
    Download a resource using the system download manager.
      -d description  description for the download request notification
      -t title        title for the download request notification
    
  • termux-fingerprint

    指紋認証を行う?(未確認)

    $ termux-fingerprint -h
    Usage: termux-fingerprint
    Use fingerprint sensor on device to check for authentication
    NOTE: Only available on Marshmallow and later
    $ termux-fingerprint
    {
      "errors": [
        "ERROR_UNSUPPORTED_OS_VERSION"
      ],
      "failed_attempts": 0,
      "auth_result": "AUTH_RESULT_UNKNOWN"
    
  • termux-infrared-frequencies

    赤外線通信情報を取得?(未確認)

    $ termux-infrared-frequencies -h
    Usage: termux-infrared-frequencies
    Query the infrared transmitter's supported carrier frequencies.
    $ termux-infrared-frequencies
    []
    
  • termux-infrared-transmit

    赤外通信で送信する?(未確認)

    $ termux-infrared-transmit -h
    Usage: termux-infrared-transmit -f frequency pattern
    Transmit an infrared pattern. The pattern is specified in comma-separated on/off intervals, such as '20,50,20,30'. Only patterns shorter than 2 seconds will be transmitted.
      -f frequency  IR carrier frequency in Hertz
    
  • termux-location

    位置情報を取得.GPSを利用すると時間が掛かる.位置情報が取得できない場合はタイムアウト後何も帰ってこない.タイムアウトは65秒前後.

    $ termux-location -h
    usage: termux-location [-p provider] [-r request]
    Get the device location.
      -p provider  location provider [gps/network/passive] (default: gps)
      -r request   kind of request to make [once/last/updates] (default: once)
    $ termux-location -p gps
    $ termux-location -p network  
    {
      "latitude": 31.2529767,
      "longitude": 130.8509959,
      "altitude": 0.0,
      "accuracy": 19.31999969482422,
      "bearing": 0.0,
      "speed": 0.0,
      "elapsedMs": 39,
      "provider": "network"
    }
    $ termux-location -p passive
    {
      "latitude": 34.77000045776367,
      "longitude": 138.4600067138672,
      "altitude": 0.0,
      "accuracy": 976974.0625,
      "bearing": 81.0,
      "speed": 0.0,
      "elapsedMs": 5,
      "provider": "fused"
    }
    
  • termux-media-player
    メディアの再生,操作

    $ termux-media-player -h
    termux-media-player: Invalid cmd: '-h'
    Usage: termux-media-player cmd [args]
    
    help        Shows this help
    info        Displays current playback information
    play        Resumes playback if paused
    play <file> Plays specified media file
    pause       Pauses playback
    stop        Quits playback
    $ termux-media-player play 
    No previous track to resume!
    Please supply a new media file
    $ termux-media-player play /storage/sdcard1/Android/data/com.bambuna.podcastaddict/files/podcast/エッジのたたないポッドキャスト/MzoRbgzFVe_3248.mp3
    Now Playing: MzoRbgzFVe_3248.mp3
    $ termux-media-player pause
    Paused playback
    $ termux-media-player play
    Resumed playback
    Track: MzoRbgzFVe_3248.mp3
    Current Position: 00:27 / 13:39
    $ termux-media-player info  
    Status: Playing
    Track: MzoRbgzFVe_3248.mp3
    Current Position: 01:10 / 13:39
    $ termux-media-player info
    No track currently!
    $ termux-media-player play photo.jpg
    
    Prepare failed.: status=0x1
    
  • termux-media-scan

    メディアをスキャンする?

    $ termux-media-scan -h
    Usage: termux-media-scan [-v] [-r] file [file...]
    Scan the specified file(s) and add it to the media content provider.
      -r  scan directories recursively
      -v  verbose mode
    $ termux-media-scan -r /storage/sdcard1/Android/data/com.bambuna.podcastaddict/files/podcast/エッジのたたないポッドキャスト
    Finished scanning 2 file(s)
    $ termux-media-scan -r -v /storage/sdcard1/Android/data/com.bambuna.podcastaddict/files/podcast/エッジのたたないポッドキャスト
    /storage/sdcard1/Android/data/com.bambuna.podcastaddict/files/podcast/エッジのたたないポッドキャスト
    /storage/sdcard1/Android/data/com.bambuna.podcastaddict/files/podcast/エッジのたたないポッドキャスト/MzoRbgzFVe_3248.mp3
    Finished scanning 2 file(s)
    $ termux-media-player info
    No track currently!
    
  • termux-microphone-record

    録音をする.出力ファイル形式は3GPPのよう

    $ termux-microphone-record -h
    Usage: termux-microphone-record [args]
    Record using microphone on your device
    
    -h           Shows this help
    -d           Start recording w/ defaults
    -f <file>    Start recording to specific file
    -l <limit>   Start recording w/ specified limit (in seconds)
    -i           Get info about current recording
    -q           Quits recording
    $ termux-microphone-record -d -f termux-record.mp3 -l 10
    Recording started: /data/data/com.termux/files/home/termux-record 
    Max Duration: 00:10
    $ termux-microphone-record -i
    {
      "isRecording": true,
      "outputFile": "\/data\/data\/com.termux\/files\/home\/termux-record"
    }
    $ termux-microphone-record -i
    {
      "isRecording": false
    }
    file ./termux-record
    ./termux-record: ISO Media, MPEG v4 system, 3GPP
    $ mv ./termux-record ./termux-record.3gpp
    $ termux-media-player play ./termux-record.3gpp
    Now Playing: termux-record.3gpp
    
  • termux-notification

    通知を出力する.タイトル,メッセージ以外にもバイブレーションやサウンド,LEDなども操作できる.

    $ termux-notification -h
    Usage: termux-notification [options]
    Display a system notification. Context text is read from stdin or specified using --content.
      --action action          action to execute when pressing the notification
      --button1 text           text to show on the first notification button
      --button1-action action  action to execute on the first notification button
      --button2 text           text to show on the second notification button
      --button2-action action  action to execute on the second notification button
      --button3 text           text to show on the third notification button
      --button3-action action  action to execute on the third notification button
      --content content        content to show in the notification. Read from stdin not specified here.
      --id id                  notification id (will overwrite any previous notification with the same id)
      --led-color rrggbb       color of the blinking led as RRGGBB (default: none)
      --led-on milliseconds    number of milliseconds for the LED to be on while it's flashing (default: 800)
      --led-off milliseconds   number of milliseconds for the LED to be off while it's flashing (default: 800)
      --on-delete action       action to execute when the the notification is cleared
      --priority prio          notification priority (high/low/max/min/default)
      --sound                  play a sound with the notification
      --title title            notification title to show
      --vibrate pattern        vibrate pattern, comma separated as in 500,1000,200
    $ termux-notification --title hoge --content fuga
    

    Screenshot_2018-06-21-00-54-59

  • termux-notification-remove

    termux-notification -idで指定したidのメッセージを削除する.

    $ termux-notification-remove -h
    Usage: termux-notification-remove notification-id
    Remove a notification previously shown with termux-notification --id.
    $ termux-notification --content hoge --id tm01
    $ termux-notification-remove tm01
    
  • termux-sensor

    センサーの値を取得する.センサーの値は定期的に表示される(既定値は多分1秒間隔)

    $ termux-sensor -h
    Usage: termux-sensor
    Get information about types of sensors as well as live data
      -h, help           Show this help
      -a, all            Listen to all sensors (WARNING! may have battery impact)
      -c, cleanup        Perform cleanup (release sensor resources)
      -l, list           Show list of available sensors
      -s, sensors [,,,]  Sensors to listen to (can contain just partial name)
      -d, delay [ms]     Delay time in milliseconds before receiving new sensor update
    $ termux-sensor -l
    {
      "sensors": [
        "BMA2X2 Accelerometer\/Temperature\/Double-tap",
        "AK8963 Magnetometer",
        "AK8963 Magnetometer Uncalibrated",
        "BMG160 Gyroscope",
        "BMG160 Gyroscope Uncalibrated",
        "APDS-9930\/QPDS-T930 Proximity & Light",
        "APDS-9930\/QPDS-T930 Proximity & Light",
        "Gravity",
        "Linear Acceleration",
        "Rotation Vector",
        "Step Detector",
        "Step Counter",
        "Significant Motion Detector",
        "Game Rotation Vector",
        "GeoMagnetic Rotation Vector",
        "Orientation"
      ]
    }
    $ termux-sensor -s "BMA2X2 Accelerometer\/Temperature\/Double-tap"
    No valid sensors were registered!
    $ termux-sensor -s "AK8963 Magnetometer"
    {
      "AK8963 Magnetometer": {
        "values": [
          -11.248207092285156,
          -37.157630920410156,
          23.89850616455078
        ]
      }
    }
    {
      "AK8963 Magnetometer": {
        "values": [
          16.16058349609375,
          -33.7738037109375,
          -13.971900939941406
        ]
      }
    }
    {
      "AK8963 Magnetometer": {
        "values": [
          3.6207199096679688,
          -38.532447814941406,
          -17.789649963378906
        ]
      }
    }
    ^CCaught interrupt.. Finishing...
    Performing sensor cleanup
    Sensor cleanup successful!
    $ termux-sensor -s "AK8963 Magnetometer Uncalibrated"
    {
      "AK8963 Magnetometer Uncalibrated": {
        "values": [
          -18.68438720703125,
          -71.844482421875,
          195.37200927734375,
          -26.05126953125,
          -30.462646484375,
          221.81549072265625
        ]
      }
    }
    {
      "AK8963 Magnetometer Uncalibrated": {
        "values": [
          -18.6492919921875,
          -70.87860107421875,
          196.197509765625,
          -26.05126953125,
          -30.462646484375,
          221.81549072265625
        ]
      }
    }
    ^CCaught interrupt.. Finishing...
    Performing sensor cleanup
    Sensor cleanup successful!
    $ termux-sensor -s "BMG160 Gyroscope"
    {
      "BMG160 Gyroscope": {
        "values": [
          8.544921875E-4,
          8.087158203125E-4,
          8.544921875E-4
        ]
      }
    }
    ^CCaught interrupt.. Finishing...
    Performing sensor cleanup
    Sensor cleanup successful!
    $ termux-sensor -s "BMG160 Gyroscope Uncalibrated"
    {
      "BMG160 Gyroscope Uncalibrated": {
        "values": [
          -0.006317138671875,
          0.002044677734375,
          0,
          -0.006103517021983862,
          0.0012359619140625,
          -8.544921875E-4
        ]
      }
    }
    ^CCaught interrupt.. Finishing...
    Performing sensor cleanup
    Sensor cleanup successful!
    $ termux-sensor -s "APDS-9930\/QPDS-T930 Proximity & Light"
    No valid sensors were registered!
    $ termux-sensor -s "Gravity"
    {
      "Gravity": {
        "values": [
          1.4136531352996826,
          -1.045373558998108,
          9.647754669189453
        ]
      }
    }
    ^CCaught interrupt.. Finishing...
    Performing sensor cleanup
    Sensor cleanup successful!
    $ termux-sensor -s "Linear Acceleration"
    {
      "Linear Acceleration": {
        "values": [
          -0.0018668174743652344,
          0.005246162414550781,
          0.001544952392578125
        ]
      }
    }
    ^CCaught interrupt.. Finishing...
    Performing sensor cleanup
    Sensor cleanup successful!
    $ termux-sensor -s "Rotation Vector"
    {
      "Rotation Vector": {
        "values": [
          0.07332251220941544,
          -0.0574394166469574,
          0.9877411723136902,
          0.12526708841323853,
          0.1745329201221466
        ]
      }
    }
    ^CCaught interrupt.. Finishing...
    Performing sensor cleanup
    Sensor cleanup successful!
    $ termux-sensor -s "Step Detector"
    {}
    ^CCaught interrupt.. Finishing...
    Performing sensor cleanup
    Sensor cleanup successful!
    $ termux-sensor -s "Step Counter"
    {
      "Step Counter": {
        "values": [
          0
        ]
      }
    }
    ^CCaught interrupt.. Finishing...
    Performing sensor cleanup
    Sensor cleanup successful!
    $ termux-sensor -s "Significant Motion Detector"
    {}
    {}
    ^CCaught interrupt.. Finishing...
    Performing sensor cleanup
    Sensor cleanup successful!
    $ termux-sensor -s "Game Rotation Vector"
    {
      "Game Rotation Vector": {
        "values": [
          -0.04727154225111008,
          -0.08051935583353043,
          0.005690218415111303,
          0.9956152439117432
        ]
      }
    }
    ^CCaught interrupt.. Finishing...
    Performing sensor cleanup
    Sensor cleanup successful!
    $ termux-sensor -s "GeoMagnetic Rotation Vector"
    {
      "GeoMagnetic Rotation Vector": {
        "values": [
          0.07260913401842117,
          -0.05879773199558258,
          0.9851652383804321,
          0.14394499361515045,
          0.1745329201221466
        ]
      }
    }
    ^CCaught interrupt.. Finishing...
    Performing sensor cleanup
    Sensor cleanup successful!
    $ termux-sensor -s "Orientation"
    {
      "Orientation": {
        "values": [
          194.80770874023438,
          5.517017364501953,
          9.214399337768555
        ]
      }
    }
    ^CCaught interrupt.. Finishing...
    Performing sensor cleanup
    Sensor cleanup successful!
    
  • termux-share

    引数に指定されたファイルを共有する.

    $ termux-share -h
    Usage: termux-share [-a action] [-c content-type] [-d] [-t title] [file]
    Share a file specified as argument or the text received on stdin if no file argument is given.
      -a action        which action to performed on the shared content:
                         edit/send/view (default:view)
      -c content-type  content-type to use (default: guessed from file extension,
                         text/plain for stdin)
      -d               share to the default receiver if one is selected
                         instead of showing a chooser
      -t title         title to use for shared content (default: shared file name)
    $ termux-share photo.jpg 
    
  • termux-sms-inbox

    受信済のSMSメッセージを読み込む.(未確認.SIMなし端末で試したら0件表示された)

    $ termux-sms-inbox -h
    Usage: termux-sms-inbox [-d] [-l limit] [-n] [-o offset]
    List received SMS messages.
      -d         show dates when messages were created
      -l limit   offset in sms list (default: 10)
      -n         show phone numbers
      -o offset  offset in sms list (default: 0)
    $ termux-sms-inbox
    
  • termux-sms-send

    smsメッセージを送信する.(未確認)

    $ termux-sms-send -h
    Usage: termux-sms-send -n number[,number2,number3,...] [text]
    Send a SMS message to the specified recipient number(s). The text to send is either supplied as arguments or read from stdin if no arguments are given.
      -n number(s)  recipient number(s) - separate multiple numbers by commas
    $ termux-sms-send -n 電話番号 message
    
  • termux-speech-to-text

    音声認識した結果を表示する.端末上では空行しか見えないがodに流すと文字列が帰っているのが解る.多分英語のみ?

    $ termux-speech-to-text -h
    Usage: termux-speech-to-text
    Converts speech to text, sending partial matches to stdout.
    $ termux-speech-to-text


    $ termux-speech-to-text|od -xc
    0000000  \n  \n  \n   H   u   d   l  \n
            0a0a 480a 6475 0a6c
    0000010
    
  • termux-storage-get

    システムに指定したファイルを渡して開く?反応がない.

    $ termux-storage-get -h
    Usage: termux-storage-get output-file
    Request a file from the system and output it to the specified file.
    $ termux-storage-get photo.jpg 
    
  • termux-telephony-call

    指定した番号に電話を掛ける(mobile回線は未確認だが,電話のみでもアプリ選択画面にはなるのでWi-FiのみでもSIPなどで電話することは多分可能)

    $ termux-telephony-call -h
    Usage: termux-telephony-call <number>
    Call a telephony number.
    $ termux-telephony-call 電話番号
    
  • termux-telephony-cellinfo

    電話基地局情報を取得?

    $ termux-telephony-cellinfo -h
    Usage: termux-telephony-cellinfo
    Get information about all observed cell information from all radios on the device including the primary and neighboring cells.
    $ termux-telephony-cellinfo
    [
      {
        "type": "wcdma",
        "registered": true,
        "asu": 6,
        "dbm": -101,
        "level": 2,
        "cid": 249053510,
        "lac": 25994,
        "mcc": 440,
        "mnc": 10,
        "psc": 33
      }
    ]


  • termux-telephony-deviceinfo

    テレフォニーデバイス情報を取得?

    $ termux-telephony-deviceinfo -h
    Usage: termux-telephony-deviceinfo
    Get information about the telephony device.
    $ termux-telephony-deviceinfo
    {
      "data_activity": "none",
      "data_state": "disconnected",
      "device_id": "357931051XXXXXXX",
      "device_software_version": "81",
      "phone_type": "gsm",
      "network_operator": "",
      "network_operator_name": "",
      "network_country_iso": "",
      "network_type": "unknown",
      "network_roaming": false,
      "sim_country_iso": "",
      "sim_operator": "",
      "sim_operator_name": "",
      "sim_serial_number": null,
      "sim_subscriber_id": null,
      "sim_state": "absent"
    }
    
  • termux-toast

    Toast(一時的なポップアップ)メッセージを表示する

    $ termux-toast -h
    Usage: termux-toast [-s] [text]
    Show text in a Toast (a transient popup). The text to show is either supplied as arguments or read from stdin if no arguments are given.
     -s  only show the toast for a short while
    $ termux-toast hello
    

    Screenshot_2018-06-21-01-57-40

  • termux-torch

    トーチをon/offする?手元の環境では反応がなかった.

    $ termux-torch -h
    Illegal parameter: -h
    Usage: termux-torch [on | off]
    Toggle LED Torch on device
    $ termux-torch on
    ^C
    
  • termux-tts-engines

    テキスト読み上げエンジン(tts)の一覧を表示する

    $ termux-tts-engines -h
    Usage: termux-tts-engines
    Get information about the available text-to-speech (TTS) engines. The name of an engine may be given to the termux-tts-speak command using the -e option.
    $ termux-tts-engines
    [
      {
        "name": "com.google.android.tts",
        "label": "Googleテキスト読み上げエンジン",
        "default": false
      },
      {
        "name": "jp.kddilabs.n2tts",
        "label": "KDDILABS N2 TTS",
        "default": true
      }
    ]
    
  • termux-tts-speak

    テキスト読み上げを行う.日本語に対応したttsであれば日本語も問題ない.標準入力からも受け付けるので記事や小説の読み上げも簡単.

    $ termux-tts-speak こんにちは
    $ echo '吾輩は猫である' | termux-tts-speak
    $ w3m -dump https://www.aozora.gr.jp/cards/000148/files/789_14547.html | termux-tts-speak
    
  • termux-vibrate

    バイブレートを実行.長さの指定やサイレントモードでも強行するモードもある.

    $ termux-vibrate -h
    Usage: termux-vibrate [-d duration] [-f]
    Vibrate the device.
      -d duration  the duration to vibrate in ms (default:1000)
      -f           force vibration even in silent mode
    $ termux-vibrate
    
  • termux-volume
    ボリュームの変更.手元の環境では0〜15で数字が大きいほど音量が大きくなった.16以上を指定しても15と同じ動きになった.

    $ termux-volume -h
    Invalid argument count
    Usage: termux-volume stream volume
    Change volume of audio stream
    Valid audio streams are: alarm, music, notification, ring, system, call
    Call w/o arguments to show information about each audio stream
    $ termux-volume music 5
    
  • termux-wallpaper

    壁紙を設定.位置合わせや切り抜き指定は出来ない.-uが便利.

    $ termux-wallpaper -h
    Change wallpaper on your device
    
    Usage: termux-wallpaper cmd [args]
    -h         show this help
    -f <file>  set wallpaper from file
    -u <url>   set wallpaper from url resource
    -l         set wallpaper for lockscreen (Nougat and later)
    $ termux-wallpaper -u https://www.nasa.gov/sites/default/files/styles/full_width_feature/public/thumbnails/image/pia22422.jpg
    Wallpaper set successfully!
    
  • termux-wifi-connectioninfo

    Wi-Fi接続情報を表示.

    $ termux-wifi-connectioninfo -h
    Usage: termux-wifi-connectioninfo
    Get information about the current wifi connection.
    $ termux-wifi-connectioninfo
    {
      "bssid": "10:6f:3f:XX:XX:XX",
      "frequency_mhz": 2462,
      "ip": "192.168.2.211",
      "link_speed_mbps": 54,
      "mac_address": "68:76:4f:XX:XX:XX",
      "network_id": 0,
      "rssi": -51,
      "ssid": "home-ap",
      "ssid_hidden": false,
      "supplicant_state": "COMPLETED"
    }
    
  • termux-wifi-enable

    Wi-Fiの有効無効設定.

    $ termux-wifi-enable -h
    Usage: termux-wifi-enable [true | false]
    Toggle Wi-Fi On/Off
    $ termux-wifi-enable false
    
    $ termux-wifi-enable true
    
    
  • termux-wifi-scaninfo

    Wi-Fiスキャン結果を表示.

    $ termux-wifi-scaninfo -h
    Usage: termux-wifi-scaninfo
    Get information about the last wifi scan.
    $ termux-wifi-scaninfo
    [
      {
        "bssid": "12:6f:3f:XX:XX:XX",
        "frequency_mhz": 2462,
        "rssi": -55,
        "ssid": "home-guest",
        "timestamp": 2978153233
      },
      {
        "bssid": "10:6f:3f:XX:XX:XX",
        "frequency_mhz": 2462,
        "rssi": -54,
        "ssid": "home-ap",
        "timestamp": 2978153243
      },
      {
        "bssid": "10:6f:3f:XX:XX:XX",
        "frequency_mhz": 2447,
        "rssi": -78,
        "ssid": "matohara",
        "timestamp": 2978153249
      }
    ]
    

Androidアプリケーションを作成しなくてもちょっとしたことならこのAPIの組み合わせで遊ぶことができそうです.(bash+Zenityみたいな?ちょっとちがうか)
Termux:Task/Boot等と組み合わせると更に活用の幅は広がりそうです.(未確認)

Android端末にTermux + Dropbearでssh login

TermuxはAndroid上でLinux環境が構築できる独自パッケージシステムなアプリケーションです.端末ソフトも同梱されています.Termux-apiを使うとshellでAndroidの操作が出来てちょっと面白いのですが,Androidのタッチパネルで文字を打つのが面倒.リモート操作したいのでsshdが動かないか試してみました.

パッケージを検索してみます.定番のOpenSSHとDropbearが使えそうです.

$ pkg search ssh
Hit:1 https://termux.net stable InRelease
Reading package lists... Done
Building dependency tree       
Reading state information... Done
All packages are up to date.
Sorting... Done
Full Text Search... Done
autossh/stable 1.4f arm
  Automatically restart SSH sessions and tunnels

corkscrew/stable 2.0-1 arm
  A tool for tunneling SSH through HTTP proxies

dropbear/stable,now 2018.76-1 arm [installed]
  Small SSH server and client

libssh/stable 0.7.5-1 arm
  Tiny C SSH library

libssh-dev/stable 0.7.5-1 arm
  Development files for libssh

openssh/stable 7.7p1-2 arm
  Secure shell for logging into a remote machine

sshpass/stable 1.06 arm
  Noninteractive ssh password provider

今回は操作ができればいいので消費リソースの少ないDropbearを選択しました.

$ pkg install dropbear
$ dropbear -h
Dropbear server v2018.76 https://matt.ucc.asn.au/dropbear/dropbear.html
Usage: dropbear [options]
-b bannerfile   Display the contents of bannerfile before user login
                (default: none)
-r keyfile  Specify hostkeys (repeatable)
                defaults: 
                dss /data/data/com.termux/files/usr/etc/dropbear/dropbear_dss_host_key
                rsa /data/data/com.termux/files/usr/etc/dropbear/dropbear_rsa_host_key
                ecdsa /data/data/com.termux/files/usr/etc/dropbear/dropbear_ecdsa_host_key
-R              Create hostkeys as required
-F              Don't fork into background
(Syslog support not compiled in, using stderr)
-w              Disallow root logins
-G              Restrict logins to members of specified group
-T              Maximum authentication tries (default 10)
-j              Disable local port forwarding
-k              Disable remote port forwarding
-a              Allow connections to forwarded ports from any host
-c command      Force executed command
-p [address:]port
                Listen on specified tcp port (and optionally address),
                up to 10 can be specified
                (default port is 8022 if none specified)
-P PidFile      Create pid file PidFile
                (default /data/data/com.termux/files/usr/var/run/dropbear.pid)
-i              Start for inetd
-W <receive_window_buffer> (default 24576, larger may be faster, max 1MB)
-K <keepalive>  (0 is never, default 0, in seconds)
-I <idle_timeout>  (0 is never, default 0, in seconds)
-V    Version

鍵を用意します.普通に~/.ssh/authorized_keysに公開鍵を登録すれば良いようです.PCで作成した鍵ペアの公開鍵を登録しました.

$ cd && pwd
/data/data/com.termux/files/home
$ ls -lA ~/.ssh
total 4
-rw-------    1 u0_a235  u0_a235        170 Jun 20 03:58 authorized_keys

sshデーモンを起動します.オプションは適当でポート番号を2222番にしています.

$ dropbear -w -T 2 -j -k -p 2222 -I 600

Androidのipアドレスを確認して,

$ ip r
default via 192.168.2.1 dev wlan0  metric 322 
100.93.0.128/26 dev rmnet0  proto kernel  scope link  src 100.93.0.160 
192.168.2.0/24 dev wlan0  proto kernel  scope link  src 192.168.2.211  metric 322

PCからこんな感じで接続してみると繋がりました!

$ ssh u0_a235@192.168.2.211 -p 2222 -i ~/.ssh/id_ed25519_termux

これで操作が楽に&端末の結果を保存しやすくなりました.

追記)
Dropbearを止める

$ pgrep dropbear
10925
10958
$ pkill dropbear