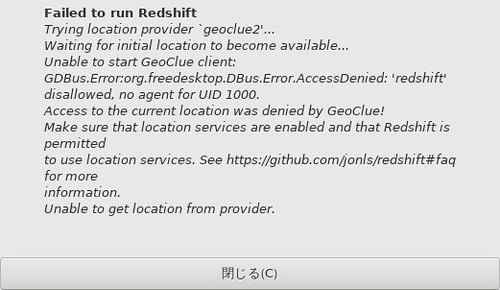
Screenfetch的な情報表示コマンドのNeofetch

Screenfetch的な情報表示コマンドのNeofetch

よくデスクトップのキャプチャを取得するときに表示されているScreenfetchコマンドというものがあります.システムの情報とアスキーアートを素敵に表示してくれます. これににたものでNetfetchというものを見かけたので試してみました.こちらは画像も扱えるようです.

導入

以下のページに各種環境への導入方法が書かれています.

Debian sid/stretchにはパッケージがあるようなことが書かれていますが,

Neofetch is in Debian Unstable/Stretch's official repositories.

今はsidのみのようです.

ということでひとまずstretchではこんな感じで導入しました.

$ #-- /etc/apt/sources.list.d/neofetch を作る
$ sudo apt edit-sources neofetch
$ cat /etc/apt/sources.list.d/neofetch.list
deb http://dl.bintray.com/dawidd6/neofetch jessie main
$ #-- 鍵のインポート
$ wget "https://bintray.com/user/downloadSubjectPublicKey?username=bintray" -O Release-neofetch.key
$ gpg Release-neofetch.key
pub   rsa4096 2015-02-17 [SC]
      8756C4F765C9AC3CB6B85D62379CE192D401AB61
uid           Bintray (by JFrog) <bintray@bintray.com>
sub   rsa4096 2015-02-17 [E]
$ sudo apt-key add Release-neofetch.key
$ rm Release-neofetch.key
$ #-- pkg情報更新&pkg導入
$ sudo apt update
$ sudo apt install neofetch

早速実行

$ neofetch --help

    NEOFETCH

    USAGE: neofetch --option "value" --option "value"

    NOTE: There's also a config option for each flag below.

    Info:
    --disable infoname          Allows you to disable an info line from appearing
                                in the output.
                                NOTE: You can supply multiple args. eg.
                                'neofetch --disable cpu gpu disk shell'
                                NOTE: The arguments must all be lowercase.
    --os_arch on/off            Hide/Show OS architecture.
    --speed_type type           Change the type of cpu speed to display.
                                Possible values: current, min, max, bios,
                                scaling_current, scaling_min, scaling_max
                                NOTE: This only support Linux with cpufreq.
    --cpu_shorthand type        Shorten the output of CPU
                                Possible values: name, speed, tiny, on, off
    --cpu_cores type            Whether or not to display the number of CPU cores
                                Takes: logical, physical, off
                                NOTE: 'physical' doesn't work on BSD.
    --cpu_speed on/off          Hide/Show cpu speed.
    --cpu_temp on/off           Hide/Show cpu temperature.
                                NOTE: This only works on Linux and BSD.
                                NOTE: For FreeBSD-based systems, you need to enable coretemp
                                      kernel module.
    --distro_shorthand on/off   Shorten the output of distro (tiny, on, off)
                                NOTE: This option won't work in Windows (Cygwin)
    --kernel_shorthand on/off   Shorten the output of kernel
                                NOTE: This option won't work in BSDs (except PacBSD and PC-BSD)
    --uptime_shorthand on/off   Shorten the output of uptime (tiny, on, off)
    --refresh_rate on/off       Whether to display the refresh rate of each monitor
                                Unsupported on Windows
    --gpu_brand on/off          Enable/Disable GPU brand in output. (AMD/NVIDIA/Intel)
    --gtk_shorthand on/off      Shorten output of gtk theme/icons
    --gtk2 on/off               Enable/Disable gtk2 theme/icons output
    --gtk3 on/off               Enable/Disable gtk3 theme/icons output
    --shell_path on/off         Enable/Disable showing $SHELL path
    --shell_version on/off      Enable/Disable showing $SHELL version
    --ip_host url               Url to query for public IP
    --song_shorthand on/off     Print the Artist/Title on seperate lines
    --birthday_shorthand on/off Shorten the output of birthday
    --birthday_time on/off      Enable/Disable showing the time in birthday output
    --birthday_format format    Format the birthday output. (Uses 'date' cmd format)

    Text Formatting:
    --colors x x x x x x        Changes the text colors in this order:
                                title, @, underline, subtitle, colon, info
    --underline on/off          Enable/Disable the underline.
    --underline_char char       Character to use when underlining title
    --bold on/off               Enable/Disable bold text

    Color Blocks:
    --color_blocks on/off       Enable/Disable the color blocks
    --block_width num           Width of color blocks in spaces
    --block_height num          Height of color blocks in lines
    --block_range start end     Range of colors to print as blocks

    Bars:
    --bar_char 'elapsed char' 'total char'
                                Characters to use when drawing bars.
    --bar_border on/off         Whether or not to surround the bar with '[]'
    --bar_length num            Length in spaces to make the bars.
    --bar_colors num num        Colors to make the bar.
                                Set in this order: elapsed, total
    --cpu_display mode          Bar mode.
                                Takes: bar, infobar, barinfo, off
    --memory_display mode       Bar mode.
                                Takes: bar, infobar, barinfo, off
    --battery_display mode      Bar mode.
                                Takes: bar, infobar, barinfo, off
    --disk_display mode         Bar mode.
                                Takes: bar, infobar, barinfo, off

    Image:
    --image type                Image source. Where and what image we display.
                                Possible values: wall, ascii,
                                /path/to/img, /path/to/dir/, off
    --size 00px | --size 00%    How to size the image.
                                Possible values: auto, 00px, 00%, none
    --crop_mode mode            Which crop mode to use
                                Takes the values: normal, fit, fill
    --crop_offset value         Change the crop offset for normal mode.
                                Possible values: northwest, north, northeast,
                                west, center, east, southwest, south, southeast

    --xoffset px                How close the image will be to the left edge of the
                                window. This only works with w3m.
    --yoffset px                How close the image will be to the top edge of the
                                window. This only works with w3m.
    --bg_color color            Background color to display behind transparent image.
                                This only works with w3m.
    --gap num                   Gap between image and text.
                                NOTE: --gap can take a negative value which will
                                move the text closer to the left side.
    --clean                     Delete cached files and thumbnails.

    Ascii:
    --ascii value               Where to get the ascii from, Possible values:
                                distro, /path/to/ascii
    --ascii_colors x x x x x x  Colors to print the ascii art
    --ascii_distro distro       Which Distro's ascii art to print
                                NOTE: Arch and Ubuntu have 'old' logo varients.
                                NOTE: Use 'arch_old' or 'ubuntu_old' to use the old logos.
                                NOTE: Ubuntu has flavor varients.
                                NOTE: Change this to 'Lubuntu', 'Xubuntu', 'Ubuntu-GNOME'
                                or 'Ubuntu-Budgie' to use the flavors.
    --ascii_logo_size           Size of ascii logo.
                                Supported distros: Arch, Gentoo, Crux, OpenBSD.
    --ascii_bold on/off         Whether or not to bold the ascii logo.
    --logo | -L                 Hide the info text and only show the ascii logo.

    Screenshot:
    --scrot | -s /path/to/img   Take a screenshot, if path is left empty the screen-
                                shot function will use $scrot_dir and $scrot_name.
    --upload | -su /pth/t/img   Same as --scrot but uploads the scrot to a website.
    --image_host                Website to upload scrots to. Takes: imgur, teknik
    --scrot_cmd cmd             Screenshot program to launch

    Other:
    --config /path/to/config    Specify a path to a custom config file
    --config none               Launch the script without a config file
    --help                      Print this text and exit
    --version                   Show neofetch version
    -v                          Display error messages.
    -vv                         Display a verbose log for error reporting.

オプション結構多いです. とりあえず素で実行.

20161207_05:12:12-5188

情報もScreenfetchより増えています.

20161207_05:12:20-9093

次は画像を指定してみます.画像サイズが大きかったので25%に縮小もしています. 楽しい :)

20161207_05:12:35-3963

20161207_06:12:30-16979

画像の表示については環境によってうまく行く行かないがあるようです.うまく表示されない場合は以下のWikiを参照すると良さそうです.

マルチプラットホーム&スライドに特化したMarkdown WriterのMarpを試す

最近勉強会の発表資料はスライドにせずにMarkdownやAsciidocで書いてhtmlやpdfに書き出してました.これをSlideshareとかに置いているのですが,スライド形式に比べてアクセスが1桁少ないです. Markdownでスライドにする方法はいろいろあるのですが,1ページの分量がまちまちになってはみ出したりと言ったことをよくやってしまいあまりつかっていませんでした.

そんなところにプレゼンテーション向けのMarkdown Writerがあったので試してみました.

マルチプラットホームでElectron製です.PDFファイルへの書き出しも可能です.

雰囲気は以下の画像でだいたいわかるんじゃないかと思います.

https://yhatt.github.io/marp/images/marp-cast.gif

https://yhatt.github.io/marp/images/marp-cast.gif

左ペインでMarkdownを書いて右ページにプレビューが表示されます. プレビューは3種類選べますが,"1:1 slide/Slide List"のどちらかだとスライド形式でプレビューが表示されるのでレイアウトを確認しながら書くことができます.

試しにちょっと書いてみました. するとMarpのプレビュー,Evinceでは問題なかったのですが,SlideshareにPDFをアップロードすると背景画像やフッターが上下反転しています……. 試しにSpekerdeckにもアップロードしてみましたがこちらは問題なし. 恐らくSlideshareの問題ではないかと思います.

Electron製ということで降るmのマシンでは重いかなと思っていたのですが,Core2Duoのマシンでも試してみましたが一気にスクロールとかしなければ重く感じるところはなく実用範囲内に感じました.

Mumbleでリモート会議

先週ですが,FSIJ 月例会に参加していました. といっても東京に出て行ったわけではなくネットワーク開催だったので家からの参加です.

ということでMumbleというソフトウェアで音声チャット + Etherpad(ウェブブラウザベース)でテキスト交換という環境でした. Mumbleを前もって試していればよかったのだけど直前に入れてなかなか参加できず途中からの参加になりましたorz~

MumbleはDebian stretch amd64環境ではパッケージが存在する( mumble )のでこれを導入するだけでした.マルチプラットホームで各種環境向けにも存在して,Androidなどでも利用できるようです. – Mumble, the open source VoIP solutionPlumble – Mumble VOIP (Free) – Google Play の Android アプリPlumble – Mumble VOIP – Google Play の Android アプリ

今回使用機器は以下のような感じ.でしたが,スピーカーは試行錯誤している時に繋いだもので後で試すと本体のスピーカーで大丈夫でした.

  • PC : Thinkpad X220(Debian stretch amd64)
  • マイク : 3.5mmジャックに直接挿せるもの(型番不明)
  • スピーカー : ELECOM LBT-SPTR01AV(Bluetooth)

このときMumble利用時に嵌ったところをメモしておきます. – ヘッドホンとマイクが1つの端子の端末でマイクを繋ぐとヘッドホンもそちらを向いてしまって音が出なかった – Bluetothヘッドセットを繋ぐとそちらから音が出るようになったがマイクがうまく働かない – PulseAudio Volume Control (pavucontrol)で見るとマイクがミュートになっていたので解除してMumbleに割り当て – 伝送方式を"push to talk"にしたがpushがわからなかった -> ショートカットで適当なキーに割り当て(Mumble非アクティブ時も有効)

  • その他
    • Awesome WM環境ではMumbleが最小化してしまうと窓を復帰させる方法が今のところわからない.タスクトレイのアイコンをクリックしても出てこない.(Xfce4はアイコンクリックで出てくるよう)
    • 一回設定できればフォーカスがなくてもショートカットが効いて話せるのでとりあえず使えるけどチャットと誰が話しているかのアイコンの確認(唇アイコンが赤くなる)が出来ない(オーバーレイの設定でどうにかなりそう?)
    • アイコンを右クリックしてそのまま離すと丁度終了になってしまう…….
    • Mumbleの音声品質は16kbps/40kbps/72kbpsから選択可能(規定値は40k)
    • push to talkを使うとその時しか音声が飛ばないので周りの環境に左右されにくくて良い(キー入力の音や環境音が入りにくい)

最近はUstream.tv/Youtube Liveなどの動画配信やBBB(BigBlueButton)などの動画を使ったオンライン会議システムなどで中継ということが多いですが,手弁当の勉強会なんかだと回線などの問題でうまく行かなかったりすることが多いですが割り切って音声のみの中継にしてしまうのもありだなと感じました.

最近リモート参加した勉強会

形態素解析システムJUMAN++をちょっと試したメモ

京都大学 黒橋・河原研究室より2016-09-23にリリースされた新しい形態素解析システムだそうです.とりあえず手元の環境で動かしてみたのでそのメモです.

環境

Debian stretch amd64 / Ubuntu 16.10 amd64 で確認しました.どちらも以下の手順でOKでした.開発元ではCent OS 6.7で動作確認をしているようです.

build

必要なパッケージを導入してmake.

$ sudo apt install libboost-dev build-essential
$ wget http://lotus.kuee.kyoto-u.ac.jp/nl-resource/jumanpp/jumanpp-1.01.tar.xz
$ sha256sum jumanpp-1.01.tar.xz 0d587416a3eb7123638f9c1e30a649b72dfb483448839168dcb48be572c5919a  jumanpp-1.01.tar.xz
$ tar tvf ./jumanpp-1.01.tar.xz
$ tar xf ./jumanpp-1.01.tar.xz
$ ./configure --prefix=${HOME}/usr/local
$ make
$ make install

動作確認

適当に文章を入れてみたり.

$ ~/usr/local/bin/jumanpp
こんにちはJUMANPP++
こんにち こんにち こんにち 名詞 6 時相名詞 10 * 0 * 0 "代表表記:今日/こんにち カテゴリ:時間"
は は は 助詞 9 副助詞 2 * 0 * 0 NIL
JUMANPP JUMANPP JUMANPP 未定義語 15 その他 1 * 0 * 0 "品詞推定:名詞"
+ + + 未定義語 15 その他 1 * 0 * 0 "品詞推定:名詞"
EOS

青空文庫の古典を流し込んでみたり.

$ wget -O - http://www.aozora.gr.jp/cards/000160/files/2617_ruby_23916.zip | zcat | iconv -f SJIS -t UTF-8 - | ~/usr/local/bin/jumanpp
三十 三十 三十 名詞 6 数詞 7 * 0 * 0 "カテゴリ:数量"
年 ねん 年 接尾辞 14 名詞性名詞助数辞 3 * 0 * 0 "代表表記:年/ねん 準内容語 カテゴリ:時間"
後 ご 後 接尾辞 14 名詞性名詞接尾辞 2 * 0 * 0 "代表表記:後/ご 内容語"
の の の 助詞 9 接続助詞 3 * 0 * 0 NIL
世界 せかい 世界 名詞 6 普通名詞 1 * 0 * 0 "代表表記:世界/せかい カテゴリ:場所-その他"
      :

古典とかよりTwitterとかのほうがいいかもしれない.

$ curl 'https://twitter.com/search?f=tweets&vertical=default&q=lang%3Aja%20near%3A%22%E6%97%A5%E6%9C%AC%22%20within%3A15mi&src=typd&lang=ja' | grep 'class="TweetTextSize  js-tweet-text tweet-text"' | lynx -stdin -dump -nolist | ~/usr/local/bin/jumanpp

ちなみにちょっと試したいだけであれば導入しなくても以下のページで試せます.ラティス表示も楽しい.

mind mappingアプリのFreeplaneを試す

FreeMindをDebian jessieに導入しようとしたらパッケージが見当たりません. 探してみるとメンテナンスされてないからjessie/sidから消されたようです.

We have Freeplane which is actively maintained and roughly equivalent in features.

でもFreeplaneというメンテされている似たものがあるよということでこれを試してみることにしました.

#ちなみにFreeMindのsiteを見るとstableのリリースが2013年で1.0.1.その後1.1.0-Beta1が2015年1.1.0-Beta2が2016年に出ていて,Debianでは0.9.0だったようです.

FreeplaneはどうもFreeMindのフォークのようです.見た目も使い勝手も似ています.JAVA製でマルチプラットホームなのも同じです.

導入はパッケージがあるのでそれを利用しました.

$ sudo apt install freeplane

起動ロゴ……何だろうこの虫?は.

20161005_01:10:30-30616

初回起動時にはWhats Newが表示されました.

20161005_01:10:09-30241

少し日本語が豆腐になってしまっている場所がありましたがフォントを日本語フォントに変更することで解決しました. 後はチュートリアルとかに目を通しておくと良さそうです.

チュートリアルなどのドキュメントは/usr/share/freeplane/doc/辺りにありました.

$ ls -1 /usr/share/freeplane/doc/*_ja.mm
/usr/share/freeplane/doc/freeplaneFunctions_ja.mm
/usr/share/freeplane/doc/freeplaneTutorial_ja.mm
/usr/share/freeplane/doc/freeplane_ja.mm

20161005_01:10:53-29876

20161005_01:10:09-28858

20161005_01:10:32-27112

未だそんなに使っていませんが,FreeMindと同じような操作性だし以前書いた.mmも読めるようなのでそのまま移行できそうです.

<追記>

Ubuntu 16.10 amd64(今は未だリリース前)にも入れてみましたが起動しませんでした.とりあえず本家から.zipを貰ってきて動かしています.一応報告はしてみました.

</追記>

byobu+screenでfunctionkeyを無効にする

機能覚えてないし遠いしたまに間違って押して混乱したりするので無効にしました.
Debian stretch amd64, Ubuntu 16.04 LTS amd64で確認.

$ vi ~/.byobu/keybindings

して

source $BYOBU_PREFIX/share/byobu/keybindings/common

の次の行頭で i して編集モードにした後
Ctrl+a !(aは設定してあるescape key)する.
するとこんなのが出てくるので,

:source /usr/share/byobu/keybindings/f-keys.screen

頭の : を消して

source /usr/share/byobu/keybindings/f-keys.screen.disable

を書いておく

保存して起動しなおして反映.

#viである必然性はないのでお好きなテキストエディタでどうぞ.
#tmuxの場合はこっち~/.byobu/keybindings.tmuxになるのかな?(それとも byobu-select-backend で切り替えるとファイル名入れ替わる?)

コマンドラインからGooglecastにcast出来るcastnowを試す

見つけたので試してみました

Debian stretch amd64, Ubuntu 16.04 LTS amd64で確認しています.

$HOME以下にPATH通してnpmで導入しています./usr/local以下で良ければnpm install castnow -gだけでいいかも.

$ sudo apt install npm nodejs-legacy
$ echo 'PATH="$PATH":$HOME/node_modules/.bin' >> ~/.bashrc
$ source ~/.bashrc
$ npm install castnow

入りましたがChromecastがみあたらない?

$ castnow --help
 
Usage: castnow [<media>, <media>, ...] [OPTIONS]
 
Option                  Meaning
--tomp4                 Convert file to mp4 during playback
--device <name>         The name of the Chromecast device that should be used
--address <ip>          The IP address or hostname of your Chromecast device
--subtitles <path/url>  Path or URL to an SRT or VTT file
--subtitle-scale <scale> Subtitle font scale
--subtitle-color <color> Subtitle font RGBA color
--myip <ip>             Your local IP address
--quiet                 No output
--peerflix-* <value>    Pass options to peerflix
--ffmpeg-* <value>      Pass options to ffmpeg
--type <type>           Explicitly set the mime-type (e.g. "video/mp4")
--bypass-srt-encoding   Disable automatic UTF-8 encoding of SRT subtitles
--seek <hh:mm:ss>       Seek to the specified time on start using the format hh:mm:ss or mm:ss
--loop                  Loop over playlist, or file, forever
--help                  This help screen
 
Player controls
 
Key                     Action
space                   Toggle between play and pause
m                       Toggle mute
up                      Volume Up
down                    Volume Down
left                    Seek backward
right                   Seek forward
n                       Next in playlist
s                       Stop playback
quit                    Quit
 
$ castnow
Error: device not found

名前解決が出来なかったようでipを指定するとcast出来ました.別のマシンでは通ったのでこのマシンがおかしいようです.

$ avahi-browse -a -t -l -r
+ wlp3s0 IPv6 x201s                                         Remote Disk Management local
+ wlp3s0 IPv4 Chromecast-KagoLUG                            _googlecast._tcp     local
= wlp3s0 IPv6 x201s                                         Remote Disk Management local
   hostname = [x201s.local]
   address = [fe80::222:faff:fe33:456a]
   port = [22]
   txt = []
= wlp3s0 IPv4 Chromecast-KagoLUG                            _googlecast._tcp     local
   hostname = [Chromecast-KagoLUG.local]
   address = [192.168.2.206]
   port = [8009]
   txt = ["rs=" "bs=FA8FCA59198D" "st=1" "ca=4101" "fn=Chromecast-KagoLUG" "ic=/setup/icon.png" "md=Chromecast" "ve=05" "rm=A652B47431F36207" "id=7c14aaaa62a6002dd95ba94814e5c5e0"]
$ castnow --address 192.168.2.206 http://commondatastorage.googleapis.com/gtv-videos-bucket/ED_1280.mp4
 
  State     : Playing....

パイプも使えるので色々応用できそうな気がします.
(最近Chromiumがamd64/i386しかなくなったようですが,これを使えば他のアーキテクチャでもスクリーンキャストもできそう?)

Android端末をLinuxのタッチパッド替わりにしたい(Bluetooth利用のBlink)

最近またポインティングデバイスにApple Wireless Trackpadを利用するようになりましたが持ち運びには少し嵩張ります.マウスを持ち運ぶのもかさばります.
Ubuntu TouchでHDMI接続時にタッチデバイスになるというのを見てAndroid端末をタッチデバイスにすることが出来るのでは?それなら荷物増え無いしいいかもと思って少し調べてみました.

BlinkはBluetooth接続かつPC側でデーモンを動かす必要があります.
先ずBluetoothペアリングをしておき,PC側でデーモンを導入します.

  • 必要パッケージの導入

$ sudo apt install bluez python-bluez xdotoolsudo apt-get install bluez python-bluez xdotool
  • デーモンの導入

$ git clone https://github.com/drpain/blink-server.git ~/.blink

以下のようにしてデーモンを起動するのですが,この記事を書いている時点でのDebian stretch testing amd64では以下のようなエラーとなります.

$ sudo ~/.blink/bluetooth_server.py
Traceback (most recent call last):
  File "/home/mk/.blink/bluetooth_server.py", line 25, in <module>
    profiles         = [ SERIAL_PORT_PROFILE ]
  File "/usr/lib/python2.7/dist-packages/bluetooth/bluez.py", line 176, in advertise_service
    raise BluetoothError (str (e))
bluetooth.btcommon.BluetoothError: (2, 'No such file or directory')

GuihubのHELPを参考に*/etc/bluetooth/main.conf*を以下のように修正します.

diff --git a/bluetooth/main.conf b/bluetooth/main.conf
index 372fd8c..2f7cc4a 100644
--- a/bluetooth/main.conf
+++ b/bluetooth/main.conf
@@ -64,6 +64,9 @@
 # 'false'.
 #FastConnectable = false

+# "drpain/blink-server: This is the server you would need to be able to run the Blink Android Application." https://github.com/drpain/blink-server
+DisablePlugins = pnat
+
 #[Policy]
 #
 # The ReconnectUUIDs defines the set of remote services that should try

設定を反映するためにbluetoothdを再起動してサーバを再起動します.

$ sudo service bluetooth restart

サーバは要rootのようです.
この状態でAndroid側からクライアントPCを選択して接続すればok.

$ sudo ~/.blink/bluetooth_server.py
READY FOR CONNECTIONS, RFCOMM channel 1
('INBOUND CONNECTION ', ('68:76:4F:3B:D1:E0', 1))
COMMAND RECEIVED [{"action":"mouse-move","x":null,"y":null}]
['xdotool', 'mousemove_relative', '--', 'None', 'None']
COMMAND RECEIVED [{"action":"mouse-move","x":-1,"y":0}]
['xdotool', 'mousemove_relative', '--', '-1', '0']
COMMAND RECEIVED [{"action":"mouse-move","x":0,"y":0}]
['xdotool', 'mousemove_relative', '0', '0']
COMMAND RECEIVED [{"action":"mouse-move","x":-1,"y":0}]
['xdotool', 'mousemove_relative', '--', '-1', '0']

上の方のモード切替スイッチをタップして規定の「Swipe Area」から「Mouse」にします.「Mouse Area」で操作するとxdotoolのログが大量に出つつ操作できます.

27629912281 e0ba729509 n
27094267013 3fb8577a76 n

操作は少し解りづらくてこんな感じです.

  • タップ→左クリック

  • タップ, ホールド, リリース → 右クリック

中クリックやドラッグは多分未実装で使えません.
カーソル移動はちらつきますがとりあえず使える感じです.

でも導入に要設定変更&要rootなのが面倒ですね.

awesomeとかでApple Wireless Trackpadを設定する

Bluetooth接続のApple Wireless Trackpadですが,GnomeとかだとBluetoothでペアリングした後こんな感じでGUIで設定できるのですが,

27082898093 594ed9ea4e n
27082898303 067a324e77 n
27414891970 2128414b0d n

awesomeだと効かないようです.ペアリングした後カーソル移動,2本指スクロール,右クリックはなどは動作するのですが,一番利用する左クリックが動作しません.

こいつはDynaptics driver用のコマンドのsynclientを使って設定内容の確認とアドホックな動作確認をします.
コマンドが存在しない場合 xserver-xorg-input-synaptics pkgを導入してください.
-l optionで設定項目の確認が出来ます.

$ synclient -l
Parameter settings:
    LeftEdge                = -2393
    RightEdge               = 2651
    TopEdge                 = -2030
    BottomEdge              = 2139
    FingerLow               = 70
    FingerHigh              = 75
    MaxTapTime              = 180
    MaxTapMove              = 346
    MaxDoubleTapTime        = 100
    SingleTapTimeout        = 180
    ClickTime               = 100
    EmulateMidButtonTime    = 0
    EmulateTwoFingerMinZ    = 100
    EmulateTwoFingerMinW    = 50
    VertScrollDelta         = 157
    HorizScrollDelta        = 157
    VertEdgeScroll          = 0
    HorizEdgeScroll         = 0
    CornerCoasting          = 0
    VertTwoFingerScroll     = 1
    HorizTwoFingerScroll    = 1
    MinSpeed                = 1
    MaxSpeed                = 1.75
    AccelFactor             = 0.0253743
    TouchpadOff             = 0
    LockedDrags             = 0
    LockedDragTimeout       = 5000
    RTCornerButton          = 0
    RBCornerButton          = 0
    LTCornerButton          = 0
    LBCornerButton          = 0
    TapButton1              = 0
    TapButton2              = 2
    TapButton3              = 3
    ClickFinger1            = 1
    ClickFinger2            = 3
    ClickFinger3            = 2
    CircularScrolling       = 1
    CircScrollDelta         = 0.1
    CircScrollTrigger       = 0
    CircularPad             = 0
    PalmDetect              = 1
    PalmMinWidth            = 10
    PalmMinZ                = 200
    CoastingSpeed           = 50
    CoastingFriction        = 50
    PressureMotionMinZ      = 30
    PressureMotionMaxZ      = 160
    PressureMotionMinFactor = 1
    PressureMotionMaxFactor = 1
    GrabEventDevice         = 0
    TapAndDragGesture       = 1
    AreaLeftEdge            = 0
    AreaRightEdge           = 0
    AreaTopEdge             = 0
    AreaBottomEdge          = 0
    HorizHysteresis         = 4
    VertHysteresis          = 4
    ClickPad                = 0
    RightButtonAreaLeft     = 0
    RightButtonAreaRight    = 0
    RightButtonAreaTop      = 0
    RightButtonAreaBottom   = 0
    MiddleButtonAreaLeft    = 0
    MiddleButtonAreaRight   = 0
    MiddleButtonAreaTop     = 0
    MiddleButtonAreaBottom  = 0

とりあえずタップの設定をしてみます.これでタップが出来るようになったら設定項目は当たりです.

$ synclient TapButton1=1
$ synclient -l|grep TapButton1
    TapButton1              = 1

設定項目が判ったら設定ファイルに書いておきます.
今回は /etc/X11/xorg.conf.d/21-apple-touchpad.conf にしました.
とりあえずタップの設定だけ以下のように設定しました.
ファイルの用意ができたらXの再起動を行います.awesomeの場合 Mod4 + Shift + q とかで一旦Xを終了してログインし直します.

Section "InputClass"
    Identifier "touchpad"
    Driver "synaptics"
    MatchIsTouchpad "on"
        Option "TapButton1" "1" # 1本指タップを左クリックに
EndSection

他の設定項目も同様に設定していきます.
現在こんな感じにしています.

Section "InputClass"
    Identifier "touchpad"
    Driver "synaptics"
    MatchIsTouchpad "on"
        Option "TapButton1" "1" # 1本指タップを左クリックに
        Option "TapButton2" "3" # 2本指タップを右クリックに
        Option "TapButton3" "2" # 3本指タップを中クリックに
        Option "VertTwoFingerScroll" "on"       # 縦スクロールを有効
        Option "HorizTwoFingerScroll" "on"      # 横スクロールを有効
        Option "PalmDetect" "1" # 手のひら検出
EndSection

今回Debian stretch testing amd64ですが他の環境でも同様に行けると思います.

$ screenfetch
         _,met$$$$$gg.           mk@x220
      ,g$$$$$$$$$$$$$$$P.        OS: Debian testing stretch
    ,g$$P""       """Y$$.".      Kernel: x86_64 Linux 4.5.0-2-amd64
   ,$$P'              `$$$.      Uptime: 1d 12h 8m
  ',$$P       ,ggs.     `$$b:    Packages: 4379
  `d$$'     ,$P"'   .    $$$     Shell: bash 4.3.42
   $$P      d$'     ,    $$P     Resolution: 1366x768
   $$:      $$.   -    ,d$$'     WM: Awesome
   $$\;      Y$b._   _,d$P'      WM Theme: awesome
   Y$$.    `.`"Y$$$$P"'          CPU: Intel Core i5-2540M CPU @ 3.3GHz
   `$$b      "-.__               GPU: Mesa DRI Intel(R) Sandybridge Mobile
    `Y$$                         RAM: 4288MiB / 15934MiB
     `Y$$.
       `$$b.
         `Y$$b.
            `"Y$b._
                `""""