ext4の暗号化fsを試してみる

Linux 4.1でext4の暗号化ファイルシステムが取り込まれているのに気づいたので少し試してみました.
cCryptFSやEncFSなどと同じようにファイル単位での暗号化です.前もって暗号化フラグを設定してあれば一般ユーザが勝手に暗号領域を作ることも可能でした.eCryptFSやEncFSのような使い方も可能そうです.恐らく速度はこちらのほうが速いでしょう(未確認).ただ,パスフレーズがわかってしまうと別のユーザからもマウント可能だしパーミッションがあれば読み書きも出来るので通常のファイルシステムと同様パーミッションの設定は必須ですね.
パーティション内全てを暗号化することは出来ないようなのでLUKS(dm-crypt)とは単純に空きかえることはできなさそうです.

そんなこんなでもともとAndroid向けということもあってPC/Serverではあまり使いみちが思いつかない感じです.(何かいい使い方ありそうだけど…….)

必要条件確認

  • Linux 4.1以上
$ uname -r
4.9.0-2-amd64
  • CONFIG_EXT4_ENCRYPTIONが有効
$ grep CONFIG_EXT4_ENCRYPTION /boot/config-`uname -r`
CONFIG_EXT4_ENCRYPTION=y
  • e2fsprogs 1.43以上
$ dpkg-query -W e2fsprogs
e2fsprogs       1.43.4-2
  • ブロックサイズが4k
$ sudo dumpe2fs /dev/loop0 | grep -i 'block size'
dumpe2fs 1.43.4 (31-Jan-2017)
Block size:               4096

必要なパッケージの導入

$ sudo apt install e2fsprogs keyutils util-linux coreutils mount

ファイルシステムの用意

今回は既存のファイルシステム内にディスクイメージを作成してそれを利用

  • 1GBのディスクイメージの作成
$ dd if=/dev/zero of=ext4-crypt.img seek=1073741824 bs=1 count=1
1+0 レコード入力
1+0 レコード出力
1 byte copied, 0.000118528 s, 8.4 kB/s
  • パーティションの作成
    primaryを1つ作成
$ /sbin/fdisk ext4-crypt.img

Welcome to fdisk (util-linux 2.29.2).
Changes will remain in memory only, until you decide to write them.
Be careful before using the write command.

Device does not contain a recognized partition table.
Created a new DOS disklabel with disk identifier 0xa25a3988.

Command (m for help): n
Partition type
   p   primary (0 primary, 0 extended, 4 free)
   e   extended (container for logical partitions)
Select (default p): p
Partition number (1-4, default 1): 
First sector (2048-2097151, default 2048): 
Last sector, +sectors or +size{K,M,G,T,P} (2048-2097151, default 2097151): 

Created a new partition 1 of type 'Linux' and of size 1023 MiB.

Command (m for help): w
The partition table has been altered.
Syncing disks.
  • ext4でフォーマット
$ /sbin/mkfs.ext4 ./ext4-crypt.img 
mke2fs 1.43.4 (31-Jan-2017)
Found a dos partition table in ./ext4-crypt.img
Proceed anyway? (y,N) y
Discarding device blocks: done                            
Creating filesystem with 262144 4k blocks and 65536 inodes
Filesystem UUID: dc44fd43-7d7a-4dfc-87f1-dc52410e2dd1
Superblock backups stored on blocks: 
        32768, 98304, 163840, 229376

Allocating group tables: done                            
Writing inode tables: done                            
Creating journal (8192 blocks): done
Writing superblocks and filesystem accounting information: done
  • マウント
$ sudo mount -o loop ./ext4-crypt.img /mnt
$ grep /mnt /etc/mtab 
/dev/loop0 /mnt ext4 rw,relatime,data=ordered 0 0
  • オーナー,グループの変更
$ sudo chown `id -u`.`id -g` /mnt
$ ls -la /mnt
合計 36
drwxr-xr-x 3 mk   mk    4096  4月  2 04:58 .
drwxr-xr-x 1 root root   248  3月 28 02:19 ..
drwx------ 2 root root 16384  4月  2 04:58 lost+found

ext4暗号化ファイルシステムの利用

  • ext4の暗号化フラグを設定
$ sudo tune2fs -O encrypt /dev/loop0
$ sudo dumpe2fs /dev/loop0 | grep -io encrypt
dumpe2fs 1.43.4 (31-Jan-2017)
encrypt
  • 鍵の生成とキーリングへの追加
$ /usr/sbin/e4crypt add_key
Enter passphrase (echo disabled): 
Added key with descriptor [07a3ce5a6ebf0396]
$ keyctl show
Session Keyring
1048296028 --alswrv   1000  1000  keyring: _ses
 615559430 --alsw-v   1000  1000   \_ logon: ext4:07a3ce5a6ebf0396

※パスフレーズの入力は1回だけで確認されないので初回は特に注意.利用しはじめる前にキーリングをクリアして登録し直してパスフレーズが正しいか確認しておく.

  • 暗号化ポリシーの設定

このとき対象ディレクトリが空ではない場合エラーとなる( Error [Directory not empty] setting policy. )ので注意.

マウントポイントにはlost+foundが存在するので必ずサブディレクトリ以下である必要がある.

$ mkdir /mnt/encryption
$ /usr/sbin/e4crypt set_policy 07a3ce5a6ebf0396 /mnt/encryption
Key with descriptor [07a3ce5a6ebf0396] applied to /mnt/encryption.

※鍵の生成とキーリングへの追加と暗号化ポリシーの設定は次のようにすることで一度に設定可能

$ /usr/sbin/e4crypt add_key /mnt/encryption
  • 暗号化ファイルシステム領域にファイルを作成
$ echo 'hello' > /mnt/encryption/test.txt
$ ls -la /mnt/encryption
合計 12
drwxr-xr-x 2 mk mk 4096  4月  2 05:07 .
drwxr-xr-x 4 mk mk 4096  4月  2 05:06 ..
-rw-r--r-- 1 mk mk    6  4月  2 05:07 test.txt
  • キーリングのクリア
$ sudo keyctl clear @s
$ sudo keyctl show
Session Keyring
1048296028 --alswrv   1000  1000  keyring: _ses

キーリングをクリアしただけではアクセスできる

$ ls -lA /mnt/encryption
合計 12
-rw-r--r-- 1 mk mk    6  4月  2 05:07 test.txt
  • アンマウントとマウントし直し

キーリングをクリアした状態でアンマウントすると暗号化された状態に戻る

$ sudo umount /mnt
$ sudo mount -o loop ./ext4-crypt.img /mnt
$ ls -la /mnt/encryption
合計 12
drwxr-xr-x 2 mk mk 4096  4月  2 05:42 .
drwxr-xr-x 4 mk mk 4096  4月  2 05:06 ..
-rw-r--r-- 1 mk mk    6  4月  2 05:42 uzUlJZQfaxMx,7cC63,53A
$ cat /mnt/encryption/uzUlJZQfaxMx,7cC63,53A 
cat: /mnt/encryption/uzUlJZQfaxMx,7cC63,53A: 要求されたキーが利用できません

ユーザ,グループ,パーミッションなどは見える.内容にはアクセスできない.

  • 再度暗号化領域を利用出来るようにする

鍵の生成とキーリングへの追加と暗号化ポリシーの設定をし直すとアクセスできるようになる

$ /usr/sbin/e4crypt add_key /mnt/encryption
Enter passphrase (echo disabled): 
Added key with descriptor [07a3ce5a6ebf0396]
$ ls -la /mnt/encryption
合計 12
drwxr-xr-x 2 mk mk 4096  4月  2 05:42 .
drwxr-xr-x 4 mk mk 4096  4月  2 05:06 ..
-rw-r--r-- 1 mk mk    6  4月  2 05:42 test.txt

ファイル名長の確認

EncFSなどはファイル名のメタデータがファイル名内にあるので利用できるファイル名長が短くなってしまう.ext4ではどうか試す.

  • 通常のext4領域では256文字
$ touch /mnt/1234567890123456789012345678901234567890123456789012345678901234567890123456789012345678901234567890123456789012345678901234567890123456789012345678901234567890123456789012345678901234567890123456789012345678901234567890123456789012345678901234567890123456
touch: '/mnt/1234567890123456789012345678901234567890123456789012345678901234567890123456789012345678901234567890123456789012345678901234567890123456789012345678901234567890123456789012345678901234567890123456789012345678901234567890123456789012345678901234567890123456' に touch できません: ファイル名が長すぎます
$ touch /mnt/123456789012345678901234567890123456789012345678901234567890123456789012345678901234567890123456789012345678901234567890123456789012345678901234567890123456789012345678901234567890123456789012345678901234567890123456789012345678901234567890123456789012345
  • 暗号化領域も同様だった
$ touch /mnt/encryption/123456789012345678901234567890123456789012345678901234567890123456789012345678901234567890123456789012345678901234567890123456789012345678901234567890123456789012345678901234567890123456789012345678901234567890123456789012345678901234567890123456789012345
$ ls -lA /mnt/encryption/
合計 4
-rw-r--r-- 1 mk mk 0  4月  2 07:14 123456789012345678901234567890123456789012345678901234567890123456789012345678901234567890123456789012345678901234567890123456789012345678901234567890123456789012345678901234567890123456789012345678901234567890123456789012345678901234567890123456789012345
-rw-r--r-- 1 mk mk 6  4月  2 05:42 test.txt
  • 非暗号化状態ではこんな状態
-rw-r--r-- 1 mk mk    0  4月  2 07:14 _OsoePJvc3qPQCPHbUMtjSynszcHig3BL
-rw-r--r-- 1 mk mk    6  4月  2 05:42 uzUlJZQfaxMx,7cC63,53A

復号状態のファイル名は別の場所に記録されているよう.

複数の暗号化領域を作ってみる

  • 新しい暗号化領域のためのディレクトリを作成
$ mkdir /mnt/encryption2
$ ls -la /mnt/encryption2
合計 8
drwxr-xr-x 2 mk mk 4096  4月  2 06:49 .
drwxr-xr-x 5 mk mk 4096  4月  2 06:49 ..
  • 暗号化設定
$ sudo e4crypt add_key /mnt/encryption2
Enter passphrase (echo disabled):
Key with descriptor [9640dd016062b432] already exists
Key with descriptor [9640dd016062b432] applied to /mnt/encryption2.
$ keyctl show
Session Keyring   
1048296028 --alswrv   1000  1000  keyring: _ses
  94779002 --alsw-v      0     0   \_ logon: ext4:69ca01e214957173
 219437542 --alsw-v      0     0   \_ logon: ext4:07a3ce5a6ebf0396
1025344233 --alsw-v      0     0   \_ logon: ext4:9640dd016062b432
$ touch /mnt/encryption2/hoge
  • 一回暗号化を解除してマウントし直す
$ keyctl clear @s
$ keyctl show
Session Keyring   
1048296028 --alswrv   1000  1000  keyring: _ses
$ sudo umount /mnt
$ sudo mount -o loop ./ext4-crypt.img /mnt
  • 片方だけ鍵を登録して暗号化領域を利用
$ sudo e4crypt add_key /mnt/encryption2
Enter passphrase (echo disabled):
Added key with descriptor [9640dd016062b432]
Key with descriptor [9640dd016062b432] applied to /mnt/encryption2.
$ ls -la /mnt/encryption*
/mnt/encryption:  
合計 12
drwxr-xr-x 2 mk mk 4096  4月  2 06:11 .
drwxr-xr-x 5 mk mk 4096  4月  2 06:49 ..
-rw-r--r-- 1 mk mk    0  4月  2 06:11 _OsoePJvc3qPQCPHbUMtjSynszcHig3BL
-rw-r--r-- 1 mk mk    6  4月  2 05:42 uzUlJZQfaxMx,7cC63,53A

/mnt/encryption2: 
合計 8
drwxr-xr-x 2 mk mk 4096  4月  2 06:51 .
drwxr-xr-x 5 mk mk 4096  4月  2 06:49 ..
-rw-r--r-- 1 mk mk    0  4月  2 06:51 hoge

暗号化領域に鍵が登録されてない状態でファイルを作ってみる

暗号化領域に鍵が登録されてない状態でファイルを作るとどうなるかを確認.

$ ls -lA /mnt/encryption
合計 4
-rw-r--r-- 1 mk mk 0  4月  2 07:14 _OsoePJvc3qPQCPHbUMtjSynszcHig3BL
-rw-r--r-- 1 mk mk 6  4月  2 05:42 uzUlJZQfaxMx,7cC63,53A
mk@x220:~ (1180)$ touch /mnt/encryption/test
touch: '/mnt/encryption/test' のタイムスタンプを設定中です: そのようなファイルやディレクトリはありません
mk@x220:~ (1181)$ ls -lA /mnt/encryption
合計 4
-rw-r--r-- 1 mk mk 0  4月  2 07:14 _OsoePJvc3qPQCPHbUMtjSynszcHig3BL
-rw-r--r-- 1 mk mk 6  4月  2 05:42 uzUlJZQfaxMx,7cC63,53A

エラーとなって作れない.

別のユーザで利用

  • 別のユーザで中が見えるか確認
$ id
uid=1001(gm) gid=1001(gm) groups=1001(gm),20(dialout),24(cdrom),25(floppy),29(audio),30(dip),44(video),46(plugdev),107(netdev)
$ ls -la /mnt/encryption
合計 12
drwxr-xr-x 2 mk mk 4096  4月  2 06:11 .
drwxr-xr-x 7 mk mk 4096  4月  2 07:48 ..
-rw-r--r-- 1 mk mk    0  4月  2 07:14 _OsoePJvc3qPQCPHbUMtjSynszcHig3BL
-rw-r--r-- 1 mk mk    6  4月  2 05:42 uzUlJZQfaxMx,7cC63,53A
$ ls -la /mnt/encryption
合計 12
drwxrwxrwx 2 mk mk 4096  4月  2 06:11 .
drwxr-xr-x 7 mk mk 4096  4月  2 07:48 ..
-rw-r--r-- 1 mk mk    0  4月  2 07:14 123456789012345678901234567890123456789012345678901234567890123456789012345678901234567890123456789012345678901234567890123456789012345678901234567890123456789012345678901234567890123456789012345678901234567890123456789012345678901234567890123456789012345
-rw-r--r-- 1 mk mk    6  4月  2 05:42 test.txt
  • 権限があればファイル作成もできる
$ touch /mnt/encryption/other_user
$ ls -lA /mnt/encryption
合計 4
-rw-r--r-- 1 mk mk 0  4月  2 07:14 123456789012345678901234567890123456789012345678901234567890123456789012345678901234567890123456789012345678901234567890123456789012345678901234567890123456789012345678901234567890123456789012345678901234567890123456789012345678901234567890123456789012345
-rw-r--r-- 1 gm gm 0  4月  2 07:55 other_user
-rw-r--r-- 1 mk mk 6  4月  2 05:42 test.txt
  • 暗号化解除は出来ないと思ったが,
$ /usr/sbin/e4crypt add_key /mnt/encryption
/mnt/encryption: Permission denied
  • パーミッションをゆるくしてやると出来てしまう.
$ ls -la /mnt/encryption
合計 12
drwxrwxrwx 2 mk mk 4096  4月  2 07:55 .
drwxr-xr-x 7 mk mk 4096  4月  2 07:48 ..
-rw-r--r-- 1 gm gm    0  4月  2 07:55 97NmIBETx,1q9US96etRsA
-rw-r--r-- 1 mk mk    0  4月  2 07:14 _OsoePJvc3qPQCPHbUMtjSynszcHig3BL
-rw-r--r-- 1 mk mk    6  4月  2 05:42 uzUlJZQfaxMx,7cC63,53A
$ /usr/sbin/e4crypt add_key /mnt/encryption
Enter passphrase (echo disabled): 
Added key with descriptor [07a3ce5a6ebf0396]
Error [Permission denied] setting policy.
The key descriptor [07a3ce5a6ebf0396] may not match the existing encryption context for directory [/mnt/encryption].
$ ls -lA /mnt/encryption
合計 4
-rw-r--r-- 1 mk mk 0  4月  2 07:14 123456789012345678901234567890123456789012345678901234567890123456789012345678901234567890123456789012345678901234567890123456789012345678901234567890123456789012345678901234567890123456789012345678901234567890123456789012345678901234567890123456789012345
-rw-r--r-- 1 gm gm 0  4月  2 07:55 other_user
-rw-r--r-- 1 mk mk 6  4月  2 05:42 test.txt

DebianのisoイメージをUSBメモリに書き込み

gistに貼ってたものだけどせっかくなのでこちらにも.

ファイルダウンロード

今回はDebian stretch Debian Installer rc2のi386版のnetinst.

  • debian-stretch-DI-rc2-i386-netinst.iso : イメージ本体
  • SHA512SUMS : isoファイルのチェックサムファイル
  • SHA512SUMS.sign : SHA512SUMSの署名ファイル
$ wget http://cdimage.debian.org/cdimage/stretch_di_rc2/i386/iso-cd/debian-stretch-DI-rc2-i386-netinst.iso http://cdimage.debian.org/cdimage/stretch_di_rc2/i386/iso-cd/SHA512SUMS.sign http://cdimage.debian.org/cdimage/stretch_di_rc2/i386/iso-cd/SHA512SUMS

※i386/amd64をよく使う場合はmulti-archを使うと1つのUSBメモリでi386/amd64が利用できて便利

チェックサムファイルの署名確認

チェックサムファイルのSHA512SUMSが正常なものか確認

$ gpg --verify SHA512SUMS.sign
gpg: 署名されたデータが'SHA512SUMS'にあると想定します
gpg: 2017年02月02日 07時45分30秒 JSTに施された署名
gpg:                RSA鍵DA87E80D6294BE9Bを使用
gpg: "Debian CD signing key <debian-cd@lists.debian.org>"からの正しい署名 [不明の]
gpg: *警告*: この鍵は信用できる署名で証明されていません!
gpg:       この署名が所有者のものかどうかの検証手段がありません。
 主鍵フィンガープリント: DF9B 9C49 EAA9 2984 3258  9D76 DA87 E80D 6294 BE9B

公開鍵が見つかりません(public key not found)というエラーの場合はgpg --keyserver keyring.debian.org --recv-keys DA87E80D6294BE9Bで鍵をインポートして再度確認.鍵のIDやフィンガープリントは以下のページでも確認できる

ハッシュ確認

isoファイルが正しくダウンロードされているか確認
以下の例はdebian-stretch-DI-rc2-i386-netinst.isoしかダウンロードしていないのでそれ以外のエラーや警告は無視する

$ sha512sum -c SHA512SUMS
sha512sum: debian-mac-stretch-DI-rc2-i386-netinst.iso: そのようなファイルやディレクトリはありません
debian-mac-stretch-DI-rc2-i386-netinst.iso: FAILED open or read
debian-stretch-DI-rc2-i386-netinst.iso: 完了
sha512sum: debian-stretch-DI-rc2-i386-xfce-CD-1.iso: そのようなファイルやディレクトリはありません
debian-stretch-DI-rc2-i386-xfce-CD-1.iso: FAILED open or read
sha512sum: 警告: 一覧にある 2 個のファイルが読み込めませんでした

usbメモリへの書き込み

USBメモリの確認

書き込み先のデバイスが正しいか確認する
USBメモリ接続直後にdmesgを確認したりfdiskコマンドやマウントして中を確認したり……

$ dmesg
  :
[414356.444121] usb 1-1.2: New USB device found, idVendor=13fe, idProduct=1a00
[414356.444128] usb 1-1.2: New USB device strings: Mfr=0, Product=11, SerialNumber=0
[414356.444131] usb 1-1.2: Product: USB 2.0 HUB
[414362.925178] usb-storage 1-1.2.1:1.0: USB Mass Storage device detected
[414362.925967] scsi host6: usb-storage 1-1.2.1:1.0
[414364.184209] sd 6:0:0:1: [sdb] 980480 512-byte logical blocks: (502 MB/479 MiB)
[414364.187102] sd 6:0:0:1: [sdb] Write Protect is off
[414364.187106] sd 6:0:0:1: [sdb] Mode Sense: 23 00 00 00
[414364.190339] sd 6:0:0:1: [sdb] No Caching mode page found
[414364.190345] sd 6:0:0:1: [sdb] Assuming drive cache: write through
[414364.201730]  sdb: sdb1
[414364.201734] sdb: p1 size 982496 extends beyond EOD, enabling native capacity
[414364.214471]  sdb: sdb1
[414364.214475] sdb: p1 size 982496 extends beyond EOD, truncated
[414364.228961] sd 6:0:0:1: [sdb] Attached SCSI removable disk
$ sudo fdisk -l /dev/sdb
Disk /dev/sdb: 478.8 MiB, 502005760 bytes, 980480 sectors
Units: sectors of 1 * 512 = 512 bytes
Sector size (logical/physical): 512 bytes / 512 bytes
I/O size (minimum/optimal): 512 bytes / 512 bytes
Disklabel type: dos
Disk identifier: 0x00000000

Device     Boot Start    End Sectors   Size Id Type
/dev/sdb1  *       32 982527  982496 479.8M  6 FAT16

USBメモリのアンマウント

USBメモリをマウントしている場合はアンマウントしておく

$ sudo umount /dev/sdb1
$ mount | grep /dev/sdb

パーテイション情報の削除

念の為パーテイション情報を削除しておく

$ sudo wipefs /dev/sdb
offset               type
----------------------------------------------------------------
0x1fe                dos   [partition table]

$ sudo wipefs -a /dev/sdb ; sync
/dev/sdb: 2 bytes were erased at offset 0x000001fe (dos): 55 aa
/dev/sdb: calling ioctl to re-read partition table: 成功です

書き込み

進捗状態を確認したい場合はpvコマンドを間に挟んだり,ddrescue / ddrescueなどが利用できる

$ sudo dd if=./debian-stretch-DI-rc2-i386-netinst.iso of=/dev/sdb bs=4M ; sync
95+1 レコード入力
95+1 レコード出力
401604608 bytes (402 MB, 383 MiB) copied, 176.874 s, 2.3 MB/s

書き込みが終わったらUSBメモリを取り外してターゲットマシンで利用する

VirtualBoxで起動確認(余録)

手軽に試せるマシンがなかったのでVirtualBoxからUSBメモリを起動して確認した

USBメモリのディスクイメージ作成

直にUSBメモリを指定できないのでUSBメモリへアクセスするためのvmdkイメージを作成

$ sudo VBoxManage internalcommands createrawvmdk -rawdisk /dev/sdb -filename sdb.vmdk 
RAW host disk access VMDK file sdb.vmdk created successfully.
$ sudo cat sdb.vmdk
# Disk DescriptorFile
version=1
CID=1722e641
parentCID=ffffffff
createType="fullDevice"

# Extent description
RW 980480 FLAT "/dev/sdb" 0

# The disk Data Base 
#DDB

ddb.virtualHWVersion = "4"
ddb.adapterType="ide"
ddb.geometry.cylinders="972"
ddb.geometry.heads="16"
ddb.geometry.sectors="63"
ddb.uuid.image="c2c9d560-049f-4c44-bf8a-0b85e820ba12"
ddb.uuid.parent="00000000-0000-0000-0000-000000000000"
ddb.uuid.modification="00000000-0000-0000-0000-000000000000"
ddb.uuid.parentmodification="00000000-0000-0000-0000-000000000000"

USBメモリにアクセス権のあるユーザでVirtualBoxを起動してUSBメモリのイメージを指定して起動

(ここいまいち……)

$ gksudo virtualbox

mosh 1.3.0をDropbear sshdで利用してみる

moshの1.3.0がリリースされました.

moshはsshを置き換えようとしているソフトウェアで,ネットワークが遅いときにローカルエコーを表示したり,ネットワークが切り替わってもローミングしたりと便利なソフトウェアです.(NotePCで接続してサスペンドして別のネットワークでレジュームしてもすぐに使っていた端末にアクセスできる)

1.3.0でなにかおもしろい機能が増えたりしていないかなと眺めていると

  * Add --no-ssh-pty option for Dropbear compatibility and other issues.

Dropbearで使えるようになるオプションが増えているようです.
DropbearはOpenSSHに比べて大分小さなsshdです.組み込みとかで使われているのを見ます.でも機能が物足りないなと思うことも.

mosh + Dropbearの組み合わせを試してみました.

試したのはこんな感じの環境です.

Host : Raspbian jessie(Raspberry Pi 2B)
Client : Debian sid amd64

dropbearの準備

HostにDropbearをパッケージで導入します

$ sudo apt install dropbear

dropbearのhost鍵を用意

$ mkdir /tmp/dropbear
$ dropbearkey -t ecdsa -s 521 -f /tmp/dropbear/dropbear_ecdsa_host_key
  • -t 鍵種類
  • -s 鍵長
  • -f 鍵ファイル

接続時に解りやすいようにバナーファイル作成

$ banner dropbear > /tmp/dropbear/banner

Dropbearを2222番ポートで起動

$ dropbear -r /tmp/dropbear/dropbear_ecdsa_host_key -p 2222 -b /tmp/dropbear/banner -E
  • -r host鍵を指定
  • -p sshポート番号
  • -b バナーファイル
  • -E 標準エラー出力にメッセージ出力

Dropbearにssh接続できるか確認

$ ssh pi@192.168.2.200 -i ~/.ssh/id_ecdsa -p 2222
Host key fingerprint is SHA256:G3u9pP4ZrkZ2kWs9e+ly9MkEtnO0f4ebvkBS0ObGJQQ
+---[ECDSA 521]---+
|          E+.    |
|           .+ .  |
|           +.+   |
|           .*o . |
|        S ..o++ .|
|         +o++oo= |
|        oo.o= *+=|
|         ..+ *o**|
|         o+o=.O=o|
+----[SHA256]-----+

 #####   #####    ####   #####   #####   ######    ##    #####
 #    #  #    #  #    #  #    #  #    #  #        #  #   #    #
 #    #  #    #  #    #  #    #  #####   #####   #    #  #    #
 #    #  #####   #    #  #####   #    #  #       ######  #####
 #    #  #   #   #    #  #       #    #  #       #    #  #   #
 #####   #    #   ####   #       #####   ######  #    #  #    #

Authenticated to 192.168.2.200 ([192.168.2.200]:2222).

The programs included with the Debian GNU/Linux system are free software;
the exact distribution terms for each program are described in the
individual files in /usr/share/doc/*/copyright.

Debian GNU/Linux comes with ABSOLUTELY NO WARRANTY, to the extent
permitted by applicable law.
pi@raspberrypi:~ $ 

mosh 1.3.0の準備

server側はsourceからbuild

$ sudo apt-get build-dep mosh
$ wget https://mosh.org/mosh-1.3.0.tar.gz
$ sha256sum mosh-1.3.0.tar.gz
320e12f461e55d71566597976bd9440ba6c5265fa68fbf614c6f1c8401f93376  mosh-1.3.0.tar.gz

※hashとgpg署名は以下のメールに,鍵は https://mosh.org/ の一番下にある.

sourceを展開してbuild

$ tar tvf mosh-1.3.0.tar.gz
$ tar xf mosh-1.3.0.tar.gz
$ ./configure --prefix=${HOME}/usr/local
$ make
$ install

host側はDebian sid amd64のパッケージを利用した

$ sudo apt install mosh
$ dpkg-query -W mosh
mosh    1.3.0-1

ということでホスト側はこんな状態に

  • OpenSSH : 22番ポート
  • Dropbear : 2222番ポート
  • mosh 1.2.4a-1+b2(pkg) : /usr/bin/mosh-server
  • mosh 1.3.0 : ${HOME}/usr/local/bin/mosh-server

この状態でDropbearとmosh 1.3.0を利用するにはこんな感じ

$ mosh pi@192.168.2.200 --ssh="ssh -p 2222" --server='${HOME}'/usr/local/bin/mosh-server

でも実際に繋ごうとするとエラーになってしまう.

接続元のmoshではこんなエラー

/usr/bin/mosh: Did not find mosh server startup message. (Have you installed mosh on your server?)

接続先のDropbearではこんなエラー

[20390] Mar 28 06:37:20 Child connection from 192.168.2.205:32888
[20390] Mar 28 06:37:21 Pubkey auth attempt with unknown algo for 'pi' from 192.168.2.205:32888
[20390] Mar 28 06:37:21 Pubkey auth succeeded for 'pi' with key md5 0b:fb:21:45:d6:a0:7d:57:02:24:9b:d3:ed:c7:c6:23 from 192.168.2.205:32888
[20391] Mar 28 06:37:21 ioctl(TIOCSCTTY): Input/output error
[20391] Mar 28 06:37:21 /dev/pts/1: No such file or directory
[20391] Mar 28 06:37:21 open /dev/tty failed - could not set controlling tty: No such device or address
[20390] Mar 28 06:37:21 Exit (pi): Disconnect received

ということで,mosh 1.3.0で入った--no-ssh-ptyを付けてみます.

$ mosh pi@192.168.2.200 --ssh="ssh -p 2222" --server='${HOME}'/usr/local/bin/mosh-server --no-ssh-pty

asciicast

うまく繋がりました.
試しに回線を切断して再接続すると自動的に繋がるのも確認 ☺

--no-ssh-ptyを~/.ssh/configとかに書いとけるといいんですけどね.今のところ毎回指定するしかなさそう?

Joypadで簡易操作を試みる

LinuxBoxで文章を読むのにJoypadで操作できないかなと思ってちょっと試してみました.

はじめはxevコマンドでJoypadのKeyCodeを調べてxmodmadコマンドで書き換えればいいだろうと思っていたのですが,xevコマンドでJoypadは反応しないようでした.他に方法はないかと検索するとjoy2keyというものを見つけたのでこれを試してみました.

$ apt show joy2key
Package: joy2key
Version: 1.6.3-2
Priority: optional
Section: x11
Maintainer: Debian QA Group <packages@qa.debian.org>
Installed-Size: 52.2 kB
Depends: libc6 (>= 2.15), libx11-6
Homepage: http://joy2key.sourceforge.net
Tag: hardware::input:joystick, hardware::input:keyboard, implemented-in::c,
 role::program, use::configuring
Download-Size: 21.8 kB
APT-Sources: http://dennou-q.gfd-dennou.org/debian sid/main amd64 Packages
Description: ジョイスティックの動きを同等のキーストロークに変換
 joy2key により、ジョイスティックの軸とボタンの動きに対してキーボードイベント
 を選択できますので、ネーティブでジョイスティックをサポートしていないアプリケーション
 でジョイスティックやゲームパッドを利用できます。

DebianだとWheezy以降,Ubuntuだとprecise(12.04LTS)以降にパッケージがあるようです.

今回はDebian sidやjessieなので導入はパッケージを入れるだけでした.

$ sudo apt install joy2key

設定はよく解らなかったけどこの辺を参考に

こんな感じで動きました.キーマップは未だ詰めるつもりだけどとりあえず.

$ DISPLAY=:0 joy2key -X -buttons A B X Y L Tab Escape Return KP_9 -axis Left Right Up Down -thresh -16383 16383 -16383 16383

キーコードについてはxevや/usr/include/X11/keysymdef.hで確認できます.とりあえずここにも貼っておきます.

しかしShift + Tabも使いたいのだけどShift/Tabそれぞれ単体は入力できるけど同時入力が効かないようです.通常のKBDでは動作するのでjoy2keyの問題だと思います.

試した環境はDebian sidのjoy2key 1.6.3-2とDebian lennyのjoy2key 1.6.3-2でJoypadはハードオフで\200くらいだったBUFFALOのスーパーファミコンみたいな見た目のBSGP801シリーズと書かれているもの.

[ 5239.625574] usb 2-1.2: authorized to connect
[ 5263.982357] usb 1-1.2: new low-speed USB device number 6 using ehci-pci
[ 5264.095408] usb 1-1.2: New USB device found, idVendor=0583, idProduct=2060
[ 5264.095410] usb 1-1.2: New USB device strings: Mfr=0, Product=2, SerialNumber=0
[ 5264.095411] usb 1-1.2: Product: USB,2-axis 8-button gamepad  
[ 5264.095545] usb 1-1.2: Device is not authorized for usage
[ 5266.168066] usb 1-1.2: authorized to connect
[ 5266.176105] hidraw: raw HID events driver (C) Jiri Kosina
[ 5266.184205] usbcore: registered new interface driver usbhid
[ 5266.184207] usbhid: USB HID core driver
[ 5266.188173] input: USB,2-axis 8-button gamepad   as /devices/pci0000:00/0000:00:1a.0/usb1/1-1/1-1.2/1-1.2:1.0/0003:0583:2060.0001/input/input19
[ 5266.188377] hid-generic 0003:0583:2060.0001: input,hidraw0: USB HID v1.10 Joystick [USB,2-axis 8-button gamepad  ] on usb-0000:00:1a.0-1.2/input0

minicomでステータスラインを非表示に

というのを見て気になって確認してみた.manを見てみると-Fというのがそれぽい

$ minicim -D /dev/ttyACM1 -F ''

としてみるとステータスラインの内容は消えるけどステータスライン自体は残っているのでちょっと違う感じ.

minicim起動中に設定画面(Ctrl+A o)の「画面とキーボード」内にそれらしい「C – ステータスライン表示 : 許可」というものがある.これをCを押して「禁止」にして「”dfl” に設定を保存」で設定ファイルに書き出してみる.

$ cat ~/.minirc.dfl 
# Machine-generated file - use setup menu in minicom to change parameters.
pu statusline       disabled

この状態でminicomを起動するとステータスラインは消えていて,この行をコメントアウトしてminicomを起動するとステータスラインがでてくるのを確認.

試した環境はDebian sid amd64のminicom 2.7-1+b2

mikutterからGooglePhotosにアップロードするやつを試す

Google Photosってことは容量気にせず画像投げられる & Google+との連携もできそう?ってことで試してみました.

#mikutterについてはこちらを.

関連パッケージ導入

$ sudo apt install ruby-oauth2

mikutter-google-photos-uploader plugin導入

$ cd ~/.mikutter/plugin
$ git clone https://github.com/slimymars/mikutter-google-photos-uploader
$ cd mikutter-google-photos-uploader
$ bundle install

mikutter起動

……認識されない.mikutterが古い所為のようです.

$ grep mikutter: ~/.mikutter/plugin/mikutter-google-photos-uploader/.mikutter.yml 
  mikutter: 3.5.2
$ dpkg-query -W mikutter
mikutter        3.5.0+dfsg-1

Debianではjessie-backportsからsidまで3.5.0+dfsg-1experimentalだけ3.5.2+dfsg-1でした.

てことで,experimentalから借りてきます.

sources.listexperimentalがある状態で

$ grep experimental /etc/apt/sources.list
deb http://dennou-q.gfd-dennou.org/debian/ experimental main non-free contrib
deb-src http://dennou-q.gfd-dennou.org/debian/ experimental main non-free contrib

/etc/apt/preferences.d/mikutterを以下のような感じで用意して,

$ cat /etc/apt/preferences.d/mikutter
Package: mikutter
Pin: release a=experimental
Pin-Priority: 800

パッケージを更新して導入.

$ sudo apt upgrade

mikutterでの設定

mikutterが3.5.2になったので認識しました.設定画面を見ると,GooglePhotosというタブが増えているのでそのタブのAuthrise code 取得URLをブラウザで開いて認証し,出てきたコードをAuthrization_codeに貼り付けます.
更にmikutterからアップロードする保存先のアルバムを追加しておきます.GooglePhotosに存在しないアルバムは前もって

から登録しておきましょう.アルバムは複数登録できるので例えば

  • ミク
  • フレンズ

のようにアルバムを登録しておくと画像整理がはかどります?

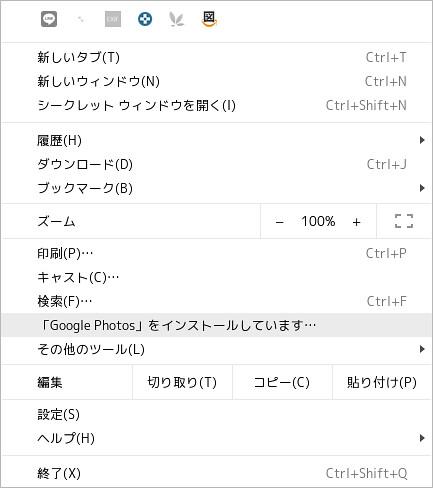
20170228_19:02:23-16584

実際の画像保存方法は,mikutterの保存したい画像の上で右クリックしてGoogle Photosに画像をアップロードを選び,

shutter_17-03-01_08:33:12_001

その後表示されるアルバムを選択するだけです.

menu_018

Google Photosに見に行くとアップロードされているのが確認できます.

Google+へのクロスポストにも使えるかなと思ったのですが,Google+の投稿画面はタイムラグがあるようで少し待たないと表示されませんでした.これはGoogle側の問題ですね.Google Photosから投稿するようにすれば良さそうです.

関連?Tweet

環境

$ screenfetch
         _,met$$$$$gg.           mk@x220
      ,g$$$$$$$$$$$$$$$P.        OS: Debian 9.0 stretch
    ,g$$P""       """Y$$.".      Kernel: x86_64 Linux 4.9.0-2-amd64
   ,$$P'              `$$$.      Uptime: 4d 18h 51m
  ',$$P       ,ggs.     `$$b:    Packages: 5147
  `d$$'     ,$P"'   .    $$$     Shell: bash 4.4.11
   $$P      d$'     ,    $$P     Resolution: 1366x768
   $$:      $$.   -    ,d$$'     WM: Awesome
   $$\;      Y$b._   _,d$P'      WM Theme: default
   Y$$.    `.`"Y$$$$P"'          CPU: Intel Core i5-2540M CPU @ 3.3GHz
   `$$b      "-.__               GPU: Mesa DRI Intel(R) Sandybridge Mobile 
    `Y$$                         RAM: 13040MiB / 15934MiB
     `Y$$.                      
       `$$b.                    
         `Y$$b.                 
            `"Y$b._             
                `""""           

Ubuntu 17.04のSynergyと互換性が無くなったのでDebianでexperimentalのSynergyを使う

20170224_01-02-43-4533

リリース前のUbuntu 17.04をサブマシンで使用しているのですが,これをメインPCの横に置いてSynergyを使ってメインPCから操作しています.しかしUbuntu 17.04のSynergyが新しくなって繋がらなくなりました.
設定を確認するとこれまで暗号化通信にパスワードを指定する形でした.これがSSLになったようです.
GUIでもman synergys/synergycを見ても旧形式は使えなさそうで互換性が失われているようです.

20170224_01-02-53-4521
※Ubuntu 17.04のsynergy 1.8.7-stable+dfsg.1-2

20170224_01:02:47-1037
※Debian stretchのsynergy 1.4.16-2

DebianのSynergyのバージョンを確認すると,今のところsidでも1.4.16-2でexperimentalでは1.8.7-stable+dfsg.1-2でした.

とりあえずexperimentalから借りてくることにしました.

sources.listexperimentalがある状態で

$ grep experimental /etc/apt/sources.list
deb http://dennou-q.gfd-dennou.org/debian/ experimental main non-free contrib
deb-src http://dennou-q.gfd-dennou.org/debian/ experimental main non-free contrib

/etc/apt/preferences.d/synergyを以下のような感じで用意して,

$ cat /etc/apt/preferences.d/synergy
Package: synergy
Pin: release a=experimental
Pin-Priority: 800

パッケージ情報を更新して導入.

$ sudo apt update
$ sudo apt install synergy
 :
以下のパッケージはアップグレードされます:
  synergy
アップグレード: 1 個、新規インストール: 0 個、削除: 0 個、保留: 22 個。
853 kB のアーカイブを取得する必要があります。
この操作後に追加で 607 kB のディスク容量が消費されます。
取得:1 <http://dennou-q.gfd-dennou.org/debian> experimental/main amd64 synergy amd64 1.8.7-stable+dfsg.1-2 [853 kB]
853 kB を 3秒 で取得しました (235 kB/s)
 :
.../synergy_1.8.7-stable+dfsg.1-2_amd64.deb を展開する準備をしています ...
synergy (1.8.7-stable+dfsg.1-2)(1.4.16-2 に) 上書き展開しています ...
synergy (1.8.7-stable+dfsg.1-2) を設定しています ...
 :

という感じで導入できました.
元に戻す場合は/etc/apt/preferences.d/synergyを消してパッケージを更新すればいいはず.

バージョンが新しくなってからSynergyを起動するとウィザードが走ってSSL証明書が~/.synergy/SSL/Synergy.pemに作られます.フィンガープリントも~/.synergy/SSL/Fingerprints/Local.txtに作成されるので初回接続時にClient側に表示されるメッセージをSynergy Server側のこのフィンガープリントと見比べてから接続します.

$ cat ~/.synergy/SSL/Fingerprints/Local.txt 
2E:51:06:DC:05:42:09:81:7E:FB:3A:4F:C6:A4:A4:EE:98:ED:75:A0

20170225_00:02:32-4657

このフィンガープリントはClientの~/.synergy/SSL/Fingerprints/TrustedServers.txtに保存されます.

$ cat ~/.synergy/SSL/Fingerprints/TrustedServers.txt
2E:51:06:DC:05:42:09:81:7E:FB:3A:4F:C6:A4:A4:EE:98:ED:75:A0

てことでとりあえず使えるようになりました.

環境

  • server
$ lsb_release -d
Description:    Debian GNU/Linux 9.0 (stretch)
$ uname -a
Linux x220 4.9.0-2-amd64 #1 SMP Debian 4.9.10-1 (2017-02-17) x86_64 GNU/Linux
$ dpkg-query -W synergy
synergy 1.8.7-stable+dfsg.1-2
  • client
$ lsb_release -d
Description:    Ubuntu Zesty Zapus (development branch)
$ uname -a
Linux x200 4.9.0-15-generic #16-Ubuntu SMP Fri Jan 20 15:31:12 UTC 2017 x86_64 x86_64 x86_64 GNU/Linux
$ dpkg-query -W synergy
synergy 1.8.7-stable+dfsg.1-2

Mumble server設定メモ

鹿児島Linux勉強会 2017.01の遠隔で利用した設定メモです.

  • サーバのOSはDebian jessie amd64
  • 自動起動せず利用時に手動で起動する
  • fwも都度手動
  • サブチャンネルはなし
  • ssl証明書は既存のstartsslを利用

pkgの導入

$ sudo apt install mumble-server

自動起動を無効にする

$ sudo dpkg-reconfigure mumble-server

で設定画面に入り,

Mumble-server (murmurd) can start automatically when the server is booted.

Autostart mumble-server on server boot?

を選択する.
(/etc/default/mumble-serverMURMUR_DAEMON_START=0でも)

設定ファイルを編集

diff --git a/mumble-server.ini b/mumble-server.ini
index b445d4e..46f1dfd 100644
--- a/mumble-server.ini
+++ b/mumble-server.ini
@@ -12,7 +12,7 @@
 #        NOT regex = \w* BUT regex = \\w*

 # Path to database. If blank, will search for
-# murmur.sqlite in default locations or create it if not found.
+A
 database=/var/lib/mumble-server/mumble-server.sqlite

 # If you wish to use something other than SQLite, you'll need to set the name
@@ -86,7 +86,7 @@ pidfile=/var/run/mumble-server/mumble-server.pid
 # configure it here ehan ehrough D-Bus or Ice.
 #
 # Welcome message sent to clients when they connect.
-welcometext="<br />Welcome to this server running <b>Murmur</b>.<br />Enjoy your stay!<br />"
+welcometext="<br />Welcome to KagoLUG server running <b>Murmur</b>.<br />Enjoy your stay!<br />"

 # Port to bind TCP and UDP sockets to.
 port=64738
@@ -144,26 +144,28 @@ users=100
 # addresses.
 # Only uncomment the 'registerName' parameter if you wish to give your "Root" channel a custom name.
 #
-#registerName=Mumble Server
+registerName=KagoLUG Mumble Server
 #registerPassword=secret
 #registerUrl=http://mumble.sourceforge.net/
-#registerHostname=
+registerHostname=kagolug.org

 # If this option is enabled, the server will announce its presence via the 
 # bonjour service discovery protocol. To change the name announced by bonjour
 # adjust the registerName variable.
 # See http://developer.apple.com/networking/bonjour/index.html for more information
 # about bonjour.
-#bonjour=True
+bonjour=False

 # If you have a proper SSL certificate, you can provide the filenames here.
 # Otherwise, Murmur will create it's own certificate automatically.
-#sslCert=
-#sslKey=
+#sslCert=/etc/letsencrypt/live/kagolug.org/cert.pem
+sslCert=/etc/letsencrypt/live/kagolug.org/fullchain.pem
+sslKey=/etc/letsencrypt/live/kagolug.org/privkey.pem
+#sslCA=/etc/letsencrypt/live/kagolug.org/fullchain.pem

 # If Murmur is started as root, which user should it switch to?
 # This option is ignored if Murmur isn't started with root privileges.
-uname=mumble-server
+uname=root

 # If this options is enabled, only clients which have a certificate are allowed
 # to connect.

ssl証明書をクリア

$ sudo murmurd -wipessl
$ sudo killall murmurd

利用時

デーモンの起動とポート開放を行う

$ sudo service mumble-server start
$ sudo iptables -A INPUT -p udp -m udp --dport 64738 -j ACCEPT
$ sudo iptables -A INPUT -p tcp -m tcp --dport 64738 -j ACCEPT

利用者にはサーバとポートを伝える
– server : kagolug.org
– port : 64738

mumble://kagolug.org?title=KagoLUG%20Mumble%20Server&version=1.2.0

利用環境

  • PC : ThinkPad X200(Ubuntu 16.10 amd64)
  • マイク : elecom製の数百円のもの
  • スピーカー : Elecom LBT-SPTR01ECBK

はじめLBT-SPTR01ECBKでマイクとスピーカー両方の役割をと思っていたが,うまく音を拾えない&HSP/HFPでは音が悪く聞き取りづらかったので役割を分けた.
マイクはPC直付だったので音を拾いづらい&キー入力の音などを拾っていたはず.

利用完了時

デーモンの終了

$ sudo service mumble-server start

iptablesのmumbleルールを閉じる

$ sudo iptables -L --line-numbers | grep 64738
23   ACCEPT     udp  --  anywhere             anywhere             udp dpt:64738
24   ACCEPT     tcp  --  anywhere             anywhere             tcp dpt:64738
$ sudo iptables -D INPUT 23
$ sudo iptables -D INPUT 24
$ sudo iptables -L --line-numbers | grep 64738

課題

ssl証明書ファイルを読み込むためにdaemonをrootで動かしているのをmumble-serverユーザに戻したい.

-uname=mumble-server
+uname=root
$ sudo ls -l /etc/letsencrypt/live/kagolug.org/fullchain.pem /etc/letsencrypt/live/kagolug.org/privkey.pem
lrwxrwxrwx 1 root ssl-cert 40 Dec 26 10:30 /etc/letsencrypt/live/kagolug.org/fullchain.pem -> ../../archive/kagolug.org/fullchain9.pem
lrwxrwxrwx 1 root ssl-cert 38 Dec 26 10:30 /etc/letsencrypt/live/kagolug.org/privkey.pem -> ../../archive/kagolug.org/privkey9.pem

ssl-certグループにmumble-serverを登録で行けそう?

マイク

会議向けの全方位のマイクが欲しい

コマンドスニペットを手軽に調べられるコマンドのborg

borgはOK borgというsiteのスニペットをコマンドライン上から検索したり編集できるコマンドのようです.borgはgo製でApache License Version 2.0のソフトウェアです.

導入

導入方法は如何から対応バイナリを入手して適当な場所に置き,実行権をつけるだけです.arm linuxとか*BSDとか結構いろいろそろっています.

今回はこんな感じで導入しました.

$ wget https://github.com/ok-borg/borg/releases/download/v0.0.1/borg_linux_amd64 -O ~/usr/local/bin/borg && chmod +x ~/usr/local/bin/borg

利用方法

基本的にコマンドの後ろに調べたいキーワードをつけるだけです.規定値では5つの例が表示されます. bashでloopどう書くんだっけ?

$ borg "bash loop"
(1) Bash Shell Do While Loop Infinite loop?
         [11] while [ `prog -some flags` = "Another instance of this program is running, please exit it first" ]
              -
              bay=$(prog -some flags)
              while [ $bay = "Another instance of this program is running, please exit it first" ]
              do
              echo "Awaiting Access to program"
              bay=$(prog -some flags)
              done
              .....
         [12] while true
              do
         ...  

(2) Bash foreach loop
         [21] xargs cat <filenames.txt
              -
              for fn in `cat filenames.txt`; do
                  echo "the next file is $fn"
                  cat $fn
              done
         [22] for fn in `cat filenames.txt`; do cat "$fn"; done
         [23] while read filename
              do
                  echo "Printing: $filename"
                  cat "$filename"
         ...

(3) Bash loop ping successful
         [31] ((count = 100))                            # Maximum number to try.
              while [[ $count -ne 0 ]] ; do
                  ping -c 1 8.8.8.8                      # Try once.
                  rc=$?
                  if [[ $rc -eq 0 ]] ; then
                      ((count = 1))                      # If okay, flag to exit loop.
                  fi
                  ((count = count - 1))                  # So we don't go forever.
              done
              if [[ $rc -eq 0 ]] ; then                  # Make final determination.
         ...

(4) Limit for bash loop
        [41] for(( i=1; i <= 1000; i++ )); do
                 name=$(date --date="$i day ago" +%Y%m%d%H%M%S)
                 mkdir -p "$name" &&
                 touch "$name/${name}_file" ||
                 break
             done

(5) Bash 'for' loop syntax?
         [51] for (($i=0...
              -
              for ((i=0;i<10;i++))
         [52] for i in `seq 0 9`
              do
                  echo "the i is $i"
              done
         [53] for i in {0..9}
                do
                  echo $i
                done
         ...

画像をタイルに結合って?

$ borg "image tile"
(1) ImageMagick crop huge image
         [11] $ time convert -crop 512x512 +repage huge.tif x/image_out_%d.tif
              real    0m5.623s
              user    0m2.060s
              sys     0m2.148s
              $ time vips dzsave huge.tif x --depth 1 --tile-size 512 --overlap 0 --suffix .tif
              real    0m1.643s
              user    0m1.668s
              sys     0m1.000s
         [12]  convert -monitor -limit area 2mb myLargeImg.tif myLargeImg.mpc
              -
               #!/bin/bash
         ...

(2) Set clipboard to image - pbcopy
        [21] cat image.png | impbcopy -
        [22] # Copy image to clipboard
             uuencode SomeFile.jpg - | pbcopy
             -
             # Paste from clipboard to image file
             pbpaste | uudecode -o AnotherFile.jpg


(3) Using Amazon MapReduce/Hadoop for Image Processing
         [31] and should be able to be done using Bash
         [32] #!/usr/bin/env bash
              # NLineInputFormat gives a single line: key is offset, value is Isotropic Url
              read offset isofile
              # Retrieve file from Isotropic server to local disk
              echo "reporter:status:Retrieving $isofile" >&2
              target=`echo $isofile | awk '{split($0,a,"/");print a[5] a[6]}'`
              filename=$target.tar.bz2
              #$HADOOP_INSTALL/bin/hadoop fs -get $isofile ./$filename
              curl  $isofile -o $filename
         ...

(4) Convert multipage PDF to a single image
        [41] convert in.pdf -append out%d.png
             -
             convert *.png output.pdf
             -
             convert foo?.png output.pdf
        [42] convert in.pdf +append out%d.png

(5) bash cgi won't return image
        [51] echo -ne "Content-type: image/png\n\n"
             -
             echo -e "Content-type: image/png\n"
             -
               -n     do not output the trailing newline

とかとか.

オプションはこんな感じとりあえず省略されないように-fをつけてページャに渡すと良さそう.

$ borg --help
Usage of borg:
-f  (= false)
    Print full results, ie. no more '...'
-h (= "borg.crufter.com")
    Server to connect to
-l  (= 5)
    Result list limit. Defaults to 5
-p  (= false)
    Private search. Your search won't leave a trace. Pinky promise. Don't use this all the time if you want to see the search result relevancy improved

検索だけでなくスニペットの追加や編集もできるようです.

サーバも選べるので自分用のメモを蓄積することもできますね. ちょっと惜しいのはサーバと通信して結果を表示するのでオフラインでは使えないというところ. オフラインで使いたい場合はローカルにサーバを立てるか別の方法を使うしかなさそうです.

端末をWeb共有できるttyd

端末をWebブラウザで共有できるソフトウェエアです. 以前似たものでGoTTYを試してみましたが,ttydはGoTTYインスパイアらしいです. ttydはc製でMITライセンスです.

導入

今回はDebian stretch amd64(testing)に導入しました. README.mdではUbuntu 16.04での手順が書かれていますがそのまま使えました.

$ sudo apt install cmake g++ pkg-config git vim-common libwebsockets-dev libjson-c-dev libssl-dev
$ git clone https://github.com/tsl0922/ttyd.git
$ cd ttyd
$ mkdir build
$ cd build
$ cmake ..
$ make

動かしてみる

$ ./ttyd -p 8080 bash

としてウェブブラウザで http://localhost:8080/ に繋ぐと利用できます. tmuxのセッションを共有して複数のブラウザで1つの端末の操作とかdocker利用とかGoTTYと同じように利用できます.

$ ./ttyd -p 8080 tmux new -A -s ttyd
[2016/12/09 18:54:25:5954] NOTICE: Initial logging level 7
[2016/12/09 18:54:25:5954] NOTICE: Libwebsockets version: 2.0.3 unknown-build-hash
[2016/12/09 18:54:25:5954] NOTICE: IPV6 not compiled in
[2016/12/09 18:54:25:5954] NOTICE: libev support compiled in but disabled
[2016/12/09 18:54:25:5954] NOTICE: libuv support compiled in but disabled
[2016/12/09 18:54:25:5955] NOTICE:  Threads: 1 each 1024 fds
[2016/12/09 18:54:25:5955] NOTICE:  mem: platform fd map:  8192 bytes
[2016/12/09 18:54:25:5955] NOTICE:  Compiled with OpenSSL support
[2016/12/09 18:54:25:5955] NOTICE:  SSL disabled: no LWS_SERVER_OPTION_DO_SSL_GLOBAL_INIT
[2016/12/09 18:54:25:5955] NOTICE: Creating Vhost 'default' port 8080, 2 protocols
[2016/12/09 18:54:25:5955] NOTICE:  Listening on port 8080
[2016/12/09 18:54:25:5955] NOTICE:  mem: per-conn:          920 bytes + protocol rx buf
[2016/12/09 18:54:25:5956] NOTICE:  canonical_hostname = x220
[2016/12/09 18:54:25:5956] NOTICE: TTY configuration:
[2016/12/09 18:54:25:5956] NOTICE:   start command: tmux new -A -s ttyd
[2016/12/09 18:54:25:5956] NOTICE:   reconnect timeout: 10s
[2016/12/09 18:54:25:5956] NOTICE:   close signal: SIGHUP (1)
[2016/12/09 18:54:25:6057] NOTICE: lws_protocol_init
[2016/12/09 18:54:25:9806] NOTICE: HTTP connect from localhost (127.0.0.1), path: /
[2016/12/09 18:54:25:0015] NOTICE: HTTP connect from localhost (127.0.0.1), path: /auth_token.js
[2016/12/09 18:54:26:3474] NOTICE: client connected from localhost (127.0.0.1), total: 1
[2016/12/09 18:54:26:3548] NOTICE: started process, pid: 30365
[2016/12/09 18:54:34:2928] NOTICE: HTTP connect from localhost (127.0.0.1), path: /
[2016/12/09 18:54:34:3132] NOTICE: error on reading from skt : 104
[2016/12/09 18:54:34:3132] NOTICE: sending SIGHUP to process 30365
[2016/12/09 18:54:34:3138] NOTICE: process exited with code 256, pid: 30365
[2016/12/09 18:54:34:3138] NOTICE: client disconnected from localhost (127.0.0.1), total: 0
[2016/12/09 18:54:34:5554] NOTICE: HTTP connect from localhost (127.0.0.1), path: /auth_token.js
[2016/12/09 18:54:34:5732] NOTICE: client connected from localhost (127.0.0.1), total: 1
[2016/12/09 18:54:34:5811] NOTICE: started process, pid: 30505
[2016/12/09 18:54:40:0073] NOTICE: wsi 0x556bcbc34500: TIMEDOUT WAITING on 3 (did hdr 0, ah 0x556bcbbc0c50, wl 0, pfd events 0)
[2016/12/09 18:54:40:0074] NOTICE: lws_header_table_detach: wsi 0x556bcbc34500: ah held 6s, ah.rxpos 0, ah.rxlen 0, mode/state 0 4,wsi->more_rx_waiting 0

20161209_18:12:56-1180

GoTTYについてはこちらを.


勉強会向けサーバを作ってみる2 / Rasbian jessieを試す/ Google Authenticatorのパスコードを作る from Kenichiro MATOHARA