ThinkPad T430s の BIOS を USB メモリ経由でアップデートする

以前ジャンクで入手したThinkPad T430s ですが,外部キーボードを使ったり,壊れたX220 の部品を使ったりで現在メインマシンとして利用しています.
今NVIDIA Optimus が利用できないかと試していますが,うまく行っていません.BIOS Update で治ったという事例を見つけたのでUpdate しました.Update イメージはCD に書き込んでそこから起動しないといけませんが,USBメモリでもうまく行ったのでメモを残しておきます.

※失敗するとマシンが動かなくなる可能性があります.

まずはBIOS のversion を確認します.date が2012年とかなので古そう.

現在のBIOS version 確認
$ sudo dmidecode -t bios|grep -E "Version:|Release Date:"
		Version: G7ET60WW (2.02 )
		Release Date: 09/11/2012
$ sudo lshw | grep "\-firmware" -A10|grep -E "version|date"
		  version: G7ET60WW (2.02 )
		  date: 09/11/2012

Lenovo のページでBIOSを確認すると, 26 Jun 2019 の Version 2.75 というものが最新のようです.
Windows用の実行ファイルと,起動CD用のisoファイル,それとそれぞれのリリースレターが用意されています.Linux マシンなのでisoファイルの方を入手します.

ダウンロードしたら,チェックサムを確認します.

webpage より

Checksum Tips

MD5:aa9846fb15114ef18770cc0812188418

SHA1:ace55c1a1fa87f3ca5140ef67d565ff9f863020a

SHA-256:623dc5d0442b3b0e105186901dc403c911717d4f7998223593b93e66afdbcd93

sha256sum で確認
$ sha256sum ~/Downloads/g7uj28us.iso
623dc5d0442b3b0e105186901dc403c911717d4f7998223593b93e66afdbcd93  /home/matoken/Downloads/g7uj28us.iso
isoinfo で少し中を覗く
$ isoinfo -d  -i ./g7uj28us.iso
CD-ROM is in ISO 9660 format
System id:
Volume id: G7ETB5US
Volume set id:
Publisher id:
Data preparer id:
Application id: NERO BURNING ROM
Copyright File id:
Abstract File id:
Bibliographic File id:
Volume set size is: 1
Volume set sequence number is: 1
Logical block size is: 2048
Volume size is: 16566
El Torito VD version 1 found, boot catalog is in sector 20
Joliet with UCS level 3 found
NO Rock Ridge present
Eltorito validation header:
    Hid 1
    Arch 0 (x86)
    ID 'NERO BURNING ROM'
    Key 55 AA
    Eltorito defaultboot header:
        Bootid 88 (bootable)
        Boot media 4 (Hard Disk Emulation)
        Load segment 7C0
        Sys type 6
        Nsect 1
        Bootoff 1B 27
$ isoinfo -l  -i ./g7uj28us.iso

Directory listing of /
d---------   0    0    0            2048 Jun 13 2019 [     21 02]  .
d---------   0    0    0            2048 Jun 13 2019 [     21 02]  ..

この iso ファイルを CD に書き込んで起動すればいいはずですが,メディアが手元にありません.

iso ファイルによってはUSBメモリに書き込むだけで起動USBメディアになるものもあるので試してみましたが起動できませんでした.

どうにかならないかなーと探すと以下の記事を見つけました.

geteltorito というPerl Script でイメージを変換した後,USBメモリに書き込むことで ThinkPad の BIOS Update ができるようです.
この記事中ではScript 開発者のページから入手していますが,Debian では genisoimage pkg に含まれているのでこれを使いました.

geteltorito の含まれている genisoimage pkg の導入
$ apt-file search geteltorito
genisoimage: /usr/bin/geteltorito
genisoimage: /usr/share/doc/genisoimage/README.geteltorito
genisoimage: /usr/share/man/man1/geteltorito.1.gz
$ sudo apt install genisoimage
usage
$ geteltorito

/usr/bin/geteltorito [-hv] [-o outputfilename] cd-image
Script will try to extract an El Torito image from a
bootable CD (or cd-image) given by <cd-image> and write
the data extracted to STDOUT or to a file.
   -h:        This help.
   -v:        Print version of script and exit.
   -o <file>: Write extracted data to file <file> instead of STDOUT.
USBメモリを接続してデバイスをdmesg やfdisk で確認して,wipefs でパーティション情報をクリアしておく
$ sudo dmesg -He|tail
$ sudo fdisk -l /dev/sdb
$ sudo wipefs -a /dev/sdb
geteltorito でイメージ変換しながら USBメモリへの書き込み
$ geteltorito ./g7uj28us.iso | sudo dd of=/dev/sdb bs=1M oflag=dsync status=progress
Booting catalog starts at sector: 20
Manufacturer of CD: NERO BURNING ROM
Image architecture: x86
Boot media type is: harddisk
El Torito image starts at sector 27 and has 65536 sector(s) of 512 Bytes
[sudo] password for matoken:
33218560 bytes (33 MB, 32 MiB) copied, 10 s, 3.2 MB/sImage has been written to stdout ....

9+178 records in
9+178 records out
33554432 bytes (34 MB, 32 MiB) copied, 10.3254 s, 3.2 MB/s

Debian pkg に含まれているScript のversion とsite で配布されているversion は0.5 と0.6 と少し違ったので念の為両方で変換を掛けて比較してみましたが結果は同じでした.

念の為siteで配布されているものでも変換してイメージを比較してみると同じものだった
$ wget http://userpages.uni-koblenz.de/~krienke/ftp/noarch/geteltorito/geteltorito/geteltorito
$ chmod u+x ./geteltorito
$ ./geteltorito -v
Version: 0.6
$ ./geteltorito -o ./g7uj28us.img ./g7uj28us.iso
$ geteltorito -o ./g7uj28us.img-pkg ./g7uj28us.iso
$ diff -s ./g7uj28us.img ./g7uj28us.img-pkg
Files ./g7uj28us.img and ./g7uj28us.img-pkg are identical

ということで,書き込んだUSBメモリで起動してBIOS update はうまく行きました.

Version が上がっているのを確認
$ sudo dmidecode -t bios|grep -E "Version:|Release Date:"
        Version: G7ETB5WW (2.75 )
        Release Date: 06/10/2019

忘れがちだけど結構脆弱性の修正やmicrocode のアップデートも入っていたのでちゃんと当てないといけないですね…….

環境
$ dpkg-query -W genisoimage coreutils util-linux dmidecode lshw
coreutils       8.30-3
dmidecode       3.2-1
genisoimage     9:1.1.11-3+b2
lshw    02.18.85-0.2
util-linux      2.33.1-0.1
$ hostnamectl | egrep 'Operating System|Architecture'
  Operating System: Debian GNU/Linux 10 (buster)
      Architecture: x86-64


vlock コマンドで tmux をロックする

現在ターミナルマルチプレクサは Byobu 経由で GNU screen と tmux を環境により併用しています.GNU screen では画面ロックの設定をしていたのですがtmux は設定していなかったので今回 console lock コマンドの vlock を設定してみました.

導入
$ sudo apt install vlock
help
$ vlock -h
vlock: locks virtual consoles, saving your current session.
Usage: vlock [options] [plugins...]
	   Where [options] are any of:
-c or --current: lock only this virtual console, allowing user to
	   switch to other virtual consoles.
-a or --all: lock all virtual consoles by preventing other users
	   from switching virtual consoles.
-n or --new: allocate a new virtual console before locking,
	   implies --all.
-s or --disable-sysrq: disable SysRq while consoles are locked to
	   prevent killing vlock with SAK
-t <seconds> or --timeout <seconds>: run screen saver plugins
	   after the given amount of time.
-v or --version: Print the version number of vlock and exit.
-h or --help: Print this help message and exit.
カレントコンソールをlock してみる.何かキーを押した後ユーザのパスワードを入力することで復帰できる.
$ vlock -c
This TTY is now locked.

Please press [ENTER] to unlock.
matoken's Password:
全てのコンソールをロックする.ロック状態で Alt + n で他のコンソールに移動しても全てロックされている.
$ vlock -a
The entire console display is now completely locked.
You will not be able to switch to another virtual console.

Please press [ENTER] to unlock.
matoken's Password:
$ tty
/dev/tty1
仮想コンソール(Xの端末, ターミナルマルチプレクサ, script等)では全てのロックは失敗する
$ vlock -a
vlock: this terminal is not a virtual console
$ tty
/dev/pts/9
tmux に設定してみる(byobu 経由の場合)
$ cat ~/.byobu/.tmux.conf
# Enable locking(I need vlock -> sudo apt install vlock)
set -g lock-command vlock
set -g lock-after-time 0
bind l lock-session

.tmux.conf に設定した状態で tmux を起動して Ctrl+b l と押すと vlock でロックされます.セッション単位でロックされます.

ちなみに X では xscreensaver-command -activate を設定しています.例えば以下は awesome wm で Mod4 + l に設定してあります.

    -- lock screen
    awful.key({ "Mod1"  }, "l", function () awful.util.spawn( "xscreensaver-command -activate",false) end),
環境1
$ dpkg-query -W byobu screen tmux vlock
byobu   5.129-1
screen  4.6.2-3
tmux    2.8-3
vlock   2.2.2-8
$ hostnamectl | egrep 'Operating System|Architecture'
  Operating System: Debian GNU/Linux 10 (buster)
      Architecture: x86-64
nanoを消したDebianでエディタの警告が出るのを修正

vim使うのでnanoを消しているのですが警告が出ています.

$ sudo crontab -e
/usr/bin/sensible-editor: 25: /usr/bin/sensible-editor: /bin/nano: not found
/usr/bin/sensible-editor: 28: /usr/bin/sensible-editor: nano: not found
/usr/bin/sensible-editor: 31: /usr/bin/sensible-editor: nano-tiny: not found
crontab: installing new crontab

fallback?でvimに切り替わるので実害はないのですが気持ち悪い.
警告を出している sensible-editor を確認.

$ man sensible-editor|more
SENSIBLE-EDITOR(1)                                         General Commands Manual                                         SENSIBLE-EDITOR(1)

NAME
       sensible-editor, sensible-pager, sensible-browser - sensible editing, paging, and web browsing

SYNOPSIS
       sensible-editor [OPTIONS...]
       sensible-pager [OPTIONS...]
       sensible-browser url

DESCRIPTION
       sensible-editor,  sensible-pager and sensible-browser make sensible decisions on which editor, pager, and web browser to call, respec‐
       tively.  Programs in Debian can use these scripts as their default editor, pager, or web browser or emulate their behavior.

SEE ALSO
       Documentation of the EDITOR, VISUAL and PAGER variables in environ(7) and select-editor(1) for changing a user's default editor

STANDARD
       Documentation of behavior of sensible-utils under a debian system is available under section 11.4 of debian-policy  usually  installed
       under /usr/share/doc/debian-policy (you might need to install debian-policy)

Debian                                                           14 Nov 2010                                               SENSIBLE-EDITOR(1)

select-editor を実行するとインストール済のエディタを選択できる.

$ sudo select-editor

Select an editor.  To change later, run 'select-editor'.
  1. /usr/bin/vim.gtk3
  2. /usr/bin/vim.nox
  3. /usr/bin/vim.basic
  4. /usr/bin/mcedit
  5. /usr/bin/vim.tiny
  6. /usr/bin/vscodium

Choose 1-6 [1]: 2

警告が出なくなりました :)

$ sudo crontab -e
crontab: installing new crontab

環境

$ dpkg-query -W sensible-utils cron vim
cron    3.0pl1-133
sensible-utils  0.0.12
vim     2:8.1.0875-2
$ lsb_release -dr
Description:    Debian GNU/Linux 10 (buster)
Release:        10
$ uname -m
x86_64

色々なプログラムで proxy を使えるようにする proxychains-ng を試す

proxychains-ng というものを見かけたので試してみます.ネットワーク関連の関数をフックして,SOCKS 4a, 5, HTTP proxy を利用できるようにします.
torsocks的な感じ.

とりあえずこんな感じで動きました

$ git clone https://github.com/rofl0r/proxychains-ng
$ cd proxychains-ng
$ ./configure && make

src/proxychains.confにtorの設定が書いてあるのでとりあえずそれで動かします.(tor daemon が動いている前提)
1回目はtimeoutに,2回目は成功.

$ ./proxychains4 -f src/proxychains.conf curl ifconfig.me/ip
  :
[proxychains] Strict chain  ...  127.0.0.1:9050  ...  ifconfig.me:80 <--socket error or timeout!
curl: (7) Couldn't connect to server
$ ./proxychains4 -f src/proxychains.conf curl ifconfig.me/ip
  :
[proxychains] Strict chain  ...  127.0.0.1:9050  ...  ifconfig.me:80  ...  OK
158.69.192.239

torsocksでは起動しないfirefox も起動した.

$ ./proxychains4 -f src/proxychains.conf firefox

Debian package にも proxychains4 という名前であった.こっちのほうが楽ですね.

$ apt show proxychains4
Package: proxychains4
Version: 4.13-4
Priority: optional
Section: net
Source: proxychains-ng
Maintainer: Boyuan Yang <byang@debian.org>
Installed-Size: 45.1 kB
Provides: proxychains, proxychains-ng
Depends: libproxychains4 (= 4.13-4), libc6 (>= 2.4)
Breaks: proxychains (<< 3.1-8)
Replaces: proxychains
Homepage: https://github.com/rofl0r/proxychains-ng
Download-Size: 14.1 kB
APT-Sources: http://ftp.jp.debian.org/debian sid/main amd64 Packages
Description: redirect connections through socks/http proxies (proxychains-ng)
 Proxychains is a UNIX program, that hooks network-related libc functions
 in dynamically linked programs via a preloaded DLL (dlsym(), LD_PRELOAD)
 and redirects the connections through SOCKS4a/5 or HTTP proxies.
 It supports TCP only (no UDP/ICMP etc).
 .
 This project, proxychains-ng, is the continuation of the unmaintained
 proxychains project (known as proxychains package in Debian).
$ sudo apt install proxychains4
$ $ proxychains4 curl ifconfig.me/ip
[proxychains] config file found: /etc/proxychains4.conf
[proxychains] preloading /usr/lib/x86_64-linux-gnu/libproxychains.so.4
[proxychains] DLL init: proxychains-ng 4.13
[proxychains] Strict chain  ...  127.0.0.1:9050  ...  ifconfig.me:80  ...  OK
94.230.208.147

環境

$ lsb_release -dr
Description:    Debian GNU/Linux 10 (buster)
Release:        10
$ uname -m
x86_64

apt upgrade で ping(inetutils-ping) が壊れていると言われて失敗する

Debian sid amd64 環境で,apt upgrade するとこんなエラーで失敗しました.

$ sudo apt upgrade
Reading package lists... Done
Building dependency tree     
Reading state information... Done    
Calculating upgrade... Done          
Some packages could not be installed. This may mean that you have
requested an impossible situation or if you are using the unstable
distribution that some required packages have not yet been created
or been moved out of Incoming.         
The following information may help to resolve the situation:

The following packages have unmet dependencies:
 inetutils-ping : Conflicts: ping
E: Broken packages 

ping コマンドはあるし実行も出来る.reinstall してみましたがエラーは解消されず.

$ sudo apt install --reinstall inetutils-ping                                                                     
Reading package lists... Done
Building dependency tree
Reading state information... Done
The following package was automatically installed and is no longer required:
  python-newt
Use 'sudo apt autoremove' to remove it.
0 upgraded, 0 newly installed, 1 reinstalled, 0 to remove and 57 not upgraded.
Need to get 0 B/226 kB of archives.
After this operation, 0 B of additional disk space will be used.
(Reading database ... 472864 files and directories currently installed.)
Preparing to unpack .../inetutils-ping_2%3a1.9.4-7_amd64.deb ...
Unpacking inetutils-ping (2:1.9.4-7) over (2:1.9.4-7) ...
Setting up inetutils-ping (2:1.9.4-7) ...
Processing triggers for man-db (2.8.5-2) ...

一時的に削除してみました.

$ sudo apt remove inetutils-ping
Reading package lists... Done
Building dependency tree       
Reading state information... Done
The following package was automatically installed and is no longer required:
  python-newt
Use 'sudo apt autoremove' to remove it.
The following packages will be REMOVED:
  inetutils-ping
0 upgraded, 0 newly installed, 1 to remove and 57 not upgraded.
After this operation, 358 kB disk space will be freed.
Do you want to continue? [Y/n] 
(Reading database ... 472864 files and directories currently installed.)
Removing inetutils-ping (2:1.9.4-7) ...
Processing triggers for man-db (2.8.5-2) ...

削除した後 apt upgrade を試すと通りました.

$ sudo apt upgrade

その後 ping を install し直したあと upgrade を試すとエラーは出なくなりました.

$ sudo apt install inetutils-ping
$ sudo apt upgrade>/dev/null 2>&1;echo $?
0

原因がよくわからないですね…….

環境

$ dpkg-query -W apt inetutils-ping
apt     1.8.0
inetutils-ping  2:1.9.4-7
$ lsb_release -dr
Description:    Debian GNU/Linux 10 (buster)
Release:        10
$ uname -m
x86_64

dhcp パケットをキャプチャするメモ

tcpdumpの場合
$ sudo tcpdump -i wlp3s0 port 67 or port 68 -e -n
[sudo] password for matoken:
tcpdump: verbose output suppressed, use -v or -vv for full protocol decode
listening on wlp3s0, link-type EN10MB (Ethernet), capture size 262144 bytes
21:07:44.898511 00:23:15:5b:a6:60 > ff:ff:ff:ff:ff:ff, ethertype IPv4 (0x0800), length 342: 0.0.0.0.68 > 255.255.255.255.67: BOOTP/DHCP, Request from 00:23:15:5b:a6:60, length 300
dhcpdump も読みやすくて便利
$ sudo dhcpdump -i wlp3s0
  TIME: 2019-04-10 21:17:17.398
	IP: 0.0.0.0 (0:23:15:5b:a6:60) > 255.255.255.255 (ff:ff:ff:ff:ff:ff)
	OP: 1 (BOOTPREQUEST)
 HTYPE: 1 (Ethernet)
  HLEN: 6
  HOPS: 0
   XID: 011d073a
  SECS: 0
 FLAGS: 0
CIADDR: 0.0.0.0
YIADDR: 0.0.0.0
SIADDR: 0.0.0.0
GIADDR: 0.0.0.0
CHADDR: 00:23:15:5b:a6:60:00:00:00:00:00:00:00:00:00:00
 SNAME: .
 FNAME: .
OPTION:  53 (  1) DHCP message type         3 (DHCPREQUEST)
OPTION:  50 (  4) Request IP address        192.168.1.5
OPTION:  12 (  5) Host name                 x201i
OPTION:  55 ( 17) Parameter Request List      1 (Subnet mask)
											 28 (Broadcast address)
											  2 (Time offset)
											  3 (Routers)
											 15 (Domainname)
											  6 (DNS server)
											119 (Domain Search)
											 12 (Host name)
											 44 (NetBIOS name server)
											 47 (NetBIOS scope)
											 26 (Interface MTU)
											121 (Classless Static Route)
											 42 (NTP servers)
											249 (MSFT - Classless route)
											 33 (Static route)
											252 (MSFT - WinSock Proxy Auto Detect)
											 17 (Root path)


--------------------


^C

apt/apt-get のエイプリルフール牛さん

昨夜なんとなく apt コマンドのイースターエッグの apt moo を実行してみました.するといつもとは違った牛が!

20190402 00 04 09 23354

Debian sid 環境だったのでもしかしてキャラクター変更されたのだろうかと思ったのですがしばらくしてから再度実行するといつもの牛.

20190402 20 04 14 16775

時計を見ると日付が04/01から04/02に変わったところでした.
04/01に出現したってことはエイプリルフールな牛かな?と faketime command を利用して1日前にして実行すると出てきました.

$ faketime -f '-1d' apt moo
               _     _
              (_\___( \,
                )___   _  Have you smashed some milk today?
               /( (_)-(_)    /
    ,---------'         \_
  //(  ',__,'      \  (' ')
 //  )              '----'
 '' ; \     .--.  ,/
    | )',_,'----( ;
    ||| '''     '||

若しくは04/01を指定

$ faketime '20190401' apt moo
               _     _
              (_\___( \,
                )___   _  Have you smashed some milk today?
               /( (_)-(_)    /
    ,---------'         \_
  //(  ',__,'      \  (' ')
 //  )              '----'
 '' ; \     .--.  ,/
    | )',_,'----( ;
    ||| '''     '||

多分この辺ですね

$ grep -A21 bool\ DoMooApril ./apt-private/private-moo.cc
static bool DoMooApril()                                                /*{{{*/
{
   // by Christopher Allan Webber and proposed by Paul Tagliamonte
   // in a "Community outreach": https://lists.debian.org/debian-devel/2013/04/msg00045.html
   if (_config->FindI("quiet") >= 2)
   {
      std::cerr << "Have you smashed some milk today?" << std::endl;
      return true;
   }
   c1out <<
      "               _     _\n"
      "              (_\\___( \\,\n"
      "                )___   _  Have you smashed some milk today?\n"
      "               /( (_)-(_)    /\n"
      "    ,---------'         \\_\n"
      "  //(  ',__,'      \\  (' ')\n"
      " //  )              '----'\n"
      " '' ; \\     .--.  ,/\n"
      "    | )',_,'----( ;\n"
      "    ||| '''     '||\n";
   return true;
}

1.4 で入ったぽい?

$ zgrep -A2 \(1.4\) /usr/share/doc/apt/changelog.gz
apt (1.4) unstable; urgency=medium

  * The April Fools' Release

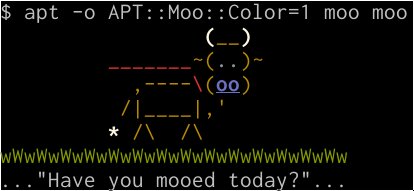
ちなみに moo moo でカラフルな牛が出てこないときは,APT::Moo::Color オプションが使えるようです.(エイプリルフール牛は単色のみみたい)

20190402 20 04 40 17194

永続化する場合や色をカスタマイズしたい場合は /usr/share/doc/apt/examples/configure-index.gz を参考に /etc/apt/apt.conf に設定すればok.

$ zgrep moo::color /usr/share/doc/apt/examples/configure-index.gz
apt::moo::color "<BOOL>";
$ echo 'apt::moo::color "true";' | sudo tee -a /etc/apt/apt.conf
apt::moo::color "true";
$ dpkg-query -W apt faketime
apt     1.8.0
faketime        0.9.7-3
$ lsb_release -dr
Description:    Debian GNU/Linux buster/sid
Release:        unstable
$ uname -m
x86_64

Endlessh を使って ssh 接続をとてもゆっくりと処理して攻撃者に嫌がらせをする

ssh は攻撃が多いです.公開鍵認証にしておくと大分侵入に強くなりますがインターネットに直接繋がっているサーバでは攻撃はとても多いです.

Endlessh はsshd の代わりに起動してバージョン情報を送る前のデータにほぼランダムな文字列をゆっくりと配信し続けて攻撃者の足止めをするプログラムのようです.
本当の sshd は別ポートで起動してそっちを使う感じでしょうか.22番を無くして port knocking や sslh を使うなどのほうがいいかもですが面白そうです.

ということで手元で少し試してみました.

導入とビルド
$ git clone https://github.com/skeeto/endlessh
$ cd endlessh
$ git log |head -1
commit 548a7b1521b2912e7e133d0d9df50e0e514f1f2c
$ make
port 22222 で起動
$ ./endlessh -v -p22222 &
[1] 22698
2019-03-24T04:56:10.338Z Port 22222
2019-03-24T04:56:10.338Z Delay 10000
2019-03-24T04:56:10.338Z MaxLineLength 32
2019-03-24T04:56:10.338Z MaxClients 4096
ssh 接続してみると700分ほど捕まえていた
$ time ssh localhost -p 22222
2019-03-24T04:56:19.510Z ACCEPT host=::1 port=59402 fd=4 n=1/4096
ssh_exchange_identification: No banner received

real    700m30.650s
user    0m0.040s
sys     0m0.240s
2019-03-24T16:37:00.162Z CLOSE host=::1 port=59402 fd=4 time=42040.652 bytes=73944
終了
$ kill %1
[1]+  Done                    ./endlessh -v -p22222

数回試しましたが,標準オプションでは700分前後捕まりました.単にありもののscriptを動かすレベルの攻撃者であればツールが対応するまでは妨害になりそうです.

環境
$ git log |head -1
commit 548a7b1521b2912e7e133d0d9df50e0e514f1f2c
$ dpkg-query -W openssh-client
openssh-client  1:7.9p1-9
$ lsb_release -dr
Description:    Debian GNU/Linux buster/sid
Release:        unstable
$ uname -m
x86_64

apticron でDebian/Ubuntuのパッケージ更新情報を取得する

最近は Debian/Ubuntu等でのパッケージ更新確認のために crontab にこんな感じのものを登録していました.

apt update 2>&1 | tail -1 | grep -v 'All packages are up to date.' && apt list --upgradable ; apt-cache stats

これはパッケージ情報を更新して,アップデートがあったらパッケージ一覧を求めています.とりあえずこれで使えていたのですが,apticron というパッケージを見つけました.
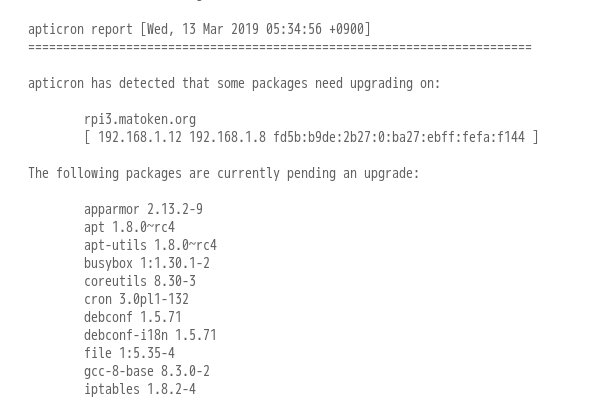
これはほぼ同じ機能のようですが,パッケージリストだけでなく changelog も含まれます.

20190316 22 03 57 12604

パッケージを導入すればとりあえず使えるようになります.
設定ファイルは /usr/lib/apticron/apticron.conf に雛形が用意されているので /etc/apticron/apticron.conf にコピーして編集します.といっても宛先のメールアドレスが root になっているのでそれを変更するくらいで問題なく使えています.
簡単便利.

Debian では jessie から,Ubuntu では trusty からパッケージがあるようです.

2019-03-17 add)
Google+(もうすぐ終了……) でjessie以前からあったようなというコメントをいただきました.changelogを見ると2002年からあったようです.packages.debian.org は jessie より古いものは置いてないので出てこないだけですね.

$ zcat /usr/share/doc/apticron/changelog.gz|tail -5
apticron (1.0.1) unstable; urgency=low

  * Initial Release.

 -- Colm MacCarthaigh   Fri,  9 Aug 2002 11:53:26 +0100

プライバシーやセキュリティが守られるprotonVPNの無料プランを少し試す

セキュアなメールサービスの ProtonMail と同じ Proton Technologies AGの VPN サービスの ProtonVPN を少し試してみました.
存在は知っていましたが接続するには専用アプリのみが必要だと思いこんでいました.openVPN で接続できるようなので試してみました.

ここでの VPN は拠点間などではなくスマートフォンやPCを公衆無線LANなどで接続したとき向けの個人向けVPNとしての話です.

無料VPNサービスはいろいろ見つかりますが,無料の代わりに個人情報を収集して販売していたりプライバシーポリシーでそういうことをしないとしつつも実際は行っていたりと怪しいものが多いです.

知識のある人であれば自宅にSBCなどで低価格,低消費電力でVPNサーバを用意したり,VPNサービスより安い価格のVPSサービスにセットアップして利用するなどといったことが可能ですが,知識のない人にサーバを立ててもらうのは難しいです.(一旦設定した後も使い続ける間はOSやサービスのアップデートなども必要だし……)

ProtonVPN は有料プランの他に無料プランがあり,無料プランでもプライバシーやセキュリティが守られるとなっています.無料はお試し版という扱いですね.無料プランでは接続できるサーバが限られており,無料プランで接続できるサーバは事に比べて利用率が高くなっています.時間帯によっては100%になっているので速度は低下すると思います.

実際にプライバシーやセキュリティが守られるのかが不安ですが,もともとジャーナリストや活動家を守るために作られたものであったり,MozillaがFirefoxに向けてのVPNサービスにProtonVPNを選ぶなどそれなりに信頼できそうな気がします.(少なくとも今の時点では)

ProtonVPN アカウントの作成

ProtonVPN を利用するためにアカントを作成します.
手順は以下に書かれています.メールアカウントが別途必要です.また,ProtonMail のアカウントを使ってProtonVPN のアカウントを作成するとこも出来るようなので私は ProtonMail でアカウントを作成しました.

Network Manager を利用して ProtonVPN に接続

お手軽にNetwork Manager の openVPN プラグインを利用して接続します.
以下に手順があるので真似します.

(GUIのNetwork Manager 以外にも command-line や IKEv2 での接続方法もあるようです.)_

必要なパッケージを導入します.

$ sudo apt install openvpn network-manager-openvpn-gnome resolvconf

ProtonVPN の設定ファイルを入手します.

  • ProtonVPN のサイトでログイン
  • Download ページに移動
  • plathome で「Linux」を選択
  • protocol はそのまま「UDP」
  • 無料プランでは「Secure Core configs」,「Country configs」は利用できないので「Server configs」を選択.
  • 後は任意の接続でダウンロード
    • 今回は「Japan」の「Japan Free#2」をダウンロードした

続いてNetwork Manager の設定をします.

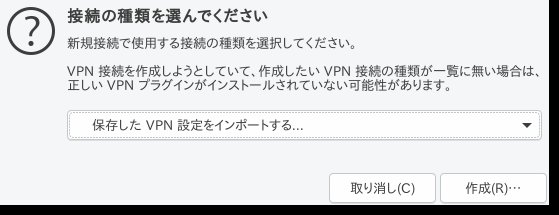
  • Network Manager のアイコンをクリックして,「VPN 接続(V)」->「VPN を設定(C)」を選択
  • 「接続の種類を選んでください」というウィンドウで,「保存した VPN 設定をインポートする…」を選んで「作成(R)…」を押す
    20190306-22-03-15-15118.jpg
  • ProtonVPN のページでダウンロードした設定ファイルを指定してインポートする
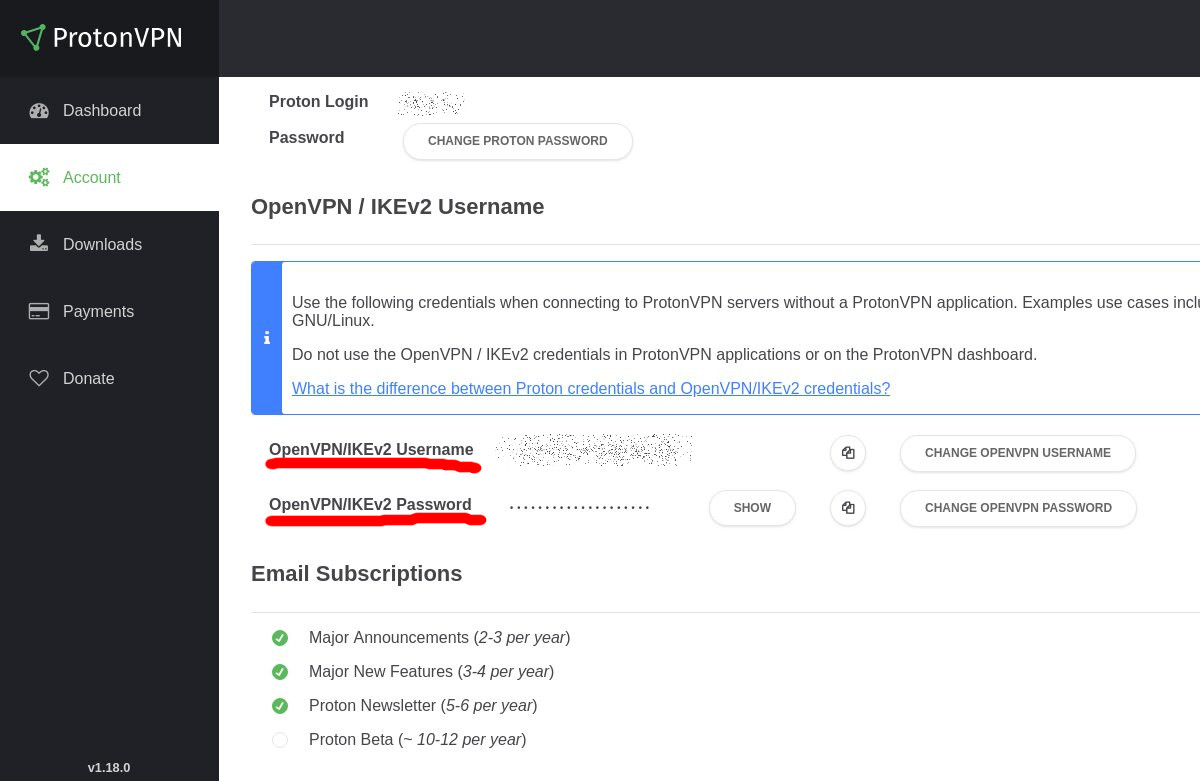
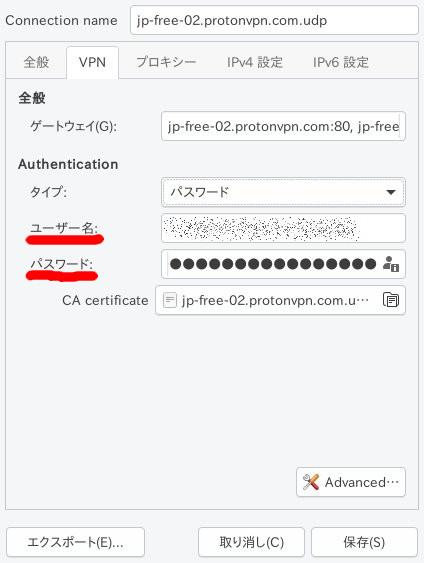
  • 次の設定画面のVPN タブで「ユーザ名」,「パスワード」を入力する.ユーザ名,パスワードは protonVPN のページで確認できる.(protonVPNサービスのものとは別で自動生成されている)
    20190306-22-03-21-8927.jpg
    20190306-22-03-05-17942.jpg

接続してみます.

  • Wi-Fi などのネットワークに接続した状態でNetwork Manager のアイコンをクリックして,「VPN 接続(V)」->設定したprotonVPN をクリック

リモートアドレスなどを確認するとVPN のものに変わっていました.

$ curl ifconfig.me/ip
185.242.4.204
$ dig | grep -i server:
;; SERVER: 10.8.8.1#53(10.8.8.1)
$ /sbin/ifconfig tun0
tun0: flags=4305<UP,POINTOPOINT,RUNNING,NOARP,MULTICAST>  mtu 1500
        inet 10.8.3.2  netmask 255.255.255.0  destination 10.8.3.2
        inet6 fe80::642a:6858:4f6:403  prefixlen 64  scopeid 0x20<link>
        unspec 00-00-00-00-00-00-00-00-00-00-00-00-00-00-00-00  txqueuelen 100  (不明なネット)
        RX packets 11489  bytes 8367918 (7.9 MiB)
        RX errors 0  dropped 0  overruns 0  frame 0
        TX packets 11204  bytes 2610990 (2.4 MiB)
        TX errors 0  dropped 0 overruns 0  carrier 0  collisions 0

$ whois 185.242.4.204
% This is the RIPE Database query service.
% The objects are in RPSL format.
%
% The RIPE Database is subject to Terms and Conditions.
% See -ripe.net - www.ripe.net/db/support/db-terms-conditions.pdf

% Note: this output has been filtered.
%       To receive output for a database update, use the "-B" flag.

% Information related to '185.242.4.0 - 185.242.4.255'

% Abuse contact for '185.242.4.0 - 185.242.4.255' is 'abuse@m247.ro'

inetnum:        185.242.4.0 - 185.242.4.255
netname:        M247-LTD-TOKYO
descr:          M247 LTD Tokyo Infrastructure
country:        JP
geoloc:         35.622214 139.7455763
admin-c:        GBXS24-RIPE
tech-c:         GBXS24-RIPE
status:         LIR-PARTITIONED PA
mnt-by:         GLOBALAXS-MNT
remarks:        ---- LEGAL CONCERNS ----
remarks:        For any legal requests, please send an email to
remarks:        ro-legal@m247.ro for a maximum 48hours response.
remarks:        ---- LEGAL CONCERNS----
created:        2018-01-17T11:32:30Z
last-modified:  2018-11-29T11:54:41Z
source:         RIPE

role:           GLOBALAXS TOKYO NOC
address:        2 Chome-1-17 Higashishinagawa, Shinagawa
address:        Tokyo 140-0002, Japan
abuse-mailbox:  abuse@m247.ro
nic-hdl:        GBXS24-RIPE
mnt-by:         GLOBALAXS-MNT
created:        2017-10-17T16:49:19Z
last-modified:  2018-07-18T11:04:41Z
source:         RIPE # Filtered

% Information related to '185.242.4.0/24AS9009'

route:          185.242.4.0/24
origin:         AS9009
mnt-by:         GLOBALAXS-MNT
created:        2018-01-17T11:33:29Z
last-modified:  2018-01-17T11:33:29Z
source:         RIPE

% This query was served by the RIPE Database Query Service version 1.92.6 (WAGYU)

速度については確認した回線がADSL で元々細いせいかVPN利用時,非利用時であまり変わりませんでした(400kB/s程).公衆無線LAN などでも試してみたいところです.

ちなみに,AndroidスマートフォンのProtonVPN を携帯回線で利用した状態で Wi-Fi 接続したら VPNのセッションは張り直されず Wi-Fi を利用しているつもりで携帯回線を使い続けていたということがありました.ちゃんと検証していないですが気をつけたほうが良さそうです.
OpenVPN Connect のほうがいいかも

Android環境

Android のバージョン:9
セキュリティパッチレベル: 2019年3月5日

Linux環境1

$ dpkg-query -W openvpn network-manager-openvpn-gnome resolvconf
network-manager-openvpn-gnome   1.8.10-1
openvpn 2.4.7-1
resolvconf      1.79
$ lsb_release -dr
Description:    Debian GNU/Linux buster/sid
Release:        unstable
$ uname -m
x86_64

Linux環境2
$ dpkg-query -W openvpn network-manager-openvpn-gnome resolvconf
network-manager-openvpn-gnome 1.8.10-1
openvpn 2.4.6-1ubuntu3
resolvconf 1.79ubuntu10
$ lsb_release -dr
Description: Ubuntu Disco Dingo (development branch)
Release: 19.04
$ uname -m
x86_64