最近入手した(遅) RaspberryPi 3 model B で USB メモリ起動の Debian buster aarch64 を設定してみたときのメモです.
ジモティー経由で Raspberry Pi 3 model B を入手しました.Raspberry Pi 3 model B + USB Wi-Fi + USB Bluetooth + ケースのセットが2,500円 + 送料手数料 500円と安いです.普通に新品で買うと 8,000円近くすると思います.今この記事を書いている時点で未だ在庫はあるようなので興味のある人は買うといいかもしれません.(6個同梱可能なのでそれだと1個あたりが少し安くなるので近所の友達と買うといいかも)

64bitになった Raspberry Pi は欲しいと思っていたので安く手に入って助かりました :)
(後継の Raspberry Pi 3 Model B+/A+ や,SoCが 3B と同じで無線機能のない 2B v1.2 とかも欲しいですね.)
Raspberry Pi 3 model B は 32bitだけでなく64bit も利用できるハードウェアです.せっかくなので 64bitで動かしたいけど今の時点では Raspbian は 32bitのみです.そこで Debian の arm64 を試すことにしました.
Raspberry Pi 3 用 Debian buster arm64 イメージの入手とUSBメモリへの書き込み
イメージは岩松さんの東京エリアDebian勉強会の資料を真似して作ろうと思っていたのですが,
DebianWiki の RaspberryPi3 の項目を見たら非公式だけどイメージがあったので今回はそれを利用しました.現在 testing の Buster のイメージが入手できます.
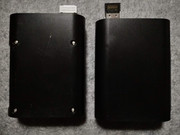
ストレージは通常 microSD を利用しますが,手持ちがないのと Raspberry Pi 3 B はUSB起動が可能なはずなのでUSBメモリを利用することにしました.USB 2.0接続の容量2GBのものを用意しました.
このような感じでイメージを入手してハッシュのチェックをした後USBメモリへ書き込みました.ここでは Linuxのddコマンドで書き込んでいますが,Etcherなどを利用すると色々な環境でGUIでの書き込みが可能です.
※イメージは最新のものを利用するようにしましょう.
$ wget -c https://people.debian.org/~gwolf/raspberrypi3/20190206/20190206-raspberry-pi-3-buster-PREVIEW.img.xz https://people.debian.org/~gwolf/raspberrypi3/20190206/20190206-raspberry-pi-3-buster-PREVIEW.img.xz.sha256
$ sha256sum -c ./20190206-raspberry-pi-3-buster-PREVIEW.img.xz.sha256
20190206-raspberry-pi-3-buster-PREVIEW.img.xz: 完了
$ xzcat 20190206-raspberry-pi-3-buster-PREVIEW.img.xz | pv | sudo dd of=/dev/sdb bs=1M oflag=dsync
USBから起動できるようOTPを設定する
注意:OTPの設定は1度しか出来ないし,元に戻すことも出来ないと思われます.起動時間が長くなるなどデメリットもあるので気をつけて設定してください.
このUSBメモリを Raspberry Pi に接続して電源を入れてみましたが起動しません.恐らく OTP(One Time Programmable)メモリの設定が USB起動に対応していないので以下のページを参考に設定します.(Raspberry Pi 3+ シリーズは標準でUSB起動可能なのでこの設定は不要なはずです.)
先ず Raspbian 2017-04-10 以降のイメージを書き込んだ microSD を用意して起動します.
( uart経由で繋ぎたい場合起動前に /boot/config.txt に enable_uart=1 を書いておきます. $ echo enable_uart=1 | tee -a /media/matoken/boot/config.txt )
OTP を確認するとやはり有効になっていませんでした.
pi@raspberrypi:~$ vcgencmd otp_dump | grep ^17:
17:1020000a
以下のように /boot/config.txt に program_usb_boot_mode=1 を追記して再起動すると反映されます.
$ echo program_usb_boot_mode=1 | sudo tee -a /boot/config.txt
program_usb_boot_mode=1
pi@raspberrypi:~$ sudo reboot
17 が 3020000a に変わればOK
pi@raspberrypi:~$ vcgencmd otp_dump | grep ^17:
17:3020000a
詳細は以下を参照してください
17 – bootmode register

Bit 1: sets the oscillator frequency to 19.2MHz
Bit 3: enables pull ups on the SDIO pins
Bit 19: enables GPIO bootmode
Bit 20: sets the bank to check for GPIO bootmode
Bit 21: enables booting from SD card
Bit 22: sets the bank to boot from
Bit 28: enables USB device booting
Bit 29: enables USB host booting (ethernet and mass storage)
設定前が,1020000a -> 0b010000001000000000000000001010 で設定後が,0x3020000a -> 0b110000001000000000000000001010 てことで,Bit 29 が 0 から 1 になってネットワーク起動とUSB起動を試すようにります.この状態で microSD 起動を試すとこれも大丈夫でした.(優先度は microSD > USB,Networkは未確認)
USBメモリからの起動
この状態で shutdown し,microSD を取り出して Debian の導入した USB メモリを接続して起動で起動しました.(USB起動の場合なかなか起動が始まらず焦ったけど30秒ほど待つとUARTにログが出はじめる.HDMIの出力は未確認)
login は root:raspberry
ちゃんと 64bit です :)
root@rpi3:~# uname -a
Linux rpi3 4.19.0-2-arm64 #1 SMP Debian 4.19.16-1 (2019-01-17) aarch64 GNU/Linux
細々とした設定(ほぼ余録)
パッケージの更新
root@rpi3:~# apt update && apt upgrade
一般ユーザの追加
root@rpi3:~# useradd -m matoken
root@rpi3:~# passwd matoken
Enter new UNIX password:
Retype new UNIX password:
passwd: password updated successfully
root@rpi3:~# chsh matoken -s /bin/bash
OpenSSH の設定変更
root@rpi3:~# diff -u /etc/ssh/sshd_config.old /etc/ssh/sshd_config
--- /etc/ssh/sshd_config.old    2019-02-06 15:15:46.940904823 +0000
+++ /etc/ssh/sshd_config        2019-02-16 13:17:17.076873278 +0000
@@ -29,7 +29,7 @@
 # Authentication:

 #LoginGraceTime 2m
-PermitRootLogin yes
+PermitRootLogin prohibit-password
 #StrictModes yes
 #MaxAuthTries 6
 #MaxSessions 10
@@ -53,7 +53,7 @@
 #IgnoreRhosts yes

 # To disable tunneled clear text passwords, change to no here!
-#PasswordAuthentication yes
+PasswordAuthentication no
 #PermitEmptyPasswords no

 # Change to yes to enable challenge-response passwords (beware issues with
@@ -119,3 +119,5 @@
 #      AllowTcpForwarding no
 #      PermitTTY no
 #      ForceCommand cvs server
+
+AllowGroups sshusers
sshusers グループを作成して ssh login 出来るユーザを登録
root@rpi3:~# sudo groupadd sshusers
root@rpi3:~# sudo usermod -a -G sshusers matoken
短いmodulus を削除する
root@rpi3:~# awk '$5>=3071' /etc/ssh/moduli | tee /etc/ssh/moduli.tmp
root@rpi3:~# wc -l /etc/ssh/moduli /etc/ssh/moduli.tmp
    427 /etc/ssh/moduli
    368 /etc/ssh/moduli.tmp
    795 total
root@rpi3:~# sudo mv /etc/ssh/moduli.tmp /etc/ssh/moduli
hostpcからssh公開鍵をcpしておく
$ ssh-copy-id -i ~/.ssh/id_ed25519_pi.pub matoken@rpi3
ssh鍵ペアを作っておく
root@rpi3:~# sudo -u matoken ssh-keygen -t ed25519
sshd の再起動
root@rpi3:~# systemctl restart ssh
ssh login時に通知を飛ばすようにしておく
root@rpi3:~# vi /etc/ssh/sshrc
root@rpi3:~# chmod +x /etc/ssh/sshrc
root@rpi3:~# cat /etc/ssh/sshrc
#!/bin/sh

/home/matoken/bin/telegram.sh sshrc:${USER}@`hostname`:${SSH_CONNECTION}
/home/matoken/bin/sms.sh sshrc:${USER}@`hostname`:${SSH_CONNECTION}
ssh でパスワードログインできず,鍵認証でログインが出来る&通知が飛ぶのを確認
root@rpi3:~# ssh root@localhost -o PasswordAuthentication=yes
root@rpi3:~# ssh matoken@localhost -o PasswordAuthentication=yes
root@rpi3:~# ssh matoken@localhost -i ~/.ssh/id_ed25519
自分のネットワークに合わせて /etc/iptables/rules.v4, /etc/iptables/rules.v6 を変更.
root@rpi3:~# grep -v ^# /etc/iptables/rules.v4
*filter
:INPUT ACCEPT [0:0]
:FORWARD ACCEPT [0:0]
:OUTPUT ACCEPT [0:0]
-A INPUT -s 127.0.0.0/8 -m comment --comment "RFC3330 loopback" -j ACCEPT
-A INPUT -s 192.168.1.0/24 -m comment --comment "RFC1918 reserved" -j ACCEPT
-A INPUT -p tcp -m tcp --dport 22 -m comment --comment SSH -j REJECT --reject-with icmp-port-unreachable
COMMIT
root@rpi3:~# grep -v ^# /etc/iptables/rules.v6
*filter
:INPUT ACCEPT [0:0]
:FORWARD ACCEPT [0:0]
:OUTPUT ACCEPT [0:0]
-A INPUT -s ::1/128 -m comment --comment "RFC3513 loopback" -j ACCEPT
-A INPUT -p tcp -m tcp --dport 22 -m comment --comment SSH -j REJECT --reject-with icmp6-port-unreachable
COMMIT
sudo を導入して設定
root@rpi3:~# apt install sudo
sudo groupにユーザを登録
root@rpi3:~# usermod -a -G sudo matoken
sudo が利用できるのを確認
matoken@rpi3:~$ sudo grep ^root: /etc/shadow
sudo: unable to resolve host rpi3: Name or service not known
root:!..VyaTFxP8kT6:17933:0:99999:7:::
rootユーザをロック
$ sudo passwd -l root
sudo: unable to resolve host rpi3: Name or service not known
passwd: password expiry information changed.
matoken@rpi3:~$ sudo passwd -S root
sudo: unable to resolve host rpi3: Name or service not known
root L 02/06/2019 0 99999 7 -1
sudo時などに「sudo: unable to resolve host rpi3: Name or service not known」と言われるので hosts の localhost に rpi3 を追加
matoken@rpi3:~$ sudo vi /etc/hosts
127.0.0.1 localhost rpi3
ここで再起動すると rootfs が見つからないと言われ起動しない.
(initramfs) Gave up waiting for root file system device. Common problems:
- Boot args (cat /proc/cmdline)
- Check rootdelay= (did the system wait long enough?)
- Missing modules (cat /proc/modules; ls /dev)
ALERT! /dev/mmcblk0p2 does not exist. Dropping to a shell!


BusyBox v1.27.2 (Debian 1:1.27.2-3) built-in shell (ash)
Enter 'help' for a list of built-in commands.
cmdline では /dev/mmcblkp2 から起動しようとしているが, /dev/sda2 から起動したい
(initramfs) ls /dev
block tty12 tty47
bsg tty13 tty48
bus tty14 tty49
char tty15 tty5
console tty16 tty50
core tty17 tty51
cpu_dma_latency tty18 tty52
disk tty19 tty53
fb0 tty2 tty54
fd tty20 tty55
full tty21 tty56
gpiochip0 tty22 tty57
gpiochip1 tty23 tty58
input tty24 tty59
kmsg tty25 tty6
kvm tty26 tty60
mem tty27 tty61
memory_bandwidth tty28 tty62
network_latency tty29 tty63
network_throughput tty3 tty7
null tty30 tty8
port tty31 tty9
psaux tty32 ttyAMA0
ptmx tty33 ttyS0
pts tty34 ttyS1
random tty35 ttyS2
sda tty36 ttyS3
sda1 tty37 urandom
sda2 tty38 vcs
snapshot tty39 vcs1
stderr tty4 vcsa
stdin tty40 vcsa1
stdout tty41 vcsu
tty tty42 vcsu1
tty0 tty43 vga_arbiter
tty1 tty44 zero
tty10 tty45
tty11 tty46
(initramfs) cat /proc/cmdline
bcm2708_fb.fbwidth=656 bcm2708_fb.fbheight=416 bcm2708_fb.fbswap=1 dma.dmachans=0x7f35 bcm2709.boardrev=0xa02082 bcm2709.serial=0xfaf144 bcm2709.uart_clock=48000000 smsc95xx.macaddr=B8:27:EB:FA:F1:44 vc_mem.mem_base=0x3ec00000 vc_mem.mem_size=0x40000000 console=tty0 console=ttyS1,115200 root=/dev/mmcblk0p2 rw elevator=deadline fsck.repair=yes net.ifnames=0 cma=64M rootwait
/boot を mount して書き換えようと思ったけどうまく mount 出来ない?
(initramfs) mkdir /tmp/boot
(initramfs) mount /dev/sda1 /tmp/boot
mount: mounting /dev/sda1 on /tmp/boot failed: Invalid argument
(initramfs) ls -la /dev/sda1 /tmp/boot
brw-------    1 0        0           8,   1 Jan  1 00:00 /dev/sda1

/tmp/boot:
total 0
drwxr-xr-x    2 0        0                0 Jan  1 00:10 .
drwxr-xr-x    3 0        0                0 Jan  1 00:10 ..
(initramfs) mount -t vfat /dev/sda1 /tmp/boot
mount: mounting /dev/sda1 on /tmp/boot failed: No such device
(initramfs) mkdir /tmp/root
(initramfs) modprobe ext4
(initramfs) mount /dev/sda2 /tmp/root
[ 2144.515323] EXT4-fs (sda2): mounted filesystem with ordered data mode. Opts: (null)
(initramfs) find /tmp/root -name "vfat.ko"
/tmp/root/usr/lib/modules/4.19.0-2-arm64/kernel/fs/fat/vfat.ko
(initramfs) modprobe -v /tmp/root/usr/lib/modules/4.19.0-2-arm64/kernel/fs/fat/vfat.ko
(initramfs) lsmod|grep fat
(initramfs) mount -t vfat /dev/sda1 /tmp/boot
mount: mounting /dev/sda1 on /tmp/boot failed: No such device
(initramfs) lsmod|grep fat
一旦電源を切って /boot/cmdline.txt の root=/dev/mmcblk0p2 を root=/dev/sda2 に書き換えて起動するようになった.(LABEL指定に変えたほうがいいかな)
$ cat /boot/firmware/cmdline.txt
console=tty0 console=ttyS1,115200 root=/dev/sda2 rw elevator=deadline fsck.repair=yes net.ifnames=0 cma=64M rootwait
※raspi3-firmware あたりのアップデートが掛かると上書きされるよう.
systemd から sysvinit に変更(RAMが開くかと思ったけど数MB程度だった)
$ sudo apt install sysvinit-core sysvinit-utils
LANGを設定
en_US.UTF-8 UTF-8, ja_JP.UTF-8 UTF-8 を有効にして,デフォルトロケールを ja_JP.UTF-8 にしたりした.
$ sudo dpkg-reconfigure locales
$ echo 'export LANG="ja_JP.UTF-8"
export LC_TIME="en_US.UTF-8"' | tee -a ~/.profile
$ source ~/.profile
$ locale
LANG=ja_JP.UTF-8
LANGUAGE=
LC_CTYPE="ja_JP.UTF-8"
LC_NUMERIC="ja_JP.UTF-8"
LC_TIME=en_US.UTF-8
LC_COLLATE="ja_JP.UTF-8"
LC_MONETARY="ja_JP.UTF-8"
LC_MESSAGES="ja_JP.UTF-8"
LC_PAPER="ja_JP.UTF-8"
LC_NAME="ja_JP.UTF-8"
LC_ADDRESS="ja_JP.UTF-8"
LC_TELEPHONE="ja_JP.UTF-8"
LC_MEASUREMENT="ja_JP.UTF-8"
LC_IDENTIFICATION="ja_JP.UTF-8"
LC_ALL=
Raspberry Pi には rtc がなくて再起動などで時計が初期化されてしまうので fake-hwclock を導入(電源断時などの時間はカウントされないので時間がずれるが時計が巻き戻らない)
$ sudo apt install fake-hwclock
ntpdate を導入して起動時の時計合わせをするようにする(systemdのままだとntpの面倒を見てくれるので必要ない)
$ sudo apt install ntpdate
$ sudo vi /etc/boot.d/ntpdate
$ cat /etc/boot.d/ntpdate
#!/bin/sh

ntpdate 1.jp.pool.ntp.org
$ sudo chmod +x /etc/boot.d/ntpdate
ntpdate iptables に合わせてこっちのほうがいいかも?(有線接続後に時計合わせする)
$ cat /etc/network/interfaces.d/eth0
auto eth0

# TODO: switch back to iptables-persistent once it re-enters testing
iface eth0 inet dhcp
        pre-up iptables-restore < /etc/iptables/rules.v4
        pre-up ip6tables-restore < /etc/iptables/rules.v6
        up ntpdate 1.jp.pool.ntp.org
uartでsetial接続するために /etc/inittab に以下を設定(systemdだと設定済みなので不要)
T1:23:respawn:/sbin/getty -L ttyS1 115200 vt100
msmtpを導入してメールを飛ばせるように
$ sudo apt install msmtp
$ sudo vi /etc/msmtprc
$ grep -v ^# /etc/msmtprc|uniq
defaults
syslog on
aliases /etc/aliases

tls on
tls_trust_file /etc/ssl/certs/ca-certificates.crt
auth on
syslog LOG_MAIL

account gmail
host smtp.gmail.com
port 587
from matohara@gmail.com
user matohara
password throjfeekdewxeib

account default : gmail
$ sudo vi /etc/aliases
$ grep -v ^# /etc/aliases
mailer-daemon:hoge@example.com
postmaster:hoge@example.com
nobody:hoge@example.com
hostmaster:hoge@example.com
usenet:hoge@example.com
news:hoge@example.com
webmaster:hoge@example.com
www:hoge@example.com
ftp:hoge@example.com
abuse:hoge@example.com
noc:hoge@example.com
security:hoge@example.com
root: hoge@example.com
default: hoge@example.com
$ echo 'hello' | msmtp matoken@ya.ru
$ sudo apt install msmtp-mta
$ echo 'hello' | /usr/sbin/sendmail matoken@ya.ru
無線を無効にするために /boot/firmware/config.txt に以下を追記……再起動しても反映されない?要確認
dtoverlay=pi3-disable-wifi
dtoverlay=pi3-disable-bt
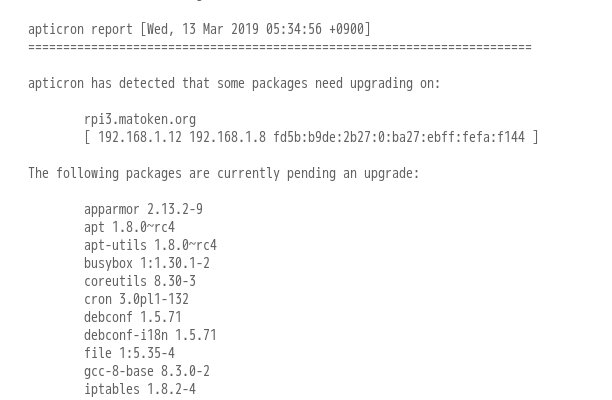
apticron を導入して更新をメールで通知する
$ sudo apt install apticron
$ sudo cp -p /usr/lib/apticron/apticron.conf /etc/apticron/
$ grep ^EMAIL= /etc/apticron/apticron.conf #必要なら宛先を書き換えたり
EMAIL="root"
deborphan でみなしごパッケージを通知するようにする
$ sudo apt install deborphan
$ sudo crontab -e
$ sudo crontab -l | grep deborphan | grep -v ^#
7 4 * * *       deborphan && printf "\nsudo apt --autoremove purge \$( deborpha)'
てことでとりあえず動くようになったけど昔もらったノベルティのUSBメモリなのでこのまま運用すると多分すぐ壊れてしまうと思います.
最近秋葉原でセールになっている様な安い SSD とか欲しいですね.
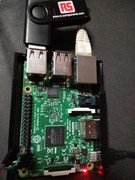
こちらは起動終了のUARTのメッセージ