smbgetのパスワード指定

sambaの速度を測るのにsambaをwgetのように使える smbget を使おうとしたのですが以前使えていた気がする -p オプションが無くなっています.

$ bash -c "read -sp \"passwd: \" passwd; smbget smb://smbhost/share/data -U user -p $passwd -O > /dev/null"
passwd: -p: unknown option

usageを見ると確かにありません.

$ smbget --usage
Usage: smbget [-?aneruRODqv] [-?|--help] [--usage] [-w|--workgroup=STRING] [-U|--user=STRING] [-a|--guest] [-n|--nonprompt] [-d|--debuglevel=INT] [-e|--encrypt]
        [-r|--resume] [-u|--update] [-R|--recursive] [-b|--blocksize=INT] [-o|--outputfile=STRING] [-O|--stdout] [-D|--dots] [-q|--quiet] [-v|--verbose]
        [-f|--rcfile=STRING]

-pを無くせばプロンプトが出てきますが毎回入力するのは面倒なのでどうにか出来ないかなとmanを見てみます.

man smbget
       -U, --user=username[%password]
           Username (and password) to use

-U オプションに一緒に書けるようです.デミリタは要らないよう.

$ bash -c "read -sp \"passwd: \" passwd; smbget smb://smbhost/share/data -U user$passwd -O > /dev/null"

デミリタに : を指定しても動きました.

$ bash -c "read -sp \"passwd: \" passwd; smbget smb://smbhost/share/data -U user:$passwd -O > /dev/null"

他にもSMB URLにも書けるようです.

man smbget
SMB URLS
       SMB URL's should be specified in the following format:

           smb://[[[domain;]user[:password@]]server[/share[/path[/file]]]]

ただし,この書き方だとSMB URLが環境変数が展開されてSTDOUTに表示されるのでパスワードを隠したい場合は使えません.

$ bash -c "read -sp \"passwd: \" passwd; smbget smb://user:$passwd@smbhost/share/data -O > /dev/null"
smb://user:password@smbhost/share/data(100.00%) at 130.69MB/s ETA: 00:00:0008
Downloaded 2.17GB in 17 seconds

それを言うと -U の場合もプロセスにパスワードが表示されてしまうのであまりよろしくないですね.てことでとりあえずこんな感じならいいかな?

$ bash -c "read -sp \"passwd: \" passwd; echo $passwd | smbget smb://smbhost/share/data -U user -O > /dev/null"

このときのプロセス

$ ps -ef|grep smbget
mk       12626 14620  0 22:38 pts/6    00:00:00 bash -c read -sp "passwd: " passwd; echo $passwd | smbget smb://smbhost/share/data -U user -O > /dev/null
mk       13263 12626 49 22:39 pts/6    00:00:00 smbget smb://smbhost/share/data -U user -O

あれ?結局最初に戻って…….

余録(キャッシュクリア)

速度を測りたいけど2回目以降はキャッシュされてしまうのでキャッシュをクリアして測る.
以下はlocalhostで試してるので差が出ているが,ネットワーク経由だとネットワークがボトルネックになり差が出なかった.でも一応やっておく.

1回目
smb://smbhost/share/data(100.00%) at 28.12MB/s ETA: 00:00:00434
Downloaded 2.17GB in 79 seconds
2回目
smb://smbhost/share/data(100.00%) at 130.69MB/s ETA: 00:00:0008
Downloaded 2.17GB in 17 seconds
キャッシュをクリア
$ sudo sh -c "sync; echo 3 > /proc/sys/vm/drop_caches"
もう一回
smb://smbhost/share/data(100.00%) at 27.43MB/s ETA: 00:00:0044
Downloaded 2.17GB in 81 seconds

/proc/sys/vm/drop_caches についてはKernel Documentsの admin-guide/sysctl/vm.rst.gz あたりを参照のこと.

$ zgrep ^drop_caches -A42 /usr/share/doc/linux-doc-5.3/Documentation/admin-guide/sysctl/vm.rst.gz

環境

環境1
$ dpkg-query -W samba smbclient bash
bash    4.4.18-2ubuntu1.2
samba   2:4.7.6+dfsg~ubuntu-0ubuntu2.14
smbclient       2:4.7.6+dfsg~ubuntu-0ubuntu2.14
$ lsb_release -dr
Description:    Ubuntu 18.04.3 LTS
Release:        18.04
$ uname -rvm
4.15.0-72-generic #81-Ubuntu SMP Tue Nov 26 12:20:02 UTC 2019 x86_64
環境2
$ dpkg-query -W samba smbclient bash
bash    5.0-5
samba   2:4.11.1+dfsg-3
smbclient       2:4.11.1+dfsg-3
$ lsb_release -dr
Description:    Debian GNU/Linux bullseye/sid
Release:        unstable
$ uname -rvm
5.3.0-3-amd64 #1 SMP Debian 5.3.15-1 (2019-12-07) x86_64

Nextcloudのデータディレクトリを移動するメモ

Nextcloudのデータディレクトリは既定値ではNextcloudのすぐ下の data ディレクトリになります.しかしここはウェブサーバのドキュメントルート以下になってしまい設定をミスするとデータディレクトリが一般公開されてしまう可能性があり少し怖いです.
そこでNextcloud導入時に設定ファイルの config/config.phpdatadirectory にウェブサーバドキュメントルートの外にNextcloudデータを設定します.

今回デフォルトのウェブサーバドキュメントルート内のまま運用されているNextcloudがあったのでそれをウェブサーバドキュメントルート外に移動してみました.
ディスクを増設してそちらにデータを移すなどの際にも同じ手順でデータ移行できると思います.

今回の例でのパスはこんな感じです.

  • Nextcloud導入ディレクトリ : /var/www/nextcloud
  • 旧Nextcloud データディレクトリ : /var/www/nextcloud/data
  • 新Nextcloud データディレクトリ : /var/data/nextcloud/data
Important
インストール後のデータディレクトリの移動は公式ではサポートされていません.

ファイルのコピー

同一のファイルシステム間であれば mv commandで一瞬ですが,今回はファイルシステムを跨いでいるので時間がかかります.
ダウンタイムを短くしたいのでNextcloud動作状態で一度データをコピーしてその後rsyncで差分のみコピーすることにします.

1度目のコピー

$ sudo cp -a /var/www/nextcloud/data /var/www/nextcloud/

rsyncでデータ同期

1度目のデータコピーに時間がかかったのでrsyncで同期

$ sudo rsync -avc /var/www/nextcloud/data /var/www/nextcloud/

バックグラウンドジョブを停止(恐らくこの手順は不要)

次の手順でメンテナンスモードに移行するので不要だと思うけど念の為バックグラウンドジョブをcrontabで設定しているのを停止(コメントアウト)しておく.(Webcronの場合も止めたほうがいいかも.AJAXの場合は恐らく不要)

$ sudo -u www-data crontab -e

メンテナンスモードに移行

ここからNextcloudは利用できなくなります.

$ sudo -u www-data php ./occ maintenance:mode --on

データ同期

-c オプションも付けたほうがいいけどデータが大きいと時間がかかるので今回はなしであとでチェックすることにする.

$ sudo rsync -av /var/www/nextcloud/data /var/www/nextcloud/

データベース書き換え

Nextcludのデータベース内のファイルディレクトリ情報を書き換えます.書き換え前に念の為データベースのバックアップも取っておきます.

バックアップ
$ sh -c "umask 266 ; mysqldump -uroot -p --opt --all-databases --events | xz > mysqlbackup-`date +\%F_\%T_\%s_$`.sql.xz"
db書き換え
$ mysql -unextcloud -p
mysql> use nextcloud;
mysql> update oc_storages set id='local::/var/data/nextcloud/data/' where id='local::/var/www/nextcloud/data/';
mysql> quit;

設定ファイル書き換え

Nextcloudの設定ファイルの config/config.php の中の datadirectory を新しいパスに書き換えます.

  'datadirectory' => '/var/data/nextcloud/data',

メンテナンスモードをoffにする

$ sudo -u www-data php ./occ maintenance:mode --off

動作確認

Nextcloudにログインしてファイルディレクトリが閲覧できることを確認する.

バックグラウンドジョブを設定

バックグラウンドジョブをcrontabで再設定

$ sudo -u www-data crontab -e

旧データの削除

しばらく運用して問題ないようなら旧データを削除する.

$ sudo rm -rf /var/www/nextcloud/data

生ディスクなんかだと secure-delete とか使うと少し安心.でも確実じゃないし時間かかるので暗号化fsを推奨.

$ sudo nice -20 ionice -c1 -n0 srm -r /var/www/nextcloud/data

環境

$ sudo -u www-data php ./occ -V
Nextcloud 17.0.1
$ dpkg-query -W php7.2-common mysql-server
mysql-server    5.7.28-0ubuntu0.18.04.4
php7.2-common   7.2.24-0ubuntu0.18.04.1
$ lsb_release -dr
Description:    Ubuntu 18.04.3 LTS
Release:        18.04
$ uname -m
x86_64

Nextcloud upgrade時に`Check for expected files The following extra files have been found: .rnd` と言われて失敗する(15.0.7→16.0.6)

Nextcloud 15.0.7からNextcloud 16.0.6へのアップグレードを行おうとしたところ,アップグレード画面で以下のようなメッセージが表示されて先に勧めません.

Nextcloud upgrade failed 20191125 13:11:17 12878

Check for expected files
The following extra files have been found:
.rnd

Nextcloud 以下を確認すると3つの .rnd ファイルが見つかりました.

$ cd /export/data/var/nextcloud-data
$ find ./ -name .rnd -ls
13495506336      0 drwxr-xr-x   3 www-data www-data       38 Jan 31  2018 ./data/matoken/files_encryption/keys/files/tmp/pizero/home/pi/.rnd
15757999341     12 -rw-r--r--   1 www-data www-data     9656 Jan 31  2018 ./data/matoken/files/tmp/pizero/home/pi/.rnd
11866753713      4 -rw-------   1 www-data www-data     1024 Nov 25 13:19 ./.rnd

以下のページを見ると,Nextcloud 直下の .rnd ファイルが悪さをしているようなのでこれを退避します.

$ sudo mv ./.rnd ~/tmp

この後もう一度アップグレードを試みるとうまく行きました.

This behavior continues up to version 15.0.7.

とのことでぎりぎり引っかかったようです😣

環境
$ sudo -u www-data php ./occ -V
Nextcloud 16.0.6
$ dpkg-query -W php7.2-common mysql-server
mysql-server    5.7.28-0ubuntu0.18.04.4
php7.2-common   7.2.24-0ubuntu0.18.04.1
$ lsb_release -dr
Description:    Ubuntu 18.04.3 LTS
Release:        18.04
$ uname -m
x86_64

Ebook reader(files_reader)を有効にしてNextcloud 16を動かなくしてしまう

Nextcloudをいじっていたらエラー画面に><

Nextcloud 20191018 16:10:02 29472

表示されているリクエストIDでログを検索してjqで展開します.

$ sudo grep 'iFqSO6b3lcl9qAXbLJXt' nextcloud.log | jq .|lv

この辺りがエラーのよう.
files_reader アプリに問題があるようです.

  "message": {
    "Exception": "Error",
    "Message": "Class 'OCP\\Config' not found",
    "Code": 0,
    "Trace": [
      {
        "file": "/var/www/files.matoken.org/apps/files_reader/lib/Hooks.php",
        "line": 41,
        "function": "get",
        "class": "OCA\\Files_Reader\\Config",
        "type": "::",
        "args": [
          "epub_enable",
          "true"
        ]
      },
      {
        "file": "/var/www/files.matoken.org/lib/private/legacy/hook.php",
        "line": 106,
        "function": "announce_settings",
        "class": "OCA\\Files_Reader\\Hooks",
        "type": "::",

とりあえずoccコマンドで`files_reader` を無効にしてエラーは解消されました.

$ php ./occ app:disable files_reader
files_reader disabled

今回エラーになったEbook reader(files_reader)はアプリストア内で確認するとNextcloud 9~13 でした.

しかし,Nextcloudのアプリ画面では「未テストのアプリを有効にする」といった警告がないので導入してしまう…….

Nextcloud 20191018 16:10:43 6871

IssueやPRは上がっているようです.

環境
$ php ./occ app:list|grep files_reader
  - files_reader
$ php ./occ status|grep version:
  - version: 16.0.5.1
$ dpkg-query -W php
php     2:7.3+69
$ lsb_release -dr
Description:    Debian GNU/Linux 10 (buster)
Release:        10
$ uname -m
x86_64

Firefox のマウス,タッチパッド等でのズーム機能を無効にする

精度の悪いタッチパッドを使っていると2本指でスクロールしたつもりが拡大,縮小になってしまうことがあります.スクロールのつもりなので操作量も多く一気に拡大されたり縮小されたり…….

Firefox でこの機能を無効にしてみました.
以下の手順ではポインティングデバイスでのズーム機能は無効化されますが,キーボード・ショートカットでのズームは利用できます.

about:config で設定(GUI)

Firefox のアドレスバーに about:config を入力して開き, zoom.maxPercent, zoom.minPercent をそれぞれ 100 に書き換える.
この手順の場合即時反映される.

20190710 22 21 33 001

設定ファイルで設定

Firefox の対象のプロファイルのあるディクトリに user.js ファイルを作成し起動すると反映される.

プロファイルのあるディレクトリは ~/.mozilla/firefox/profiles.ini を確認する.
以下の例では,~/.mozilla/firefox/4dx27pta.default/ になる.

~/.mozilla/firefox/profiles.ini
[Install4F96D1932A9F858E]
Default=4dx27pta.default

[Profile0]
Name=default
IsRelative=1
Path=4dx27pta.default
Default=1

[General]
StartWithLastProfile=1
Version=2

user.js を以下の内容で作成する.既に存在する場合は追記する.

~/.mozilla/firefox/4dx27pta.default/user.js
user_pref("zoom.maxPercent", 100);
user_pref("zoom.minPercent", 100);

環境

$ dpkg-query -W firefox
firefox 68.0+build3-0ubuntu0.18.04.1
$ hostnamectl | egrep 'Operating System|Architecture'
  Operating System: Ubuntu 18.04.2 LTS
      Architecture: arm64

apt-cacher-ng で https リポジトリを直接アクセスするようにする

apt-cacher-ng で各種リポジトリをキャッシュしているのですが,https の場合エラーになってしまいます.

error message
$ sudo apt update
Err:1 https://updates.signal.org/desktop/apt xenial InRelease              Reading from proxy failed - read (115: Operation now in progress) [IP: 192.168.1.102 3142]                                                      Err:2 https://deb.opera.com/opera-stable stable InRelease
  Reading from proxy failed - read (115: Operation now in progress) [IP: 192.168.1.102 3142]
 :
W: Failed to fetch https://deb.opera.com/opera-stable/dists/stable/InRelease  Reading from proxy failed - read (115: Operation now in progress) [IP: 192.168.1.102 3142]
W: Failed to fetch https://updates.signal.org/desktop/apt/dists/xenial/InRelease  Reading from proxy failed - read (115: Operation now in progress) [IP: 192.168.1.102 3142]
W: Some index files failed to download. They have been ignored, or old ones used instead.

Debian wiki に解決方法が載っていました.https の場合はキャッシュせずに直接見に行かせる設定が出来るようです.

HTTPS repositories
apt-cacher-ng will obviously fail to serve HTTPS repositories. There are many solutions upstream but I have found the simplest solution to be to simply tunnel HTTPS connections directly on the proxy, by putting this in /etc/apt-cacher-ng/acng.conf:

PassThroughPattern: .*

This is, as far as I can tell, the only way to avoid doing a special configuration on the clients for HTTPS repositories. The downside is that HTTPS content is not cached.

/etc/apt-cacher-ng/acng.confPassThroughPattern: .* を設定してデーモンを再起動することで直接アクセスしてエラーを出さなくなりました.

以下のページのように source.list を書き換えてhttps であってもキャッシュする方法もあるようですが今回はなしで.

apt-cacher-ng環境
$ dpkg-query -W apt-cacher-ng
apt-cacher-ng   3.1-1build1
$ hostnamectl | egrep 'Operating System|Architecture'
  Operating System: Ubuntu 18.04.2 LTS
      Architecture: x86-64
apt実行環境
$ dpkg-query -W apt
apt     1.8.2
$ hostnamectl | egrep 'Operating System|Architecture'
  Operating System: Debian GNU/Linux bullseye/sid
      Architecture: x86-64

crontab の実行タイミングをわかりやすく表示してくれる cronv を試す

ちょっと試したら少し嵌ったのでメモがてら.

build
$ go get github.com/takumakanari/cronv/cronv
$ go build -o ./cronv github.com/takumakanari/cronv/cronv
Usage
$ ./cronv -h
Usage:
  Cronv v0.4.1 [OPTIONS]

Application Options:
  -o, --output=    path to .html file to output (default: ./crontab.html)
  -d, --duration=  duration to visualize in N{suffix} style. e.g.) 1d(day)/1h(hour)/1m(minute) (default: 6h)
      --from-date= start date in the format '2006/01/02' to visualize (default: 2019/05/25)
      --from-time= start time in the format '15:04' to visualize (default: 02:50)
  -t, --title=     title/label of output (default: Cron Tasks)
  -w, --width=     Table width of output (default: 100)

Help Options:
  -h, --help       Show this help message
実行
$ crontab -l | ./cronv

2019-06-01 ADD: 以下のtab が含まれているときにエラーとなる問題は修正されました😖

しかし,missing field(s) とか syntax error in year field: とかのエラーになってしまう.

$ printf "* * * * *\tcommand\n"
* * * * *       command
$ printf "* * * * *\tcommand\n" | ./cronv
panic: Failed to analyze cron '* * * * *        command': syntax error in year field: 'command'

goroutine 1 [running]:
panic
        ../../../src/libgo/go/runtime/panic.go:554
main.main
        /home/mk/go/src/github.com/takumakanari/cronv/cronv/main.go:33

タブ区切りをやめてスペース区切りにするとエラーが出ない

$ printf "* * * * * command\n" | ./cronv
[Cron Tasks] 1 tasks.
[Cron Tasks] './crontab.html' generated.

ということでとりあえずタブをスペースに変換することにした.

$ crontab -l | tr -s '\t' ' ' | ./cronv
[Cron Tasks] 8 tasks.
[Cron Tasks] './crontab.html' generated.

作成された crontab.html を w3m で……ほとんど表示されない.

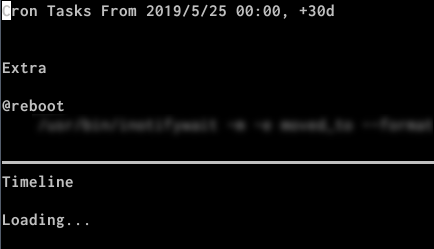
20190525 03 36 35 001

もう少しリッチな JavaScript の動くウェブブラウザで開くとOK.
これからの6時間分の様子が見える.

20190525 03 00 01 001

-d, --duration option で表示する時間間隔が指定できる.
開始日時は,--fron-date, --from-time option で指定できる.
以下の例では 2019-05-25 00:00:00 から1日分の表示になる.

$ crontab -l | tr -s '\t' ' ' | ./cronv -d 1d --from-date=2019/05/25 --from-time=00:00

20190525 02 58 37 001

ちなみに1ヶ月も試したが,ウェブブラウザで表示するのにとても時間が掛かった.

環境
$ dpkg-query -W cron gccgo-go
cron    3.0pl1-128.1ubuntu1
gccgo-go        2:1.10~4ubuntu1
$ lsb_release -d
Description:    Ubuntu 18.04.2 LTS
$ uname -m
x86_64

Ubuntu Server インストーラの Github, Launchpad からの ssh公開鍵インポート機能

github.com/settings/keys からSSH Keyとして突っ込んどくと便利だし、今のUbuntu Serverはセットアップでそれを使う項目すらあるので

なるほど便利そう
試してみようと Ubuntu Server 18.04.2 LTS
(ubuntu-18.04.2-live-server-amd64.iso) のインストーラで試してみました.

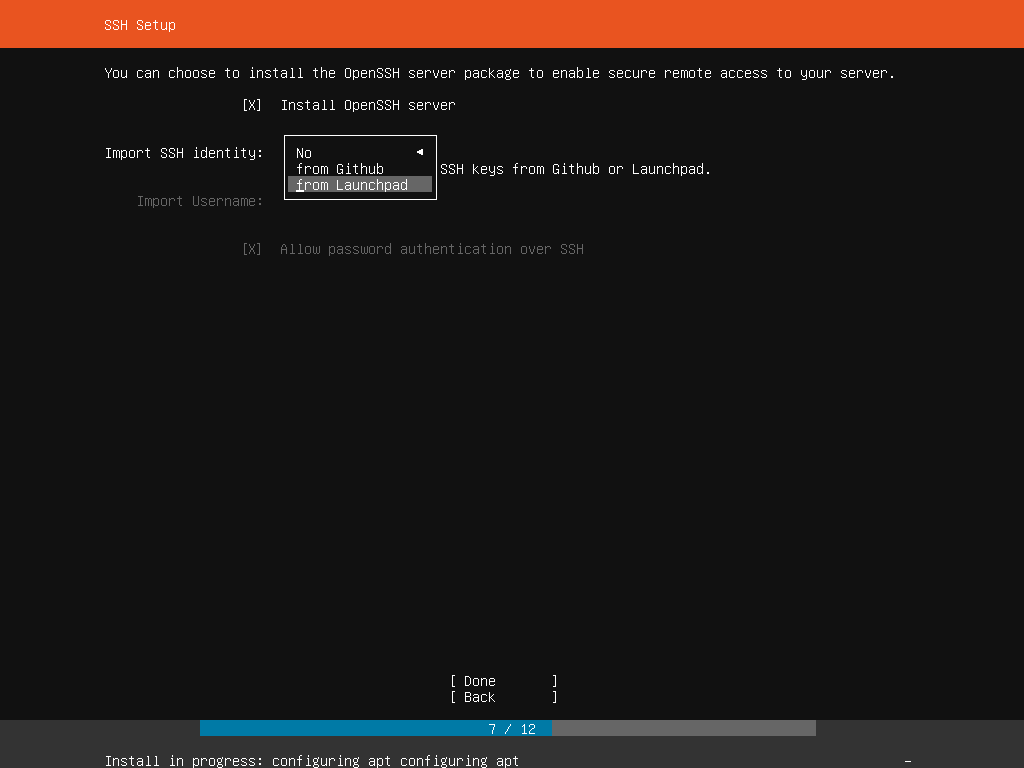
OpenSSH を導入するようにすると,SSH鍵をインポートするオプションで Github / Launchpad が選べます.
Screenshot ubuntu18 04 2019 03 30 13 02 56

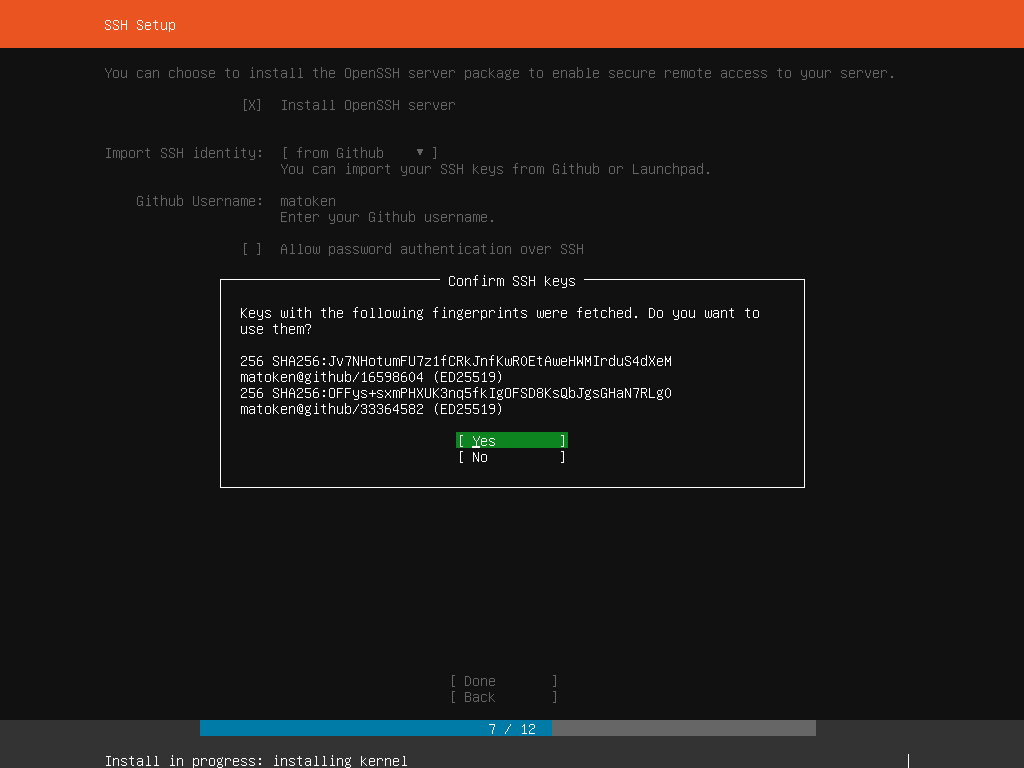
こんな感じでインポートされました.
Screenshot ubuntu18 04 2019 03 30 13 05 37

インストールが終了して ssh login するとインポートされた鍵で login 出来ました.

インポートされた公開鍵を確認するとコメント部分が少し書き換わっています.

$ cat ~/.ssh/authorized_keys
ssh-ed25519 AAAAC3NzaC1lZDI1NTE5AAAAIPgwY9aZPxN/YoBBzd7TOcCk7EuGO0E9PuUjCHPtTuHP matoken@github/16598604 # ssh-import-id gh:matoken
ssh-ed25519 AAAAC3NzaC1lZDI1NTE5AAAAIEoKnbjj7cVafcAJbYHqUEua1x/81uzoK0LnjgqmR6H8 matoken@github/33364582 # ssh-import-id gh:matoken

sshd_config を見ると編集ではなく末尾に追記してるのでちょっと雑い感.

$ grep PasswordAuthentication /etc/ssh/sshd_config
#PasswordAuthentication yes
# PasswordAuthentication.  Depending on your PAM configuration,
# PAM authentication, then enable this but set PasswordAuthentication
PasswordAuthentication no
$ tail -1 /etc/ssh/sshd_config
PasswordAuthentication no

ちなみに,Github から鍵を入手するのはこんな感じで行けるようです.
(<USERNAME>部分を該当ユーザ名に修正)

Launchpad はこんな感じ.

ちなみにLaunchpad は未だED25519形式には未対応なようです.
20190330 13 03 12 27418

Bitbucket の鍵も同様に https://api.bitbucket.org/2.0/users/<USERNAME>/ssh-keys で入手できそうと思ったのですが,未認証では駄目みたいです.

$ curl -s https://api.bitbucket.org/2.0/users/matoken/ssh-keys|jq
{
  "type": "error",
  "error": {
    "message": "This API is only accessible with the following authentication types: session, password, apppassword"
  }
}
環境
$ lsb_release -d
Description:	Ubuntu 18.04.2 LTS
$ uname -m
x86_64

GNU social にアクセスするとなにも表示されなくなって困る

gnusocial

さっきまでは動いていたのにウェブブラウザ(qutebrowser)のバージョンアップに追従するために再起動して,自分用 GNU social にアクセスすると画面が真っ白です><
スマートフォンのアプリ経由(Twidere)だと動作しているので表示周りの問題でしょうか?

config.php
$config['site']['logfile'] に指定しているログファイルを確認するとこんなメッセージがありました.

2019-03-22 14:35:28 LOG_DEBUG: [gnusocial.matoken.org:29424.bda9531d GET /] action.php - Server error '500' on 'qvitter': Class 'Locale' not found
2019-03-22 14:35:28 LOG_ERR: [gnusocial.matoken.org:29424.bda9531d GET /] Handled serverError (500) but cannot output into desired format (NULL): 'Class \'Locale\' not found'
2019-03-22 14:35:28 LOG_ERR: [gnusocial.matoken.org:29424.bda9531d GET /] ServerErrorAction: 500 Class 'Locale' not found

このあたりで使おうとしているよう

$ find plugins/Qvitter -type f -print0 | xargs -0 grep -n Locale
plugins/Qvitter/actions/qvitter.php:341:                    window.usersLanguageNameInEnglish = <?php print json_encode(Locale::getDisplayLanguage($user_browser_language, 'en')) ?>;
plugins/Qvitter/actions/qvitter.php:462:                                                $languagecodesandnames[$lancode]['english_name'] = Locale::getDisplayName($lancode, 'en');
plugins/Qvitter/actions/qvitter.php:463:                                                $languagecodesandnames[$lancode]['name'] = Locale::getDisplayName($lancode, $lancode);

これが見つからないか存在しない状態のようです.

それらしいpackage を探して,

$ apt-cache search ^php international
php-horde-idna - IDNA backend normalization package
php-horde-ingo - An email filter rules manager
php-intl - Internationalisation module for PHP [default]
php-net-idna2 - PHP Pear module for handling international domain names
php-symfony-translation - tools to internationalize an application
php7.2-intl - Internationalisation module for PHP
phpmyadmin - MySQL web administration tool
php7.0-intl - Internationalisation module for PHP
$ apt show php-intl
Package: php-intl
Version: 1:7.2+60ubuntu1
Priority: optional
Section: universe/php
Source: php-defaults (60ubuntu1)
Origin: Ubuntu
Maintainer: Ubuntu Developers <ubuntu-devel-discuss@lists.ubuntu.com>
Original-Maintainer: Debian PHP Maintainers <pkg-php-maint@lists.alioth.debian.org>
Bugs: https://bugs.launchpad.net/ubuntu/+filebug
Installed-Size: 12.3 kB
Depends: php-common, php7.2-intl
Download-Size: 2,012 B
APT-Sources: http://jp.archive.ubuntu.com/ubuntu bionic/universe amd64 Packages
Description: Internationalisation module for PHP [default]
 This package provides a Internationalisation module for PHP.
 .
 PHP (recursive acronym for PHP: Hypertext Preprocessor) is a widely-used
 open source general-purpose scripting language that is especially suited
 for web development and can be embedded into HTML.
 .
 This package is a dependency package, which depends on Ubuntu's default
 PHP version (currently 7.2).

導入することで解決しました.

sudo apt-get install php7.2-intl

恐らく php のバージョンを上げたときに漏れてしまい,API などは問題なく使えていたのでウェブブラウザを再起動するまで気づかなかった感じのようです.

しかし,GNU social はこういう警告をよく見かけるのでどうにかしないといけないですね.開発は滞っている感じなので Pleroma あたりに移行するのがいいんでしょうが…….

this will throw an Error in a future version of PHP

環境

$ dpkg-query -W php7.2-intl
php7.2-intl     7.2.15-0ubuntu0.18.04.1
$ w3m -dump https://gnusocial.matoken.org/nodeinfo/2.0|jq .software
{
  "name": "gnusocial",
  "version": "1.2.0-beta5"
}
$ lsb_release -d
Description:    Ubuntu 18.04.2 LTS
$ uname -m
x86_64

Debian, Ubuntu で 上流のパッケージを借りてくる

以前以下のような記事を書きました.

今でもこのblogの中ではアクセスが多く,最近もトラックバックをもらいました.

この当時は arm64 の mozcパッケージがなくて自分でbuild したという話なのですが,現在はDebian では buster(testing), Ubuntu ではartful(17.10) 以降でパッケージが存在します.
なのでこの野良パッケージを使うよりも公式の上流パッケージを借りるほうが大抵の場合いいと思います.
ということで手順を書いておきます.

パッケージファイルだけが必要な場合はパッケージのページからダウンロード可能です.

野良パッケージは近日中に削除します.

Debian stretch arm64 に Debian buster arm64 の mozc を借りてくる

Debian stretch arm64 では mozc-data しかない
$ apt-cache search mozc
mozc-data - Mozc input method - data files

buster(testing) のmozc を借りてくることにする.

/etc/apt/preferences で buster の優先度を下げる

/etc/apt/preferences
Package: *
Pin: release n=buster
Pin-Priority: 100
/etc/apt/sources.list に buster(testing)追加 設定
deb http://deb.debian.org/debian buster main

sources.list の編集には apt edit-sources を使うと文法チェックをしてくれるのでおすすめ

パッケージ情報の更新
$ sudo apt update
mozcパッケージの確認
$ apt-cache search mozc
mozc-data - Mozc input method - data files
fcitx-dbus-status - Addon for Fcitx to set/get/monitor IM statuses via D-Bus
emacs-mozc - Mozc for Emacs
emacs-mozc-bin - Helper module for emacs-mozc
fcitx-mozc - Mozc engine for fcitx - Client of the Mozc input method
ibus-mozc - Mozc engine for IBus - Client of the Mozc input method
mozc-server - Server of the Mozc input method
mozc-utils-gui - GUI utilities of the Mozc input method
uim-mozc - Mozc engine for uim - Client of the Mozc input method
パッケージの導入
$ apt install fcitx-mozc -t buster

後は通常の apt update && apt upgrade で stretch で導入したパッケージは stretch で,buster で導入したパッケージはbuster で更新されるはず.

Ubuntu 16.04 LTS xenial arm64 に Ubuntu 18.04 LTS bionic arm64 の mozc を借りてくる

Debianの手順と同じでもokだと思うけど念の為以下の手順を真似してみる.

mozc は Ubuntu 17.10 artful から対応しているが,もうサポートされないのでUbuntu 18.04 bionic を使う.

標準のリリースを xenial に設定

/etc/apt/apt.conf.d/01ubuntu
APT::Default-Release "xenial";

mozc をpinningする

/etc/apt/preferences
Package: *mozc*
Pin: release n=xenial
Pin-Priority: -10

Package: *mozc*
Pin: release n=bionic
Pin-Priority: 900

/etc/apt/sources.list に buster(testing) を 追加 設定

/etc/apt/sources.list
deb http://ports.ubuntu.com/ bionic main universe

※sources.list の編集には apt edit-sources を使うと文法チェックをしてくれるのでおすすめ
※mirrorにより arm64 が置かれていないので注意

パッケージ情報の更新
$ sudo apt update
検索結果にmozcが出てくる
$ apt-cache search mozc
mozc-data - Mozc input method - data files
ibus-mozc - Mozc engine for IBus - Client of the Mozc input method
mozc-server - Server of the Mozc input method
mozc-utils-gui - GUI utilities of the Mozc input method
emacs-mozc - Mozc for Emacs
emacs-mozc-bin - Helper module for emacs-mozc
fcitx-mozc - Mozc engine for fcitx - Client of the Mozc input method
uim-mozc - Mozc engine for uim - Client of the Mozc input method
パッケージの導入
$ sudo apt install fcitx-mozc -t bionic