Ubuntu 19.10 Eoan Ermine リリース

Ermine lines by Gustavo Brenner

予定通り Ubuntu 19.10 Eoan Ermine がリリースされました.

個人的なトピックはi386 archtectureがサポートされなくなった,インストーラでのZFS root対応,Raspberry Pi 4対応辺り,環境があればWPA3対応,NVIDIA driverのインストーラー同梱も便利そうです.

問題点で気になるところはログイン画面でシャットダウン,再起動が出来ないところや Raspberry Pi 3 A+ が起動できなくなっているあたりでしょうか.どちらもバグ扱いになっているので近いうちに修正されるでしょう.

19.10は通常リリースでサポート期間も9ヶ月しか無いですし大体の人はLTSな18.04か20.04を待ったほうがいいでしょうが,新しい機能を試してみたい人は楽しめるのではないでしょうか.

ubuntu 19.10 neofetch

Ubuntu 19.10 (Eoan Ermine)のインストーラにZFSの選択肢が

Ubuntu 19.10のインストーラでZFSを選択できるようになったと見かけて試してみました.

現在BETAのインストーラ( Ubuntu 19.10 (Eoan Ermine) Beta )には未だ入っていなくて,dailyのみのようです.
今回は daily-live 20191011 を利用しました.

イメージを入手して確認
$ wget -c http://cdimage.ubuntu.com/ubuntu/daily-live/20191011/SHA256SUMS \
          http://cdimage.ubuntu.com/ubuntu/daily-live/20191011/SHA256SUMS.gpg \
          http://cdimage.ubuntu.com/ubuntu/daily-live/20191011/eoan-desktop-amd64.iso
$ sha256sum -c SHA256SUMS
eoan-desktop-amd64.iso: OK
$ gpgv --keyring=/usr/share/keyrings/ubuntu-archive-keyring.gpg ./SHA256SUMS.gpg ./SHA256SUMS
gpgv: Signature made Fri 11 Oct 2019 04:48:37 PM JST
gpgv:                using DSA key 46181433FBB75451
gpgv: Can't check signature: No public key
gpgv: Signature made Fri 11 Oct 2019 04:48:37 PM JST
gpgv:                using RSA key D94AA3F0EFE21092
gpgv: Good signature from "Ubuntu CD Image Automatic Signing Key (2012) <cdimage@ubuntu.com>"

インストーラを起動して画面を進めていくと,「インストールの種類」でZFSの選択がありました.
eaon zfs Screenshot ubuntu19.04 2019 10 13 00:55:43

EXPERIMENTAL: Erase disk and use ZFS
Warning: This will delete all your files on all operating systems, This is experimental and ma cause data loss. Do not use on production systems.

仮想マシンのテスト環境なのでZFSを選んで進めます.

eaon zfs 20191013 01:10:48 17155

確認画面のメッセージが ext4 になっていますがそのまま進めるとZFSになったのでメッセージの書き換えがまだされていないのでしょう.

よく見たら vda1 のことでここは /boot/grub に割り当てられていました.

$ mount |grep vda1
/dev/vda1 on /boot/grub type ext4 (rw,relatime,errors=remount-ro)

add)
解りにくからってことでバグとして上がっていました.20.04で修正されそう.

  • Bug #1847719 “zfs “Write to change disks” message prints that an…” : Bugs : ubiquity package : Ubuntu
  • インストールが終了してインストーラからの再起動でフリーズしたようで1時間ほど前っても進まなかったので強制再起動しましたが無事起動しました.

    eaon zfs 20191013 01:10:30 12924

    ファイルシステムもZFSになっています :)
    eaon zfs Screenshot ubuntu19.04 2019 10 13 01:35:03

    $ lsb_release -a
    No LSB modules are available.
    Distributor ID: Ubuntu
    Description:    Ubuntu Eoan Ermine (development branch)
    Release:        19.10
    Codename:       eoan
    $ sudo fdisk -l /dev/vda
    Disk /dev/vda: 15 GiB, 16106127360 bytes, 31457280 sectors
    Units: sectors of 1 * 512 = 512 bytes
    Sector size (logical/physical): 512 bytes / 512 bytes
    I/O size (minimum/optimal): 512 bytes / 512 bytes
    Disklabel type: dos
    Disk identifier: 0xc32b4703
    
    Device     Boot   Start      End  Sectors Size Id Type
    /dev/vda1  *       2048   104447   102400  50M 83 Linux
    /dev/vda2        104448 31457279 31352832  15G  5 Extended
    /dev/vda5        106496  4300799  4194304   2G a5 FreeBSD
    /dev/vda6       4302848 31457279 27154432  13G a5 FreeBSD
    $ zfs list
    NAME                                               USED  AVAIL     REFER  MOUNTPOINT
    bpool                                             65.6M  1.69G      176K  /boot
    bpool/BOOT                                        64.9M  1.69G      176K  none
    bpool/BOOT/ubuntu_qblb6g                          64.7M  1.69G     64.7M  /boot
    rpool                                             3.31G  8.80G       96K  /
    rpool/ROOT                                        2.57G  8.80G       96K  none
    rpool/ROOT/ubuntu_qblb6g                          2.57G  8.80G     2.09G  /
    rpool/ROOT/ubuntu_qblb6g/srv                        96K  8.80G       96K  /srv
    rpool/ROOT/ubuntu_qblb6g/usr                       200K  8.80G       96K  /usr
    rpool/ROOT/ubuntu_qblb6g/usr/local                 104K  8.80G      104K  /usr/local
    rpool/ROOT/ubuntu_qblb6g/var                       486M  8.80G       96K  /var
    rpool/ROOT/ubuntu_qblb6g/var/games                  96K  8.80G       96K  /var/games
    rpool/ROOT/ubuntu_qblb6g/var/lib                   484M  8.80G      378M  /var/lib
    rpool/ROOT/ubuntu_qblb6g/var/lib/AccountServices    96K  8.80G       96K  /var/lib/AccountServices
    rpool/ROOT/ubuntu_qblb6g/var/lib/NetworkManager    136K  8.80G      136K  /var/lib/NetworkManager
    rpool/ROOT/ubuntu_qblb6g/var/lib/apt              75.8M  8.80G     75.8M  /var/lib/apt
    rpool/ROOT/ubuntu_qblb6g/var/lib/dpkg             29.9M  8.80G     29.9M  /var/lib/dpkg
    rpool/ROOT/ubuntu_qblb6g/var/log                  2.07M  8.80G     2.07M  /var/log
    rpool/ROOT/ubuntu_qblb6g/var/mail                   96K  8.80G       96K  /var/mail
    rpool/ROOT/ubuntu_qblb6g/var/snap                  112K  8.80G      112K  /var/snap
    rpool/ROOT/ubuntu_qblb6g/var/spool                 112K  8.80G      112K  /var/spool
    rpool/ROOT/ubuntu_qblb6g/var/www                    96K  8.80G       96K  /var/www
    rpool/USERDATA                                    2.93M  8.80G       96K  /
    rpool/USERDATA/matoken_vyi27f                     2.72M  8.80G     2.72M  /home/matoken
    rpool/USERDATA/root_vyi27f                         112K  8.80G      112K  /root
    rpool/swap                                         758M  9.54G       92K  -
    $ dpkg -l|grep -i zfs
    ii  libzfs2linux                               0.8.1-1ubuntu13                      amd64        OpenZFS filesystem library for Linux
    ii  libzpool2linux                             0.8.1-1ubuntu13                      amd64        OpenZFS pool library for Linux
    ii  zfs-initramfs                              0.8.1-1ubuntu13                      amd64        OpenZFS root filesystem capabilities for Linux - initramfs
    ii  zfs-zed                                    0.8.1-1ubuntu13                      amd64        OpenZFS Event Daemon
    ii  zfsutils-linux                             0.8.1-1ubuntu13                      amd64        command-line tools to manage OpenZFS filesystems

    実機のeaon環境が1つあるのでこれをインストールし直してZFSを試すのもいいかもしれません.でもその環境はRAMが少ないので辛いかな?

    電源管理ソフトウェアTLP のGUI なTLPUI を試す

    暑くなってきました.明け方でも室内で30度とかに.メインPCのウェブブラウザを開きっぱなしにしていたりたまにElectronなアプリが暴走してるとCPU温度が酷いことに.

    $ acpi -t
    Thermal 0: ok, 101.0 degrees C

    この状態で放置しているとCritical温度に達して勝手に再起動してしまったりします.(現在の設定は105℃)

    $ sensors coretemp-*
    coretemp-isa-0000
    Adapter: ISA adapter
    Package id 0:  +78.0°C  (high = +87.0°C, crit = +105.0°C)
    Core 0:        +78.0°C  (high = +87.0°C, crit = +105.0°C)
    Core 1:        +78.0°C  (high = +87.0°C, crit = +105.0°C)

    Operaのバッテリーセーバーを使うと改善されないだろうかと試してみましたがあまり変わらないような感じ?

    Linuxの電源管理を行うTLPというものがあります.NotePCなどで便利です.
    これ経由でCPU のgovernor をpowersave に変えて発熱量を下げてみます.

    TLPは基本的に設定ファイルを編集して設定します.設定ファイルの場所を Debian sid amd64/Ubuntu 19.10 amd64 で確認すると /etc/default/tlp です.

    $ man tlp | grep FILES -A3
    FILES
           /etc/default/tlp
                  System-wide configuration file containing all power saving settings.

    先ず,tlp を未導入の場合は導入

    $ sudo apt install tlp tlp-rdw

    Thinkpad の場合はこの辺りのKernel module も入れておきましょう.これは両方ともバッテリーのものでSandy Bridge 以降では acpi-call-dkms を,それより前では tp-smapi-dkms を導入します.よくわからない場合は両方を入れても大丈夫そうです.

    Sandy Bridge 以降向け

    $ sudo apt install acpi-call-dkms

    Sandy Bridge より前向け

    $ sudo apt install tp-smapi-dkms

    /etc/default/tlp の以下の辺りでAC電源とバッテリー電源時の療法を powersave に変えます.

    CPU_SCALING_GOVERNOR_ON_AC=powersave
    CPU_SCALING_GOVERNOR_ON_BAT=powersave

    tlp start で反映させます.

    $ sudo tlp start
    TLP started in AC mode.

    とりあえずこれで暫く試すと70℃くらいで安定しています.
    cpufreq で温度によってgovernor を変化させるともっとCPUを使うことも可能です.
    ( /etc/cpufreqd.confCPU Too hot! 辺り )

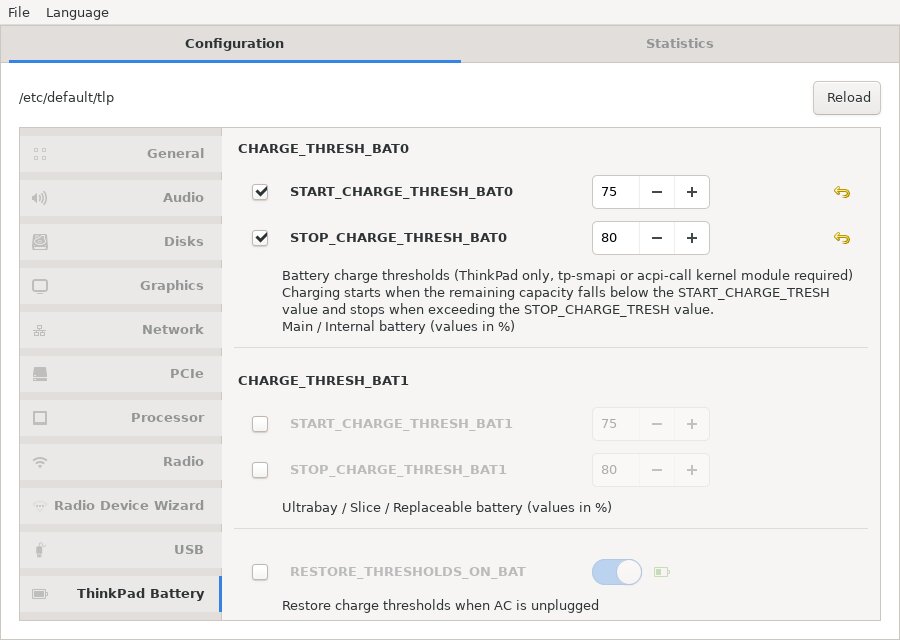
    とりあえずこれでOKなのですが,GUI のツール無いかなと探してみると TLPUI というものを見つけたので試してみました.

    TLPUI の関連パッケージを導入します.

    $ sudo apt install python3-gi git python3-setuptools python3-stdeb

    アドホックにインストールせず実行,

    $ git clone https://github.com/d4nj1/TLPUI
    $ cd TLPUI
    $ python3 -m ./tlpui

    若しくはTLPUI のsource を入手してpkg を作成してインストールして実行します.

    $ git clone https://github.com/d4nj1/TLPUI
    $ cd TLPUI
    $ python3 setup.py --command-packages=stdeb.command bdist_deb
    $ sudo dpkg -i ./deb_dist/python3-tlpui_0.1-1_all.deb
    $ which tlpui
    /usr/bin/tlpui
    $ tlpui

    20190808 17 08 04 20549
    20190808 17 08 08 20640

    一般ユーザで実行すると裏の端末で設定反映時に認証が走るのですが,認証に成功しても設定ファイルの書き換えがうまく行きませんでした.

    20190808 17 08 12 20759

    sudo で実行すると問題無さそうです.

    $ sudo tlpui

    Software still in Beta status ということで未だβですがお手軽で便利そうです.
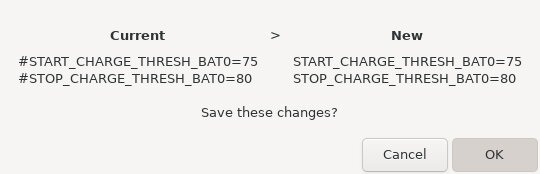
    でもβなので設定ファイルのバックアップは取っておいたほうが良さそうです.

    試した環境1(Debian sid amd64)
    $ git show|head -1
    commit 372463ba033df12dfa5c6c918f0b65c148f1ffac
    $ dpkg-query -W acpi lm-sensors tlp tlp-rdw acpi-call-dkms python3-gi git python3-setuptools python3-stdeb python3-all
    acpi    1.7-1.1
    acpi-call-dkms
    git     1:2.23.0~rc1-1
    lm-sensors      1:3.5.0-3
    python3-all     3.7.3-1
    python3-gi      3.32.2-1
    python3-setuptools      41.0.1-1
    python3-stdeb   0.8.5-3
    tlp     1.2.2-1
    tlp-rdw 1.2.2-1
    $ lsb_release -dr
    Description:    Debian GNU/Linux bullseye/sid
    Release:        unstable
    $ uname -m
    x86_64
    試した環境2(Ubuntu 19.10 development amd64)
    $ git show|head -1
    commit 372463ba033df12dfa5c6c918f0b65c148f1ffac
    $ dpkg-query -W acpi lm-sensors tlp tlp-rdw tp-smapi-dkms python3-gi git python3-setuptools python3-stdeb python3-all
    acpi    1.7-1.1
    git     1:2.20.1-2ubuntu1
    lm-sensors      1:3.5.0-3ubuntu1
    python3-all     3.7.3-1
    python3-gi      3.32.0-1
    python3-setuptools      41.0.1-1
    python3-stdeb   0.8.5-3
    tlp     1.2.2-1
    tlp-rdw 1.2.2-1
    tp-smapi-dkms   0.43-1
    $ lsb_release -dr
    Description:    Ubuntu Eoan Ermine (development branch)
    Release:        19.10
    $ uname -m
    x86_64

    Ubuntu 19.10 の initramfs-tools から dm-crypt 領域が見つからずエラーとなる

    Ubuntu 19.10 amd64 環境でapt upgrade でエラーになります.
    新しいKernel が降りてきてinitramfs のところでdm-crypy 領域が見つからない感じのようです.

    initramfs-tools (0.133ubuntu9) のトリガを処理しています ...
    update-initramfs: Generating /boot/initrd.img-5.2.0-8-generic
    cryptsetup: ERROR: Couldn't resolve device
      /dev/disk/by-uuid/805938be-2c29-4a53-9ed2-36fb233d76ea
    cryptsetup: ERROR: Couldn't resolve device
      UUID=31145c5b-93fc-4fe0-9e46-3a68bfcadeae
    W: initramfs-tools configuration sets RESUME=UUID=31145c5b-93fc-4fe0-9e46-3a68bfcadeae
    W: but no matching swap device is available.
    処理中にエラーが発生しました:

    エラーメッセージで検索すると以下のページを発見.

    The problem is that cryptsetup is not supported in the /etc/initramfs-tools/initramfs.conf configuration anymore.

    The new location for loading dm-crypt during boot is /etc/cryptsetup-initramfs/conf-hook

    CRYPTSETUP=y

    you’ll see it in the conf-hook file commented out, just set it as above and it will work again.

    If you build a system with encryption, I believe this gets changed at some point, but the live builds are systems that are not built like this, and there isn’t a lot to go on to direct you to make this change.

    When you set that and re-make your iso image, you’ll be able to do encrypted persistence again. Worked for me on latest Kali January 2019. :-)

    なるほど,この環境はいつも development branch にしているのでこの問題に当たったようですね.

    /etc/cryptsetup-initramfs/conf-hookCRYPTSETUP=y と編集して,

    $ sudo vi /etc/cryptsetup-initramfs/conf-hook
    $ sudo git diff HEAD /etc/cryptsetup-initramfs/conf-hook
    diff --git a/cryptsetup-initramfs/conf-hook b/cryptsetup-initramfs/conf-hook
    index 8a6a474..fdd7920 100644
    --- a/cryptsetup-initramfs/conf-hook
    +++ b/cryptsetup-initramfs/conf-hook
    @@ -15,7 +15,7 @@
     # cryptsetup initramfs integration.
     #
    
    -#CRYPTSETUP=
    +CRYPTSETUP=y
    
     #
     # KEYFILE_PATTERN: ...

    apt でfix-broken を掛けると正常にinitramfs が通り,再起動して新しいkernal で起動しました :)

    $ sudo apt install -f
    環境
    $ dpkg-query -W cryptsetup* initramfs-tools*
    cryptsetup      2:2.1.0-5ubuntu2
    cryptsetup-bin  2:2.1.0-5ubuntu2
    cryptsetup-initramfs    2:2.1.0-5ubuntu2
    cryptsetup-run  2:2.1.0-5ubuntu2
    initramfs-tools 0.133ubuntu9
    initramfs-tools-bin     0.133ubuntu9
    initramfs-tools-core    0.133ubuntu9
    $ lsb_release -dr
    Description:    Ubuntu Eoan Ermine (development branch)
    Release:        19.10
    $ uname -m
    x86_64

    Firefox のマウス,タッチパッド等でのズーム機能を無効にする

    精度の悪いタッチパッドを使っていると2本指でスクロールしたつもりが拡大,縮小になってしまうことがあります.スクロールのつもりなので操作量も多く一気に拡大されたり縮小されたり…….

    Firefox でこの機能を無効にしてみました.
    以下の手順ではポインティングデバイスでのズーム機能は無効化されますが,キーボード・ショートカットでのズームは利用できます.

    about:config で設定(GUI)

    Firefox のアドレスバーに about:config を入力して開き, zoom.maxPercent, zoom.minPercent をそれぞれ 100 に書き換える.
    この手順の場合即時反映される.

    20190710 22 21 33 001

    設定ファイルで設定

    Firefox の対象のプロファイルのあるディクトリに user.js ファイルを作成し起動すると反映される.

    プロファイルのあるディレクトリは ~/.mozilla/firefox/profiles.ini を確認する.
    以下の例では,~/.mozilla/firefox/4dx27pta.default/ になる.

    ~/.mozilla/firefox/profiles.ini
    [Install4F96D1932A9F858E]
    Default=4dx27pta.default
    
    [Profile0]
    Name=default
    IsRelative=1
    Path=4dx27pta.default
    Default=1
    
    [General]
    StartWithLastProfile=1
    Version=2

    user.js を以下の内容で作成する.既に存在する場合は追記する.

    ~/.mozilla/firefox/4dx27pta.default/user.js
    user_pref("zoom.maxPercent", 100);
    user_pref("zoom.minPercent", 100);

    環境

    $ dpkg-query -W firefox
    firefox 68.0+build3-0ubuntu0.18.04.1
    $ hostnamectl | egrep 'Operating System|Architecture'
      Operating System: Ubuntu 18.04.2 LTS
          Architecture: arm64

    apt-cacher-ng で https リポジトリを直接アクセスするようにする

    apt-cacher-ng で各種リポジトリをキャッシュしているのですが,https の場合エラーになってしまいます.

    error message
    $ sudo apt update
    Err:1 https://updates.signal.org/desktop/apt xenial InRelease              Reading from proxy failed - read (115: Operation now in progress) [IP: 192.168.1.102 3142]                                                      Err:2 https://deb.opera.com/opera-stable stable InRelease
      Reading from proxy failed - read (115: Operation now in progress) [IP: 192.168.1.102 3142]
     :
    W: Failed to fetch https://deb.opera.com/opera-stable/dists/stable/InRelease  Reading from proxy failed - read (115: Operation now in progress) [IP: 192.168.1.102 3142]
    W: Failed to fetch https://updates.signal.org/desktop/apt/dists/xenial/InRelease  Reading from proxy failed - read (115: Operation now in progress) [IP: 192.168.1.102 3142]
    W: Some index files failed to download. They have been ignored, or old ones used instead.

    Debian wiki に解決方法が載っていました.https の場合はキャッシュせずに直接見に行かせる設定が出来るようです.

    HTTPS repositories
    apt-cacher-ng will obviously fail to serve HTTPS repositories. There are many solutions upstream but I have found the simplest solution to be to simply tunnel HTTPS connections directly on the proxy, by putting this in /etc/apt-cacher-ng/acng.conf:

    PassThroughPattern: .*

    This is, as far as I can tell, the only way to avoid doing a special configuration on the clients for HTTPS repositories. The downside is that HTTPS content is not cached.

    /etc/apt-cacher-ng/acng.confPassThroughPattern: .* を設定してデーモンを再起動することで直接アクセスしてエラーを出さなくなりました.

    以下のページのように source.list を書き換えてhttps であってもキャッシュする方法もあるようですが今回はなしで.

    apt-cacher-ng環境
    $ dpkg-query -W apt-cacher-ng
    apt-cacher-ng   3.1-1build1
    $ hostnamectl | egrep 'Operating System|Architecture'
      Operating System: Ubuntu 18.04.2 LTS
          Architecture: x86-64
    apt実行環境
    $ dpkg-query -W apt
    apt     1.8.2
    $ hostnamectl | egrep 'Operating System|Architecture'
      Operating System: Debian GNU/Linux bullseye/sid
          Architecture: x86-64

    crontab の実行タイミングをわかりやすく表示してくれる cronv を試す

    ちょっと試したら少し嵌ったのでメモがてら.

    build
    $ go get github.com/takumakanari/cronv/cronv
    $ go build -o ./cronv github.com/takumakanari/cronv/cronv
    Usage
    $ ./cronv -h
    Usage:
      Cronv v0.4.1 [OPTIONS]
    
    Application Options:
      -o, --output=    path to .html file to output (default: ./crontab.html)
      -d, --duration=  duration to visualize in N{suffix} style. e.g.) 1d(day)/1h(hour)/1m(minute) (default: 6h)
          --from-date= start date in the format '2006/01/02' to visualize (default: 2019/05/25)
          --from-time= start time in the format '15:04' to visualize (default: 02:50)
      -t, --title=     title/label of output (default: Cron Tasks)
      -w, --width=     Table width of output (default: 100)
    
    Help Options:
      -h, --help       Show this help message
    実行
    $ crontab -l | ./cronv

    2019-06-01 ADD: 以下のtab が含まれているときにエラーとなる問題は修正されました😖

    しかし,missing field(s) とか syntax error in year field: とかのエラーになってしまう.

    $ printf "* * * * *\tcommand\n"
    * * * * *       command
    $ printf "* * * * *\tcommand\n" | ./cronv
    panic: Failed to analyze cron '* * * * *        command': syntax error in year field: 'command'
    
    goroutine 1 [running]:
    panic
            ../../../src/libgo/go/runtime/panic.go:554
    main.main
            /home/mk/go/src/github.com/takumakanari/cronv/cronv/main.go:33

    タブ区切りをやめてスペース区切りにするとエラーが出ない

    $ printf "* * * * * command\n" | ./cronv
    [Cron Tasks] 1 tasks.
    [Cron Tasks] './crontab.html' generated.

    ということでとりあえずタブをスペースに変換することにした.

    $ crontab -l | tr -s '\t' ' ' | ./cronv
    [Cron Tasks] 8 tasks.
    [Cron Tasks] './crontab.html' generated.

    作成された crontab.html を w3m で……ほとんど表示されない.

    20190525 03 36 35 001

    もう少しリッチな JavaScript の動くウェブブラウザで開くとOK.
    これからの6時間分の様子が見える.

    20190525 03 00 01 001

    -d, --duration option で表示する時間間隔が指定できる.
    開始日時は,--fron-date, --from-time option で指定できる.
    以下の例では 2019-05-25 00:00:00 から1日分の表示になる.

    $ crontab -l | tr -s '\t' ' ' | ./cronv -d 1d --from-date=2019/05/25 --from-time=00:00

    20190525 02 58 37 001

    ちなみに1ヶ月も試したが,ウェブブラウザで表示するのにとても時間が掛かった.

    環境
    $ dpkg-query -W cron gccgo-go
    cron    3.0pl1-128.1ubuntu1
    gccgo-go        2:1.10~4ubuntu1
    $ lsb_release -d
    Description:    Ubuntu 18.04.2 LTS
    $ uname -m
    x86_64

    Ubuntu Server インストーラの Github, Launchpad からの ssh公開鍵インポート機能

    github.com/settings/keys からSSH Keyとして突っ込んどくと便利だし、今のUbuntu Serverはセットアップでそれを使う項目すらあるので

    なるほど便利そう
    試してみようと Ubuntu Server 18.04.2 LTS
    (ubuntu-18.04.2-live-server-amd64.iso) のインストーラで試してみました.

    OpenSSH を導入するようにすると,SSH鍵をインポートするオプションで Github / Launchpad が選べます.
    Screenshot ubuntu18 04 2019 03 30 13 02 56

    こんな感じでインポートされました.
    Screenshot ubuntu18 04 2019 03 30 13 05 37

    インストールが終了して ssh login するとインポートされた鍵で login 出来ました.

    インポートされた公開鍵を確認するとコメント部分が少し書き換わっています.

    $ cat ~/.ssh/authorized_keys
    ssh-ed25519 AAAAC3NzaC1lZDI1NTE5AAAAIPgwY9aZPxN/YoBBzd7TOcCk7EuGO0E9PuUjCHPtTuHP matoken@github/16598604 # ssh-import-id gh:matoken
    ssh-ed25519 AAAAC3NzaC1lZDI1NTE5AAAAIEoKnbjj7cVafcAJbYHqUEua1x/81uzoK0LnjgqmR6H8 matoken@github/33364582 # ssh-import-id gh:matoken

    sshd_config を見ると編集ではなく末尾に追記してるのでちょっと雑い感.

    $ grep PasswordAuthentication /etc/ssh/sshd_config
    #PasswordAuthentication yes
    # PasswordAuthentication.  Depending on your PAM configuration,
    # PAM authentication, then enable this but set PasswordAuthentication
    PasswordAuthentication no
    $ tail -1 /etc/ssh/sshd_config
    PasswordAuthentication no

    ちなみに,Github から鍵を入手するのはこんな感じで行けるようです.
    (<USERNAME>部分を該当ユーザ名に修正)

    Launchpad はこんな感じ.

    ちなみにLaunchpad は未だED25519形式には未対応なようです.
    20190330 13 03 12 27418

    Bitbucket の鍵も同様に https://api.bitbucket.org/2.0/users/<USERNAME>/ssh-keys で入手できそうと思ったのですが,未認証では駄目みたいです.

    $ curl -s https://api.bitbucket.org/2.0/users/matoken/ssh-keys|jq
    {
      "type": "error",
      "error": {
        "message": "This API is only accessible with the following authentication types: session, password, apppassword"
      }
    }
    環境
    $ lsb_release -d
    Description:	Ubuntu 18.04.2 LTS
    $ uname -m
    x86_64

    GNU social にアクセスするとなにも表示されなくなって困る

    gnusocial

    さっきまでは動いていたのにウェブブラウザ(qutebrowser)のバージョンアップに追従するために再起動して,自分用 GNU social にアクセスすると画面が真っ白です><
    スマートフォンのアプリ経由(Twidere)だと動作しているので表示周りの問題でしょうか?

    config.php
    $config['site']['logfile'] に指定しているログファイルを確認するとこんなメッセージがありました.

    2019-03-22 14:35:28 LOG_DEBUG: [gnusocial.matoken.org:29424.bda9531d GET /] action.php - Server error '500' on 'qvitter': Class 'Locale' not found
    2019-03-22 14:35:28 LOG_ERR: [gnusocial.matoken.org:29424.bda9531d GET /] Handled serverError (500) but cannot output into desired format (NULL): 'Class \'Locale\' not found'
    2019-03-22 14:35:28 LOG_ERR: [gnusocial.matoken.org:29424.bda9531d GET /] ServerErrorAction: 500 Class 'Locale' not found

    このあたりで使おうとしているよう

    $ find plugins/Qvitter -type f -print0 | xargs -0 grep -n Locale
    plugins/Qvitter/actions/qvitter.php:341:                    window.usersLanguageNameInEnglish = <?php print json_encode(Locale::getDisplayLanguage($user_browser_language, 'en')) ?>;
    plugins/Qvitter/actions/qvitter.php:462:                                                $languagecodesandnames[$lancode]['english_name'] = Locale::getDisplayName($lancode, 'en');
    plugins/Qvitter/actions/qvitter.php:463:                                                $languagecodesandnames[$lancode]['name'] = Locale::getDisplayName($lancode, $lancode);

    これが見つからないか存在しない状態のようです.

    それらしいpackage を探して,

    $ apt-cache search ^php international
    php-horde-idna - IDNA backend normalization package
    php-horde-ingo - An email filter rules manager
    php-intl - Internationalisation module for PHP [default]
    php-net-idna2 - PHP Pear module for handling international domain names
    php-symfony-translation - tools to internationalize an application
    php7.2-intl - Internationalisation module for PHP
    phpmyadmin - MySQL web administration tool
    php7.0-intl - Internationalisation module for PHP
    $ apt show php-intl
    Package: php-intl
    Version: 1:7.2+60ubuntu1
    Priority: optional
    Section: universe/php
    Source: php-defaults (60ubuntu1)
    Origin: Ubuntu
    Maintainer: Ubuntu Developers <ubuntu-devel-discuss@lists.ubuntu.com>
    Original-Maintainer: Debian PHP Maintainers <pkg-php-maint@lists.alioth.debian.org>
    Bugs: https://bugs.launchpad.net/ubuntu/+filebug
    Installed-Size: 12.3 kB
    Depends: php-common, php7.2-intl
    Download-Size: 2,012 B
    APT-Sources: http://jp.archive.ubuntu.com/ubuntu bionic/universe amd64 Packages
    Description: Internationalisation module for PHP [default]
     This package provides a Internationalisation module for PHP.
     .
     PHP (recursive acronym for PHP: Hypertext Preprocessor) is a widely-used
     open source general-purpose scripting language that is especially suited
     for web development and can be embedded into HTML.
     .
     This package is a dependency package, which depends on Ubuntu's default
     PHP version (currently 7.2).

    導入することで解決しました.

    sudo apt-get install php7.2-intl

    恐らく php のバージョンを上げたときに漏れてしまい,API などは問題なく使えていたのでウェブブラウザを再起動するまで気づかなかった感じのようです.

    しかし,GNU social はこういう警告をよく見かけるのでどうにかしないといけないですね.開発は滞っている感じなので Pleroma あたりに移行するのがいいんでしょうが…….

    this will throw an Error in a future version of PHP

    環境

    $ dpkg-query -W php7.2-intl
    php7.2-intl     7.2.15-0ubuntu0.18.04.1
    $ w3m -dump https://gnusocial.matoken.org/nodeinfo/2.0|jq .software
    {
      "name": "gnusocial",
      "version": "1.2.0-beta5"
    }
    $ lsb_release -d
    Description:    Ubuntu 18.04.2 LTS
    $ uname -m
    x86_64

    apticron でDebian/Ubuntuのパッケージ更新情報を取得する

    最近は Debian/Ubuntu等でのパッケージ更新確認のために crontab にこんな感じのものを登録していました.

    apt update 2>&1 | tail -1 | grep -v 'All packages are up to date.' && apt list --upgradable ; apt-cache stats

    これはパッケージ情報を更新して,アップデートがあったらパッケージ一覧を求めています.とりあえずこれで使えていたのですが,apticron というパッケージを見つけました.
    これはほぼ同じ機能のようですが,パッケージリストだけでなく changelog も含まれます.

    20190316 22 03 57 12604

    パッケージを導入すればとりあえず使えるようになります.
    設定ファイルは /usr/lib/apticron/apticron.conf に雛形が用意されているので /etc/apticron/apticron.conf にコピーして編集します.といっても宛先のメールアドレスが root になっているのでそれを変更するくらいで問題なく使えています.
    簡単便利.

    Debian では jessie から,Ubuntu では trusty からパッケージがあるようです.

    2019-03-17 add)
    Google+(もうすぐ終了……) でjessie以前からあったようなというコメントをいただきました.changelogを見ると2002年からあったようです.packages.debian.org は jessie より古いものは置いてないので出てこないだけですね.

    $ zcat /usr/share/doc/apticron/changelog.gz|tail -5
    apticron (1.0.1) unstable; urgency=low
    
      * Initial Release.
    
     -- Colm MacCarthaigh   Fri,  9 Aug 2002 11:53:26 +0100