プライバシーやセキュリティが守られるprotonVPNの無料プランを少し試す

セキュアなメールサービスの ProtonMail と同じ Proton Technologies AGの VPN サービスの ProtonVPN を少し試してみました.
存在は知っていましたが接続するには専用アプリのみが必要だと思いこんでいました.openVPN で接続できるようなので試してみました.

ここでの VPN は拠点間などではなくスマートフォンやPCを公衆無線LANなどで接続したとき向けの個人向けVPNとしての話です.

無料VPNサービスはいろいろ見つかりますが,無料の代わりに個人情報を収集して販売していたりプライバシーポリシーでそういうことをしないとしつつも実際は行っていたりと怪しいものが多いです.

知識のある人であれば自宅にSBCなどで低価格,低消費電力でVPNサーバを用意したり,VPNサービスより安い価格のVPSサービスにセットアップして利用するなどといったことが可能ですが,知識のない人にサーバを立ててもらうのは難しいです.(一旦設定した後も使い続ける間はOSやサービスのアップデートなども必要だし……)

ProtonVPN は有料プランの他に無料プランがあり,無料プランでもプライバシーやセキュリティが守られるとなっています.無料はお試し版という扱いですね.無料プランでは接続できるサーバが限られており,無料プランで接続できるサーバは事に比べて利用率が高くなっています.時間帯によっては100%になっているので速度は低下すると思います.

実際にプライバシーやセキュリティが守られるのかが不安ですが,もともとジャーナリストや活動家を守るために作られたものであったり,MozillaがFirefoxに向けてのVPNサービスにProtonVPNを選ぶなどそれなりに信頼できそうな気がします.(少なくとも今の時点では)

ProtonVPN アカウントの作成

ProtonVPN を利用するためにアカントを作成します.
手順は以下に書かれています.メールアカウントが別途必要です.また,ProtonMail のアカウントを使ってProtonVPN のアカウントを作成するとこも出来るようなので私は ProtonMail でアカウントを作成しました.

Network Manager を利用して ProtonVPN に接続

お手軽にNetwork Manager の openVPN プラグインを利用して接続します.
以下に手順があるので真似します.

(GUIのNetwork Manager 以外にも command-line や IKEv2 での接続方法もあるようです.)_

必要なパッケージを導入します.

$ sudo apt install openvpn network-manager-openvpn-gnome resolvconf

ProtonVPN の設定ファイルを入手します.

  • ProtonVPN のサイトでログイン
  • Download ページに移動
  • plathome で「Linux」を選択
  • protocol はそのまま「UDP」
  • 無料プランでは「Secure Core configs」,「Country configs」は利用できないので「Server configs」を選択.
  • 後は任意の接続でダウンロード
    • 今回は「Japan」の「Japan Free#2」をダウンロードした

続いてNetwork Manager の設定をします.

  • Network Manager のアイコンをクリックして,「VPN 接続(V)」->「VPN を設定(C)」を選択
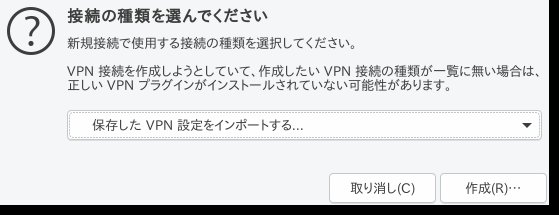
  • 「接続の種類を選んでください」というウィンドウで,「保存した VPN 設定をインポートする…」を選んで「作成(R)…」を押す
    20190306-22-03-15-15118.jpg
  • ProtonVPN のページでダウンロードした設定ファイルを指定してインポートする
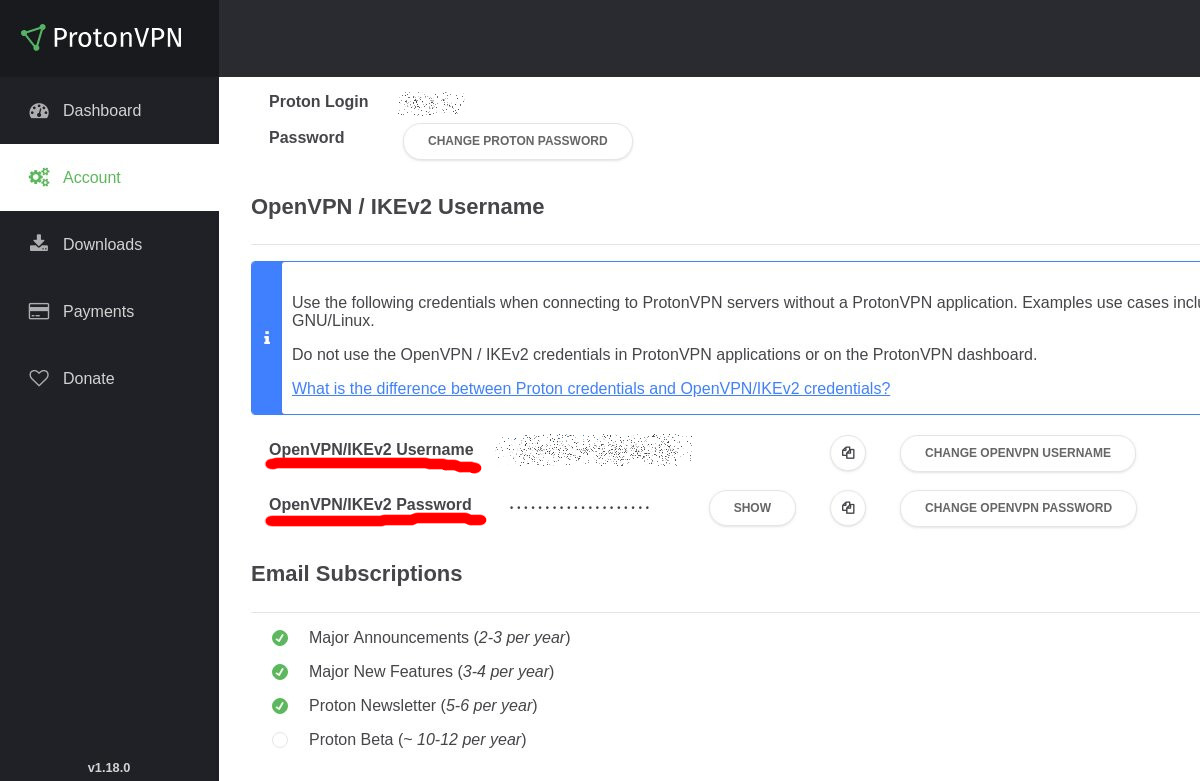
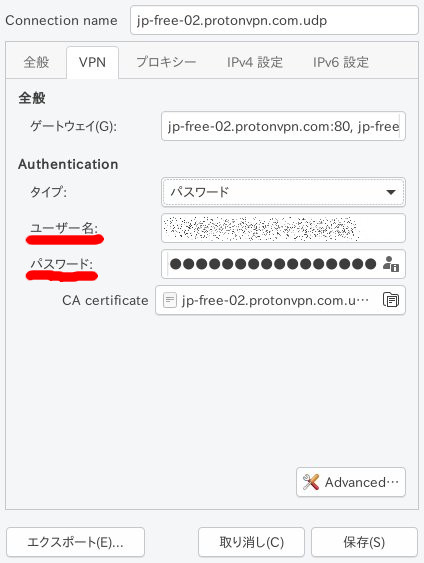
  • 次の設定画面のVPN タブで「ユーザ名」,「パスワード」を入力する.ユーザ名,パスワードは protonVPN のページで確認できる.(protonVPNサービスのものとは別で自動生成されている)
    20190306-22-03-21-8927.jpg
    20190306-22-03-05-17942.jpg

接続してみます.

  • Wi-Fi などのネットワークに接続した状態でNetwork Manager のアイコンをクリックして,「VPN 接続(V)」->設定したprotonVPN をクリック

リモートアドレスなどを確認するとVPN のものに変わっていました.

$ curl ifconfig.me/ip
185.242.4.204
$ dig | grep -i server:
;; SERVER: 10.8.8.1#53(10.8.8.1)
$ /sbin/ifconfig tun0
tun0: flags=4305<UP,POINTOPOINT,RUNNING,NOARP,MULTICAST>  mtu 1500
        inet 10.8.3.2  netmask 255.255.255.0  destination 10.8.3.2
        inet6 fe80::642a:6858:4f6:403  prefixlen 64  scopeid 0x20<link>
        unspec 00-00-00-00-00-00-00-00-00-00-00-00-00-00-00-00  txqueuelen 100  (不明なネット)
        RX packets 11489  bytes 8367918 (7.9 MiB)
        RX errors 0  dropped 0  overruns 0  frame 0
        TX packets 11204  bytes 2610990 (2.4 MiB)
        TX errors 0  dropped 0 overruns 0  carrier 0  collisions 0

$ whois 185.242.4.204
% This is the RIPE Database query service.
% The objects are in RPSL format.
%
% The RIPE Database is subject to Terms and Conditions.
% See -ripe.net - www.ripe.net/db/support/db-terms-conditions.pdf

% Note: this output has been filtered.
%       To receive output for a database update, use the "-B" flag.

% Information related to '185.242.4.0 - 185.242.4.255'

% Abuse contact for '185.242.4.0 - 185.242.4.255' is 'abuse@m247.ro'

inetnum:        185.242.4.0 - 185.242.4.255
netname:        M247-LTD-TOKYO
descr:          M247 LTD Tokyo Infrastructure
country:        JP
geoloc:         35.622214 139.7455763
admin-c:        GBXS24-RIPE
tech-c:         GBXS24-RIPE
status:         LIR-PARTITIONED PA
mnt-by:         GLOBALAXS-MNT
remarks:        ---- LEGAL CONCERNS ----
remarks:        For any legal requests, please send an email to
remarks:        ro-legal@m247.ro for a maximum 48hours response.
remarks:        ---- LEGAL CONCERNS----
created:        2018-01-17T11:32:30Z
last-modified:  2018-11-29T11:54:41Z
source:         RIPE

role:           GLOBALAXS TOKYO NOC
address:        2 Chome-1-17 Higashishinagawa, Shinagawa
address:        Tokyo 140-0002, Japan
abuse-mailbox:  abuse@m247.ro
nic-hdl:        GBXS24-RIPE
mnt-by:         GLOBALAXS-MNT
created:        2017-10-17T16:49:19Z
last-modified:  2018-07-18T11:04:41Z
source:         RIPE # Filtered

% Information related to '185.242.4.0/24AS9009'

route:          185.242.4.0/24
origin:         AS9009
mnt-by:         GLOBALAXS-MNT
created:        2018-01-17T11:33:29Z
last-modified:  2018-01-17T11:33:29Z
source:         RIPE

% This query was served by the RIPE Database Query Service version 1.92.6 (WAGYU)

速度については確認した回線がADSL で元々細いせいかVPN利用時,非利用時であまり変わりませんでした(400kB/s程).公衆無線LAN などでも試してみたいところです.

ちなみに,AndroidスマートフォンのProtonVPN を携帯回線で利用した状態で Wi-Fi 接続したら VPNのセッションは張り直されず Wi-Fi を利用しているつもりで携帯回線を使い続けていたということがありました.ちゃんと検証していないですが気をつけたほうが良さそうです.
OpenVPN Connect のほうがいいかも

Android環境

Android のバージョン:9
セキュリティパッチレベル: 2019年3月5日

Linux環境1

$ dpkg-query -W openvpn network-manager-openvpn-gnome resolvconf
network-manager-openvpn-gnome   1.8.10-1
openvpn 2.4.7-1
resolvconf      1.79
$ lsb_release -dr
Description:    Debian GNU/Linux buster/sid
Release:        unstable
$ uname -m
x86_64

Linux環境2
$ dpkg-query -W openvpn network-manager-openvpn-gnome resolvconf
network-manager-openvpn-gnome 1.8.10-1
openvpn 2.4.6-1ubuntu3
resolvconf 1.79ubuntu10
$ lsb_release -dr
Description: Ubuntu Disco Dingo (development branch)
Release: 19.04
$ uname -m
x86_64

GNOME Terminalの設定を初期化

GNOME 環境での標準端末の GNOME Terminal の設定の初期化をしました.~/.local あたりに設定ファイルがあるのかと思ったら dconfデータベースの中にあるようです.

場所は /org/gnome/terminal/ で,dconf コマンドなどで確認できます.

$ dconf dump /org/gnome/terminal/
[legacy/profiles:/:b1dcc9dd-5262-4d8d-a863-c897e6d979b9]
background-color='rgb(0,0,0)'
use-theme-colors=false
foreground-color='rgb(0,255,0)'
use-system-font=false
font='Fira Code 11'

このように reset すると設定が初期化されます.

$ dconf reset -f /org/gnome/terminal/

設定の反映は即時でGNOME Terminal 上で実行するとちょっとびっくりします.

#Youtube BAN されたのでBitChuteを試してみる.

環境

$ uname -m
x86_64
$ lsb_release -dr
Description: Ubuntu Disco Dingo (development branch)
Release: 19.04
$ dpkg-query -W gnome-terminal xterm dconf-cli
dconf-cli 0.30.1-2
gnome-terminal 3.30.1-1ubuntu1
xterm 330-1ubuntu3

Nextcloud を 15 にアップグレードしようとしてコケる

20181212_05:12:42-18746

Nextcloud 15 がリリースされました.

14.0.4 からアップグレードしようとしましたが失敗しました.そのメモです.

$ sudo -u www-data php7.0 ./occ upgrade
Nextcloud or one of the apps require upgrade - only a limited number of commands are available
You may use your browser or the occ upgrade command to do the upgrade
Set log level to debug
Updating database schema
Updated database
UnexpectedValueException: The files of the app "user_external" were not correctly replaced before running the update
Update failed
Maintenance mode is kept active
Reset log level

整合性が保たれていないようなので手動でアーカイブを入手して比較すると同じに見える

$ wget https://download.nextcloud.com/server/releases/nextcloud-15.0.0.tar.bz2 https://download.nextcloud.com/server/releases/nextcloud-15.0.0.tar.bz2.asc
$ gpg --verify ./nextcloud-15.0.0.tar.bz2.asc
gpg: 署名されたデータが'./nextcloud-15.0.0.tar.bz2'にあると想定します 
gpg: 2018年12月10日 19時27分11秒 JSTにRSA鍵ID A724937Aで施された署名
gpg: "Nextcloud Security <security@nextcloud.com>"からの正しい署名
gpg: *警告*: この鍵は信用できる署名で証明されていません!
gpg:          この署名が所有者のものかどうかの検証手段がありません。 
主鍵フィンガー・プリント: 2880 6A87 8AE4 23A2 8372  792E D758 99B9 A724 937A
$ tar tvf ./nextcloud-15.0.0.tar.bz2 | lv
$ tar xf ./nextcloud-15.0.0.tar.bz2
$ sudo -u www-data rsync -acvvn ./nextcloud/apps/user_external /var/www/home.matoken.org/nextcloud/apps/
sending incremental file list
delta-transmission disabled for local transfer or --whole-file
user_external/
user_external/appinfo/app.php is uptodate
user_external/appinfo/database.xml is uptodate
user_external/appinfo/info.xml is uptodate
user_external/appinfo/signature.json is uptodate
user_external/img/app.svg is uptodate
user_external/lib/base.php is uptodate
user_external/lib/ftp.php is uptodate
user_external/lib/imap.php is uptodate
user_external/lib/smb.php is uptodate
user_external/lib/webdavauth.php is uptodate
total: matches=0  hash_hits=0  false_alarms=0 data=0

sent 515 bytes  received 587 bytes  2,204.00 bytes/sec
total size is 19,690  speedup is 17.87 (DRY RUN)

このあたりのバグぽい

ちなみに user_external はFTP, IMAP, SMB の認証周りのよう.

Authenticate user login against FTP, IMAP or SMB.

とりあえず該当の user_external を無効にしてアップグレードは通った

$ sudo -u www-data php7.0 ./occ app:disable user_external
$ sudo -u www-data php7.0 ./occ upgrade

通ったけど無効にしていても怒られる

Some files have not passed the integrity check. Further information on how to resolve this issue can be found in the documentation. (List of invalid files… / Rescan…)

Technical information
=====================
The following list covers which files have failed the integrity check. Please read
the previous linked documentation to learn more about the errors and how to fix
them.

Results
=======
- user_external
    - EXTRA_FILE
        - user_external/appinfo/signature.json

Raw output
==========
Array
(
    [user_external] => Array
        (
            [EXTRA_FILE] => Array
                (
                    [user_external/appinfo/signature.json] => Array
                        (
                            [expected] => 
                            [current] => 37efcee67605ab01a595df9b8e37a63f0260a8d795cb4af9b1b40e137ace928193747445954b22455fcbfd1758ea9b663153afc73438f5370725682e344c8723
                        )

                )

        )

)

まだ非対応アプリも多いしメイン環境は暫く待ったほうが良さそうな感じです.

環境

$ sudo -u www-data php7.0 ./occ status -v
  - installed: true
  - version: 15.0.0.10
  - versionstring: 15.0.0
  - edition: 
$ lsb_release -d
Description:    Ubuntu 16.04.5 LTS
$ uname -m
x86_64

特定プロセスのcpu利用率を制限するcpulimitを試す

先日mysqldump + xz 圧縮の間に pv を挟んで帯域制限をして xz の負荷を下げました.

しかしこの方法ではそんなに負荷がない mysqldump もずっと動かしっぱなしで db にもよろしく無いです.mysqldump は先に済ませて xz だけを制限することにします.

before
umask 0266 && nice -n 19 ionice -c 3 /usr/bin/mysqldump --defaults-file=/mnt/backup/micro/.my-backup.cnf --single-transaction --quick --all-databases --events | pv -L 128k 2>/dev/null | nice -n 19 ionice -c 3 /usr/bin/xz -9 > /mnt/backup/micro/`date +\%F_\%T_$$`.sql.xz
after
DUMP="/mnt/backup/micro/`date +\%F_\%T_$$`.sql"; umask 0266 && nice -n 19 ionice -c 3 /usr/bin/mysqldump --defaults-file=/mnt/backup/micro/.my-backup.cnf --single-transaction --quick --all-databases --events > ${DUMP} && pv -L 128k nice -n 19 ionice -c 3 /usr/bin/xz -9 > ${DUMP}.xz && rm ${DUMP}

一応動くけどcrontabなので1行で書いてあって見にくいしあまりいけてないですね.
せめてファイルに分けたほうが良さそう.

LimitCPU

pvでもいいのですが,cpu利用率を制限できないかなと思いました.xzのオプションでは見当たらずLinux環境なので cgroups で制限しようかとも思ったのですが, LimitCPU というものを見つけました.これは SIGSTOPSIGCONT のPOSIXシグナルをプロセスに送信することにより実現しているので,POSIX環境ならどこでも動きそうなのでこちらを試してみました.

LimitCPUはメンテされなくなったCPUlimitのフォークでコマンドやパッケージ名は cpulimit です.(混乱する><)

導入
$ sudo apt install cpulimit
usage
$ cpulimit -h
CPUlimit version 2.1
Usage: cpulimit TARGET [OPTIONS...] [-- PROGRAM]
   TARGET must be exactly one of these:
      -p, --pid=N        pid of the process
      -e, --exe=FILE     name of the executable program file
                         The -e option only works when
                         cpulimit is run with admin rights.
      -P, --path=PATH    absolute path name of the
                         executable program file
   OPTIONS
      -b  --background   run in background
      -c  --cpu=N        override the detection of CPUs on the machine.
      -l, --limit=N      percentage of cpu allowed from 1 up.
                         Usually 1 - 200, but can be higher
                         on multi-core CPUs (mandatory)
      -q, --quiet        run in quiet mode (only print errors).
      -k, --kill         kill processes going over their limit
                         instead of just throttling them.
      -r, --restore      Restore processes after they have
                         been killed. Works with the -k flag.
      -s, --signal=SIG   Send this signal to the watched process when cpulimit exits.
                         Signal should be specificed as a number or
                         SIGTERM, SIGCONT, SIGSTOP, etc. SIGCONT is the default.
      -v, --verbose      show control statistics
      -z, --lazy         exit if there is no suitable target process,
                         or if it dies
          --             This is the final CPUlimit option. All following
                         options are for another program we will launch.
      -h, --help         display this help and exit

制限はプロセスIDでの制限,プログラム名での制限,指定したプログラムを制限することが可能です.
cpuが複数ある場合は -l の値はcpu 1つあたり100として,100 * cpu数 を元に指定します.cpu 2つで 50% 利用したい場合は -l 100 になると思います.

プロセスID 1234 のプログラムをcpuを2つ利用,cpuを50%(2コアなので実際は100%分)
$ cpulimit -c 2 -p 1234 -l 50
xzというプログラムをcpu利用率を25%に制限
$ cpulimit -c 2 -l 50 - xz

※xzの前の - はなくてもいいが cpulimit のオプションの最後を示す.

cpuを1つだけ利用.cpu利用率を25%に制限しつつxzを実行できます.
$ cpulimit -c 1 -l 25 -z -  xz -9 datafile
  • -c : 利用するcpu数

  • -p : 制限するプロセスID

  • -l : 制限するcpu利用率

  • -z : 指定したプロセスが完了したらcpulimitも終了する(通常は関しを続けて同じ条件に一致するプロセスが現れたら制限する)

今回はxzを制限したいのでこんな感じに.
あまり変わりませんね…….

DUMP="/mnt/backup/micro/`date +\%F_\%T_$$`.sql"; umask 0266 && nice -n 19 ionice -c 3 /usr/bin/mysqldump --defaults-file=/mnt/backup/micro/.my-backup.cnf --single-transaction --quick --all-databases --events > ${DUMP} && nice -n 19 ionice -c 3 cpulimit -c1 -l 25 - /usr/bin/xz -9 ${DUMP}

バックアップ専用ユーザとして分けてあるのでそのユーザで cpulimit -c 1 -l 25 - xz とかしてxzという名前のプロセスを全部制限してしまうのもありかもしれません.monit とかで監視させればいい感じかも?そうすると,

DUMP="/mnt/backup/micro/`date +\%F_\%T_$$`.sql"; umask 0266 && nice -n 19 ionice -c 3 /usr/bin/mysqldump --defaults-file=/mnt/backup/micro/.my-backup.cnf --single-transaction --quick --all-databases --events > ${DUMP} && /usr/bin/xz -9 ${DUMP}

あまり変わりませんね…….

環境
$ dpkg-query -W cpulimit xz-utils
cpulimit        2.2-1
$ lsb_release -d
Description:    Ubuntu 16.04.5 LTS
$ uname -m
x86_64

rsyncで同期したファイルの内容が間違っていて困る

最近外のサーバのffmpegで生成したファイルをrsyncコマンドで家にコピーしています.しかし,先日rsyncでコピーが正常終了したファイルなのに再生が出来ないファイルが現れました.
恐らくffmpegの処理が最後まで終わっていない状態でrsyncを開始して,ffmpegの -movflags faststart が最後のあたりでrsyncで転送が終わった領域を書き換えたのではないかと思います.
rsyncはチェックサムを確認していたのでは?と確認するとどうも明示的にチェックサムのオプションを付与しないと簡易的なチェックしかしていないようです.
少し確認してみました.

内容が違うけれどファイルサイズとタイムスタンプの同じファイルを用意する.

$ mkdir from to
$ echo '0123456789' > from/01
$ echo '0123456780' > to/01
$ touch -d0 from/01
$ touch -d0 to/01
$ ls -l from/01 to/01
-rw-r--r-- 1 matoken matoken 11 11月  2 00:00 from/01
-rw-r--r-- 1 matoken matoken 11 11月  2 00:00 to/01

rsync の --archive option でコピーすると同じファイルと認識されて同期されない.内容も異なったまま.

$ rsync -av from/ to/
sending incremental file list

sent 73 bytes  received 12 bytes  170.00 bytes/sec
total size is 11  speedup is 0.13
$ diff from/01 to/01
1c1
< 0123456789
---
> 0123456780

rsync の --checksum optionを付与すると別のファイルと認識されて同期されて内容も同一になる.

$ rsync -av --checksum from/ to/
sending incremental file list
01

sent 147 bytes  received 35 bytes  364.00 bytes/sec
total size is 11  speedup is 0.06
$ diff from/01 to/01

ということでこんな感じに変更した.

$ rsync -avAHXce ssh --partial --append user@server:from/ to/

#実際はよく回線切れるのでwhile loop に入れてある.

EDIT: 転送済み部分のチェックはこれではNGで --append(既存のファイルに追記)を削る必要があった.--append-verify で行けそうな気がしたがこれもNGだった.

環境
$ dpkg-query -W rsync
rsync   3.1.2-2.2
$ lsb_release -d
Description:    Ubuntu 18.10
$ uname -m
x86_64

Debian, Ubuntu で 上流のパッケージを借りてくる

以前以下のような記事を書きました.

今でもこのblogの中ではアクセスが多く,最近もトラックバックをもらいました.

この当時は arm64 の mozcパッケージがなくて自分でbuild したという話なのですが,現在はDebian では buster(testing), Ubuntu ではartful(17.10) 以降でパッケージが存在します.
なのでこの野良パッケージを使うよりも公式の上流パッケージを借りるほうが大抵の場合いいと思います.
ということで手順を書いておきます.

パッケージファイルだけが必要な場合はパッケージのページからダウンロード可能です.

野良パッケージは近日中に削除します.

Debian stretch arm64 に Debian buster arm64 の mozc を借りてくる

Debian stretch arm64 では mozc-data しかない
$ apt-cache search mozc
mozc-data - Mozc input method - data files

buster(testing) のmozc を借りてくることにする.

/etc/apt/preferences で buster の優先度を下げる

/etc/apt/preferences
Package: *
Pin: release n=buster
Pin-Priority: 100
/etc/apt/sources.list に buster(testing)追加 設定
deb http://deb.debian.org/debian buster main

sources.list の編集には apt edit-sources を使うと文法チェックをしてくれるのでおすすめ

パッケージ情報の更新
$ sudo apt update
mozcパッケージの確認
$ apt-cache search mozc
mozc-data - Mozc input method - data files
fcitx-dbus-status - Addon for Fcitx to set/get/monitor IM statuses via D-Bus
emacs-mozc - Mozc for Emacs
emacs-mozc-bin - Helper module for emacs-mozc
fcitx-mozc - Mozc engine for fcitx - Client of the Mozc input method
ibus-mozc - Mozc engine for IBus - Client of the Mozc input method
mozc-server - Server of the Mozc input method
mozc-utils-gui - GUI utilities of the Mozc input method
uim-mozc - Mozc engine for uim - Client of the Mozc input method
パッケージの導入
$ apt install fcitx-mozc -t buster

後は通常の apt update && apt upgrade で stretch で導入したパッケージは stretch で,buster で導入したパッケージはbuster で更新されるはず.

Ubuntu 16.04 LTS xenial arm64 に Ubuntu 18.04 LTS bionic arm64 の mozc を借りてくる

Debianの手順と同じでもokだと思うけど念の為以下の手順を真似してみる.

mozc は Ubuntu 17.10 artful から対応しているが,もうサポートされないのでUbuntu 18.04 bionic を使う.

標準のリリースを xenial に設定

/etc/apt/apt.conf.d/01ubuntu
APT::Default-Release "xenial";

mozc をpinningする

/etc/apt/preferences
Package: *mozc*
Pin: release n=xenial
Pin-Priority: -10

Package: *mozc*
Pin: release n=bionic
Pin-Priority: 900

/etc/apt/sources.list に buster(testing) を 追加 設定

/etc/apt/sources.list
deb http://ports.ubuntu.com/ bionic main universe

※sources.list の編集には apt edit-sources を使うと文法チェックをしてくれるのでおすすめ
※mirrorにより arm64 が置かれていないので注意

パッケージ情報の更新
$ sudo apt update
検索結果にmozcが出てくる
$ apt-cache search mozc
mozc-data - Mozc input method - data files
ibus-mozc - Mozc engine for IBus - Client of the Mozc input method
mozc-server - Server of the Mozc input method
mozc-utils-gui - GUI utilities of the Mozc input method
emacs-mozc - Mozc for Emacs
emacs-mozc-bin - Helper module for emacs-mozc
fcitx-mozc - Mozc engine for fcitx - Client of the Mozc input method
uim-mozc - Mozc engine for uim - Client of the Mozc input method
パッケージの導入
$ sudo apt install fcitx-mozc -t bionic

mysqldump を pv で制限

mysqldump 動いてる時間に同サーバで GNU social とか Nextcloud とかの mysql を利用しているアプリケーションが重くて使い物にならないです.nice + ionice は指定していますが効いてない感じ.
dump した sql を圧縮している xz コマンドが cpu を1 core 使い潰しているようです.このマシンは2 core あるのですが,もう1つの core もその他の処理でほぼ使い切って待ちが出ているような感じ.

$ vmstat 1 10
procs -----------memory---------- ---swap-- -----io---- -system-- ------cpu-----
 r  b   swpd   free   buff  cache   si   so    bi    bo   in   cs us sy id wa st
 2  0 328212 264788 212260 5628192    1    2    35   160    2   15 35  9 44 12  0
 1  1 328212 259136 212264 5628192    0    0     0   191 1497 3132 63  6 19 12  0
 1  1 328212 252492 212264 5628192    0    0     0    88  959 1716 81  6  7  6  0
 2  1 328212 248264 212264 5628196    0    0     0   114  973 1887 85  3  7  5  0
 2  0 328212 242572 212264 5628196    0    0     0    85  972 1967 74  5 15  5  0
 4  0 328212 241664 212100 5624380    0    0     0    97 1106 4226 91  7  2  2  0
 2  1 328212 234268 212100 5624384    0    0     0   140 1013 1815 70  5 19  7  0
 3  0 328212 235760 211944 5620076    0    0     0  2461 1289 4063 94  4  1  0  0
 1  0 328212 229656 211944 5620080    0    0     0   110  953 1685 61  6 18 15  0
 1  0 328212 224616 211952 5620072    0    0     0   151  983 1683 84  2  8  6  0

pv -L で帯域絞ってみました.
cpu の様子を見ながらだんだん絞っていって 128k 迄絞ってやっと xz の cpu 25〜40% 位になりました.この状態だと普通に使える感じです.
しばらくこれで試してみます.

pv で帯域制限
$ time sh -c "nice -n 19 ionice -c 3 mysqldump --defaults-file=/backup/micro/.my-backup.cnf --single-transaction --quick
--all-databases --events | pv -L 128k 2>/dev/null | nice -n 19 ionice -c 3 xz -9 > /dev/null"

real 127m16.113s
user 34m30.508s
sys 0m23.428s
cronでの実行
$ sudo -u backup crontab -l | grep mysqldump
14 3 * * *     umask 0266 && nice -n 19 ionice -c 3 /usr/bin/mysqldump --defaults-file=/mnt/backup/micro/.my-backup.cnf --single-transaction --quick --all-databases --events | pv -L 128k 2>/dev/null | nice -n 19 ionice -c 3 /usr/bin/xz -9 > /mnt/backup/micro/`date +\%F_\%T_$$`.sql.xz
環境
$ dpkg-query -W mysql-client-5.7 pv xz-utils
mysql-client-5.7        5.7.23-0ubuntu0.16.04.1
pv      1.6.0-1
xz-utils        5.1.1alpha+20120614-2ubuntu2
$ lsb_release -d
Description:    Ubuntu 16.04.5 LTS
$ uname -m
x86_64
$ grep -m1 model\ name /proc/cpuinfo
model name      : AMD Athlon(tm) II Neo N36L Dual-Core Processor

Nextcloud 14 の Telegram を使った2要素認証

先日ファイル共有ソフトの Nextcloud 14がリリースされました.

新機能のうちSignal/Telegram/SMS による2要素認証のサポートが気になります.

Signal/Telegram/SMS 2FA support
A new 2-factor authentication provider named ‘gateway’ was introduced which allows users to use the secure messaging apps Signal and Telegram as well as various SMS gateways as second factor to secure their authentication.

SMSはplaySMS, websms.deを利用するようです.SignalもTelegramもセキュアなメッセージングサービスなのでこういう用途に向いていそうです.どちらも公式でLinux x86_64のデスクトップアプリが提供されています.アプリの出来は今の所Telegramのほうが上だと思います.Arm Linuxだと公式のものはないのですが,TelegramについてはCLIのアプリがあり,Raspberry Pi の Raspbian stretch でも要patchで動作しました.(Webアプリもあるのでそちらでも動作すると思うが未確認)

SMSはやったことがあるし,Telegram が使いやすい.てことでTelegramの設定をしてみました.まだ未実装な機能が多くちょっと面倒なのでメモしておきます.

Two-Factor Gateway の導入

Nextcloud 14に Two-Factor Gateway アプリを導入します.管理者アカウントで「アプリ」の「セキュリティ」から導入するのが楽でしょう.

導入するとNextcloudの「設定」の「セキュリティ」の中に「Message gateway second-factor auth」という項目が現れますが,設定が出来ません.

GitHubのドキュメントをみると未だ未実装の機能が多いようです.

Telegram Bot の作成

TOTPコードの送信する Telegram Bot を作成します.作成はTelegram のドキュメントを参照して作成します.

BotFather と会話してbot作成

BotFather という bot 管理用の bot が居るので,会話してbot を作成します.

アイコンちょっと怖い

44062365934 5aabe8f64d m

/newbot コマンドで新しい bot の作成が始まります.botの名前を効かれるので答えます.続いて bot の username を求められます.この username は最後に bot とつける必要があります.
成功するとアクセストークンが表示されるのでメモして次の手旬に移ります.以下の例では 640093430:AAFTa_pSAcKCZWeFoVDt-l7h7ewqzNe0Luo がトークンです.

Done! Congratulations on your new bot. You will find it at t.me/matoken_bot. You can now add a description, about section and profile picture for your bot, see /help for a list of commands. By the way, when you've finished creating your cool bot, ping our Bot Support if you want a better username for it. Just make sure the bot is fully operational before you do this.

Use this token to access the HTTP API:
640093430:AAFTa_pSAcKCZWeFoVDt-l7h7ewqzNe0Luo

For a description of the Bot API, see this page: https://core.telegram.org/bots/api

30910879338 4609b7a707
44781979421 aac86c72de

occ コマンドで Telegram bot のトークン設定

Nextcloud のインストールされている場所に Nextcloud 管理用の occ コマンドがあります.このコマンドで Telegram bot のトークンを設定します.
トークンの 640093430: 部分は省いてその後ろだけを入力します.

$ sudo -u www-data php ./occ twofactorauth:gateway:configure telegram
Please enter your Telegram bot token: AAFTa_pSAcKCZWeFoVDt-l7h7ewqzNe0Luo
Using AAFTa_pSAcKCZWeFoVDt-l7h7ewqzNe0Luo.
$ sudo -u www-data php ./occ twofactorauth:gateway:status
Signal gateway: not configured
SMS gateway: not configured
Telegram gateway: configured

ひとまずこれで管理者側の設定は終了です.

Telegram bot の chat_id を調べて登録する

ここからはNextcloud の利用アカウントでの操作になります.

Telegram
In order to receive authentication codes via Telegram, you first have to start a new chat with the bot set up by your admin.
Secondly, you have to obtain your Telegram ID via the ID Bot. Enter this ID to receive your verification code below.

You are not using Telegram for two-factor authentication at the moment. Enable

Telegram アプリを利用して,Telegram の bot から TOTPコードを受け取りたい Telegram アカウントに適当なメッセージを投げます.

@matoken hello

その後,Telegram API を利用してメッセージを取得して chat_id を調べます.
以下の例では 475721977 です.

$ curl https://api.telegram.org/bot640093430:AAHu9u_c12KC2PY8g22QZoA94u4tAJvxsvY/getUpdates | jq
  % Total    % Received % Xferd  Average Speed   Time    Time     Time  Current
                                 Dload  Upload   Total   Spent    Left  Speed
100   358  100   358    0     0    315      0  0:00:01  0:00:01 --:--:--   315
{
  "ok": true,
  "result": [
    {
      "update_id": 612249686,
      "message": {
        "message_id": 9,
        "from": {
          "id": 475721977,
          "is_bot": false,
          "first_name": "matoken",
          "username": "matoken",
          "language_code": "En"
        },
        "chat": {
          "id": 475721977,
          "first_name": "matoken",
          "username": "matoken",
          "type": "private"
        },
        "date": 1537282406,
        "text": "@matoken hello",
        "entities": [
          {
            "offset": 0,
            "length": 8,
            "type": "mention"
          }
        ]
      }
    }
  ]
}

試しに送信してみて Telegram アプリに bot からメッセージが飛んできたら chat id が正しいはず.

$ curl -X POST "https://api.telegram.org/bot640093430:AAHu9u_c12KC2PY8g22QZoA94u4tAJvxsvY" -d "chat_id=475721977&text=hello" | jq
  % Total    % Received % Xferd  Average Speed   Time    Time     Time  Current
                                 Dload  Upload   Total   Spent    Left  Speed
100   274  100   246  100    28    179     20  0:00:01  0:00:01 --:--:--   200
{
  "ok": true,
  "result": {
    "message_id": 15,
    "from": {
      "id": 640093430,
      "is_bot": true,
      "first_name": "matoken_bot",
      "username": "matoken_bot"
    },
    "chat": {
      "id": 475721977,
      "first_name": "matoken",
      "username": "matoken",
      "type": "private"
    },
    "date": 1537312183,
    "text": "hello"
  }
}

Nextcloud にログインして,「設定」→「セキュリティ」の下部に「Message gateway second-factor auth」という項目が出来ているので「Enable」を押す.

Telegram
In order to receive authentication codes via Telegram, you first have to start a new chat with the bot set up by your admin.
Secondly, you have to obtain your Telegram ID via the ID Bot. Enter this ID to receive your verification code below.

You are not using Telegram for two-factor authentication at the moment. Enable

以下のメッセージが表示されたら chat_id を入力して Verify します.

Enter your identification (e.g. phone number to start the verification):
 Verify

Telegram で TOTPコードが飛んで来るのでそれを入力したらOKです.
一旦ログアウトして試してみましょう.

Telegram 認証を試す

いつものようにユーザ名,パスワードで認証すると以下のような画面に遷移します.
「Authenticate via Telegram」を押します.

44781965201 94bd9ca33e

Telegram から認証コードが飛んでくるのでそれを入力して認証完了です.

30910872108 2d5e8c21eb

めんどくさい……

未だ手順が面倒で一般ユーザに試してくれと言える状態ではないですね.でも次のリリースあたりでは簡単になるんじゃないでしょうか.

環境

$ sudo -u www-data php ./occ app:list|grep twofactor_|grep :
  - twofactor_backupcodes: 1.3.1
  - twofactor_gateway: 0.9.0
  - twofactor_totp: 1.5.0
$ sudo -u www-data php ./occ -V
Nextcloud 14.0.0
$ lsb_release -d
Description:    Ubuntu 16.04.5 LTS
$ uname -m
x86_64

Telegram の非公式cli client の telegram-cli を試す

Arm でも動くかな?と試してみました.

必要パッケージの導入
$ sudo apt install libreadline-dev libconfig-dev libssl-dev lua5.2 liblua5.2-dev libevent-dev libjansson-dev libpython-dev make libssl1.0-dev
sourceをcloneする
$ git clone --recursive https://github.com/vysheng/tg.git && cd tg
configure & make
$ ./configure
$ make
build error1
tgl/crypto/rsa_pem_openssl.c: In function ‘TGLC_rsa_new’:
tgl/crypto/rsa_pem_openssl.c:41:6: error: dereferencing pointer to incomplete type ‘RSA {aka struct rsa_st}’
   ret->e = unwrap_bn (TGLC_bn_new ());
      ^~
tgl/crypto/rsa_pem_openssl.c: In function ‘TGLC_rsa_n’:
tgl/crypto/rsa_pem_openssl.c:52:1: error: control reaches end of non-void function [-Werror=return-type]
 RSA_GETTER(n);
 ^~~~~~~~~~
tgl/crypto/rsa_pem_openssl.c: In function ‘TGLC_rsa_e’:
tgl/crypto/rsa_pem_openssl.c:53:1: error: control reaches end of non-void function [-Werror=return-type]
 RSA_GETTER(e);
 ^~~~~~~~~~
cc1: all warnings being treated as errors
Makefile.tgl:20: recipe for target 'objs/crypto/rsa_pem_openssl.o' failed
make: *** [objs/crypto/rsa_pem_openssl.o] Error 1

libssl-dev(1.1.1)では動作しないのでlibssl1.0-devに入れ替える. sudo apt install libssl1.0-dev

build error2
gcc -I. -I. -I./tgl -w  -I/usr/local/include -I/usr/include -I/usr/include -I/usr/include/lua5.2  -DHAVE_CONFIG_H -Wall -Werror -Wextra -Wno-missing-field-initializers -Wno-deprecated-declarations -fno-strict-aliasing -fno-omit-frame-pointer -ggdb -Wno-unused-parameter -fPIC -iquote ./tgl/tl-parser -c -MP -MD -MF dep/tl-parser.d -MQ objs/tl-parser.o -o objs/tl-parser.o tgl/tl-parser/tl-parser.c
tgl/tl-parser/tl-parser.c:37:10: fatal error: zlib.h: そのようなファイルやディレクトリはありません
 #include <zlib.h>
          ^~~~~~~~
compilation terminated.
make: *** [Makefile.tl-parser:4: objs/tl-parser.o] エラー 1

zlib1g-dev を導入する. sudo apt install zlib1g-dev

Raspbian stretchでの実行時エラー(32bit環境での不具合?)
$ bin/telegram-cli
Telegram-cli version 1.4.1, Copyright (C) 2013-2015 Vitaly Valtman
Telegram-cli comes with ABSOLUTELY NO WARRANTY; for details type `show_license'.
This is free software, and you are welcome to redistribute it
under certain conditions; type `show_license' for details.
Telegram-cli uses libtgl version 2.1.0
Telegram-cli includes software developed by the OpenSSL Project
for use in the OpenSSL Toolkit. (http://www.openssl.org/)
I: config dir=[/home/pi/.telegram-cli]
> telegram-cli: tgl/mtproto-utils.c:101: BN2ull: Assertion `0' failed.
SIGNAL received

以下の修正を行い, make clean して build しなおす.

$ diff -ud tgl/mtproto-utils.c.org tgl/mtproto-utils.c
--- tgl/mtproto-utils.c.org     2018-09-19 21:01:44.878560077 +0900
+++ tgl/mtproto-utils.c 2018-09-19 20:59:55.778295550 +0900
@@ -98,13 +98,13 @@
   if (sizeof (unsigned long) == 8) {
	 return TGLC_bn_get_word (b);
   } else if (sizeof (unsigned long long) == 8) {
-    assert (0); // As long as nobody ever uses this code, assume it is broken.
+    assert (0);  As long as nobody ever uses this code, assume it is broken.
	 unsigned long long tmp;
	 /* Here be dragons, but it should be okay due to be64toh */
	 TGLC_bn_bn2bin (b, (unsigned char *) &tmp);
	 return be64toh (tmp);
   } else {
-    assert (0);
+//    assert (0);
   }
 }
$ make clean
$ ./configure
$ make
初回実行時はSMS認証が必要
$ bin/telegram-cli
Telegram-cli version 1.4.1, Copyright (C) 2013-2015 Vitaly Valtman
Telegram-cli comes with ABSOLUTELY NO WARRANTY; for details type `show_license'.
This is free software, and you are welcome to redistribute it
under certain conditions; type `show_license' for details.
Telegram-cli uses libtgl version 2.1.0
Telegram-cli includes software developed by the OpenSSL Project
for use in the OpenSSL Toolkit. (http://www.openssl.org/)
I: config dir=[/home/mk/.telegram-cli]
[/home/mk/.telegram-cli] created
[/home/mk/.telegram-cli/downloads] created
phone number: +81-9000000000
code ('CALL' for phone code): 16802
User matoken updated flags
User matoken online (was online [2018/09/18 23:55:32])
User matoken offline (was online [2018/09/18 23:50:35])
認証を行うとメッセージが飛んでくる
matoken,

We detected a login into your account from a new device on 19/09/2018 at 12:28:55 UTC.

Device: Unix Console
Location: Shizuoka, Japan (IP = 180.131.110.140)

If this wasn't you, you can go to Settings - Privacy and Security - Sessions and terminate that session.

If you think that somebody logged in to your account against your will, you can enable two-step verification in Privacy and Security settings.

Sincerely,
The Telegram Team
メッセージを送信してみる
> msg @matoken hello
telegram-cli の help
$ bin/telegram-cli --help
telegram-cli Usage
  --phone/-u                           specify username (would not be asked during authorization)
  --rsa-key/-k                         specify location of public key (possible multiple entries)
  --verbosity/-v                       increase verbosity (0-ERROR 1-WARNIN 2-NOTICE 3+-DEBUG-levels)
  --enable-msg-id/-N                   message num mode
  --config/-c                          config file name
  --profile/-p                         use specified profile
  --log-level/-l                       log level
  --sync-from-start/-f                 during authorization fetch all messages since registration
  --disable-auto-accept/-E             disable auto accept of encrypted chats
  --lua-script/-s                      lua script file
  --wait-dialog-list/-W                send dialog_list query and wait for answer before reading input
  --disable-colors/-C                  disable color output
  --disable-readline/-R                disable readline
  --alert/-A                           enable bell notifications
  --daemonize/-d                       daemon mode
  --logname/-L <log-name>              log file name
  --username/-U <user-name>            change uid after start
  --groupname/-G <group-name>          change gid after start
  --disable-output/-D                  disable output
  --tcp-port/-P <port>                 port to listen for input commands
  --udp-socket/-S <socket-name>        unix socket to create
  --exec/-e <commands>                 make commands end exit
  --disable-names/-I                   use user and chat IDs in updates instead of names
  --enable-ipv6/-6                     use ipv6 (may be unstable)
  --help/-h                            prints this help
  --accept-any-tcp                     accepts tcp connections from any src (only loopback by default)
  --disable-link-preview               disables server-side previews to links
  --bot/-b                             bot mode
  --json                               prints answers and values in json format
  --permanent-msg-ids                  use permanent msg ids
  --permanent-peer-ids                 use permanent peer ids
telegram-cli 起動時のhelp
$ bin/telegram-cli -e help
Telegram-cli version 1.4.1, Copyright (C) 2013-2015 Vitaly Valtman
Telegram-cli comes with ABSOLUTELY NO WARRANTY; for details type `show_license'.
This is free software, and you are welcome to redistribute it
under certain conditions; type `show_license' for details.
Telegram-cli uses libtgl version 2.1.0
Telegram-cli includes software developed by the OpenSSL Project
for use in the OpenSSL Toolkit. (http://www.openssl.org/)
I: config dir=[/home/pi/.telegram-cli]
[33;1maccept_secret_chat <secret chat>  Accepts secret chat. Only useful with -E option
add_contact <phone> <first name> <last name>    Tries to add user to contact list
block_user <user>       Blocks user
broadcast <user>+ <text>        Sends text to several users at once
channel_get_admins <channel> [limit=100] [offset=0]     Gets channel admins
channel_get_members <channel> [limit=100] [offset=0]    Gets channel members
channel_info <channel>  Prints info about channel (id, members, admin, etc.)
channel_invite <channel> <user> Invites user to channel
channel_join <channel>  Joins to channel
channel_kick <channel> <user>   Kicks user from channel
channel_leave <channel> Leaves from channel
channel_list [limit=100] [offset=0]     List of last channels
channel_set_about <channel> <about>     Sets channel about info.
channel_set_admin <channel> <admin> <type>      Sets channel admin. 0 - not admin, 1 - moderator, 2 - editor
channel_set_username <channel> <username>       Sets channel username info.
channel_set_photo <channel> <filename>  Sets channel photo. Photo will be cropped to square
chat_add_user <chat> <user> [msgs-to-forward]   Adds user to chat. Sends him last msgs-to-forward message from this chat. Default 100
chat_del_user <chat> <user>     Deletes user from chat
chat_info <chat>        Prints info about chat (id, members, admin, etc.)
chat_set_photo <chat> <filename>        Sets chat photo. Photo will be cropped to square
chat_upgrade <chat>     Upgrades chat to megagroup
chat_with_peer <peer>   Interface option. All input will be treated as messages to this peer. Type /quit to end this mode
clear   Clears all data and exits. For debug.
contact_list    Prints contact list
contact_search username Searches user by username
create_channel <name> <about> <user>+   Creates channel with users
create_group_chat <name> <user>+        Creates group chat with users
create_secret_chat <user>       Starts creation of secret chat
del_contact <user>      Deletes contact from contact list
delete_msg <msg-id>     Deletes message
dialog_list [limit=100] [offset=0]      List of last conversations
export_card     Prints card that can be imported by another user with import_card method
export_channel_link     Prints channel link that can be used to join to channel
export_chat_link        Prints chat link that can be used to join to chat
fwd <peer> <msg-id>+    Forwards message to peer. Forward to secret chats is forbidden
fwd_media <peer> <msg-id>       Forwards message media to peer. Forward to secret chats is forbidden. Result slightly differs from fwd
get_terms_of_service    Prints telegram's terms of service
get_message <msg-id>    Get message by id
get_self        Get our user info
help [command]  Prints this help
history <peer> [limit] [offset] Prints messages with this peer (most recent message lower). Also marks messages as read
import_card <card>      Gets user by card and prints it name. You can then send messages to him as usual
import_chat_link <hash> Joins to chat by link
import_channel_link <hash>      Joins to channel by link
load_audio <msg-id>     Downloads file to downloads dirs. Prints file name after download end
load_channel_photo <channel>    Downloads file to downloads dirs. Prints file name after download end
load_chat_photo <chat>  Downloads file to downloads dirs. Prints file name after download end
load_document <msg-id>  Downloads file to downloads dirs. Prints file name after download end
load_document_thumb <msg-id>    Downloads file to downloads dirs. Prints file name after download end
load_file <msg-id>      Downloads file to downloads dirs. Prints file name after download end
load_file_thumb <msg-id>        Downloads file to downloads dirs. Prints file name after download end
load_photo <msg-id>     Downloads file to downloads dirs. Prints file name after download end
load_user_photo <user>  Downloads file to downloads dirs. Prints file name after download end
load_video <msg-id>     Downloads file to downloads dirs. Prints file name after download end
load_video_thumb <msg-id>       Downloads file to downloads dirs. Prints file name after download end
main_session    Sends updates to this connection (or terminal). Useful only with listening socket
mark_read <peer>        Marks messages with peer as read
msg <peer> <text>       Sends text message to peer
msg <peer> <kbd> <text> Sends text message to peer with custom kbd
post <peer> <text>      Sends text message to peer as admin
post_audio <peer> <file>        Posts audio to peer
post_document <peer> <file>     Posts document to peer
post_file <peer> <file> Sends document to peer
post_location <peer> <latitude> <longitude>     Sends geo location
post_photo <peer> <file>       Sends photo to peer
post_text <peer> <file> Sends contents of text file as plain text message
post_video <peer> <file>       Sends video to peer
quit    Quits immediately
rename_channel <channel> <new name>     Renames channel
rename_chat <chat> <new name>   Renames chat
rename_contact <user> <first name> <last name>  Renames contact
reply <msg-id> <text>   Sends text reply to message
reply_audio <msg-id> <file>     Sends audio to peer
reply_contact <msg-id> <phone> <first-name> <last-name> Sends contact (not necessary telegram user)
reply_document <msg-id> <file>  Sends document to peer
reply_file <msg-id> <file>      Sends document to peer
reply_location <msg-id> <latitude> <longitude>  Sends geo location
reply_photo <msg-id> <file>    Sends photo to peer
reply_video <msg-id> <file>     Sends video to peer
resolve_username username       Searches user by username
safe_quit       Waits for all queries to end, then quits
search [peer] [limit] [from] [to] [offset] pattern      Search for pattern in messages from date from to date to (unixtime) in messages with peer (if peer not
present, in all messages)
send_audio <peer> <file>        Sends audio to peer
send_contact <peer> <phone> <first-name> <last-name>    Sends contact (not necessary telegram user)
send_document <peer> <file>     Sends document to peer
send_file <peer> <file> Sends document to peer
send_location <peer> <latitude> <longitude>     Sends geo location
send_photo <peer> <file>       Sends photo to peer
send_text <peer> <file> Sends contents of text file as plain text message
send_typing <peer> [status]     Sends typing notification. You can supply a custom status (range 0-10): none, typing, cancel, record video, upload video, recor
d audio, upload audio, upload photo, upload document, geo, choose contact.
send_typing_abort <peer>        Sends typing notification abort
send_video <peer> <file>       Sends video to peer
set <param> <value>     Sets value of param. Currently available: log_level, debug_verbosity, alarm, msg_num
set_password <hint>     Sets password
set_profile_name <first-name> <last-name>       Sets profile name.
set_profile_photo <filename>    Sets profile photo. Photo will be cropped to square
set_ttl <secret chat>   Sets secret chat ttl. Client itself ignores ttl
set_username <name>     Sets username.
set_phone_number <phone>        Changes the phone number of this account
show_license    Prints contents of GPL license
start_bot <bot> <chat> <data>   Adds bot to chat
stats   For debug purpose
status_online   Sets status as online
status_offline  Sets status as offline
unblock_user <user>     Unblocks user
user_info <user>        Prints info about user (id, last online, phone)
version Prints client and library version
view_audio <msg-id>     Downloads file to downloads dirs. Then tries to open it with system default action
view_channel_photo <channel>    Downloads file to downloads dirs. Then tries to open it with system default action
view_chat_photo <chat>  Downloads file to downloads dirs. Then tries to open it with system default action
view_document <msg-id>  Downloads file to downloads dirs. Then tries to open it with system default action
view_document_thumb <msg-id>    Downloads file to downloads dirs. Then tries to open it with system default action
view_file <msg-id>      Downloads file to downloads dirs. Then tries to open it with system default action
view_file_thumb <msg-id>        Downloads file to downloads dirs. Then tries to open it with system default action
view_photo <msg-id>     Downloads file to downloads dirs. Then tries to open it with system default action
view_user_photo <user>  Downloads file to downloads dirs. Then tries to open it with system default action
view_video <msg-id>     Downloads file to downloads dirs. Then tries to open it with system default action
view_video_thumb <msg-id>       Downloads file to downloads dirs. Then tries to open it with system default action
view <msg-id>   Tries to view message contents
visualize_key <secret chat>     Prints visualization of encryption key (first 16 bytes sha1 of it in fact)
[0mAll done. Exit
halt

大抵のことは出来る感じです.

試した環境1
$ git log --decorate|head -7
commit 6547c0b21b977b327b3c5e8142963f4bc246187a (HEAD -> master, origin/master, origin/HEAD)
Merge: 443793d 160231b
Author: V V <vvaltman@aurum>
Date:   Wed Mar 23 14:42:53 2016 +0300
Merge github.com:vysheng/tg
$ dpkg-query -W libreadline-dev libconfig-dev libssl-dev lua5.2 liblua5.2-dev libevent-dev libjansson-dev libpython-dev make libssl1.0-dev
libconfig-dev:armhf     1.5-0.3
libevent-dev    2.0.21-stable-3
libjansson-dev:armhf    2.9-1
liblua5.2-dev:armhf     5.2.4-1.1
libpython-dev:armhf     2.7.13-2
libreadline-dev:armhf   7.0-3
libssl-dev
libssl1.0-dev:armhf     1.0.2l-2+deb9u3
lua5.2  5.2.4-1.1
make    4.1-9.1
$ lsb_release -d
Description:    Raspbian GNU/Linux 9.4 (stretch)
$ uname -m
armv7l
$ cat /proc/device-tree/model ;echo
Raspberry Pi 2 Model B Rev 1.1
試した環境2
$ git log --decorate|head -7
commit 6547c0b21b977b327b3c5e8142963f4bc246187a (HEAD -> master, origin/master, origin/HEAD)
Merge: 443793d 160231b
Author: V V <vvaltman@aurum>
Date:   Wed Mar 23 14:42:53 2016 +0300
Merge github.com:vysheng/tg
$ dpkg-query -W libreadline-dev libconfig-dev libssl-dev lua5.2 liblua5.2-dev libevent-dev libjansson-dev libpython-dev make libssl1.0-dev
libconfig-dev:amd64     1.5-0.4
libevent-dev    2.1.8-stable-4build1
libjansson-dev:amd64    2.11-1
liblua5.2-dev:amd64     5.2.4-1.1build1
libpython-dev:amd64     2.7.15~rc1-1
libreadline-dev:amd64   7.0-3
libssl-dev
libssl1.0-dev:amd64     1.0.2n-1ubuntu5.1
lua5.2  5.2.4-1.1build1
make    4.1-9.1ubuntu1
$ lsb_release -d
Description:    Ubuntu 18.04.1 LTS
(mk)-(jobs:0)-(~/src/tg)
$ uname -m
x86_64

デーモンの起動しないSMTPクライアントの msmtp を試す(sSMTP乗り換え)

sSMTP から msmtp へ

現在メールを受け取らずメールを送信するだけのホストではsSMTPをよく使っています.MTAはeximやPostfix等でも良いのですが,デーモンが起動しないのでその分セキュアで設定も楽です.
しかし,sSMTPは最近メンテされていません,Debian などのディストリビューションではまだメンテナンスされていますが新機能が入ったりはしないでしょう.

ssmtp is unmaintained. Consider using something like msmtp instead.
バージョンも据え置きでUpstreamも無さそう
$ w3m -dump https://packages.qa.debian.org/s/ssmtp.html|grep versions -A11
versions ... ...pool
o-o-stable
save 2.64-7
oldstable
save 2.64-8
stable
save 2.64-8
unstable
save 2.64-8
Ubuntu
2.64-8ubuntu2
$ apt show ssmtp 2>/dev/null |grep Homepage
Homepage: http://packages.qa.debian.org/s/ssmtp.html

そこで,alternativeto.net で挙げられている msmtp を試してみました.

以下では色々試していますが,システムメールを送るだけなら msmtp, msmtp-mta pkg を導入,/etc/msmtprc の設定だけでokです.

msmtp の導入

Debian sid/Ubuntu 18.04 LTS などではパッケージがあったのでこれを導入しました.

$ sudo apt install msmtp

mstpの設定

設定例が /usr/share/doc/msmtp/examples/ 以下にあるので
システム設定の場合は msmtprc-system.example`/etc/msmtprc にcpして設定.
ユーザ設定の場合は msmtprc-user.example~/.msmtprc にcpして設定する.

システムでの設定例

以下の例では root が読み書きできて,一般ユーザのmatokenアカウントは読み込みが可能な設定ファイル /etc/msmtprc を作成している.
defaults セクションに共通設定を書き,account セクションにメールサーバ固有の設定を書く.account セクションは複数書けて,account default に規定account を指定する.以下の例ではgmail が規定値となる.

/etc/msmtprc の作成
$ sudo install /dev/null /etc/msmtprc -o root -g root -m 600
$ sudo setfacl -m u:matoken:r /etc/msmtprc
$ getfacl /etc/msmtprc
getfacl: Removing leading '/' from absolute path names
# file: etc/msmtprc
# owner: root
# group: root
user::rw-
user:matoken:r--
group::---
mask::r--
other::---
$ sudo vi /etc/msmtprc
$ sudo grep -v ^# /etc/msmtprc
defaults
syslog on
aliases /etc/aliases
tls on
tls_trust_file /etc/ssl/certs/ca-certificates.crt
auth on
syslog LOG_MAIL
account gmail
host smtp.gmail.com
port 587
from example@gmail.com
user example
password porseypacdoadwif
account default : gmail

※gmailの多要素認証を利用している場合は以下からアプリパスワードを生成する.(使い回しができちゃうけれど流出したときの影響を考えて設定毎に発行する)

ユーザでの設定

ユーザの設定ファイルは`~/.msmtprc` 若しくは $XDG_CONFIG_HOME/msmtp/config でシステムと違い,alias file と log を適当なファイルにした.
アカウントも増やしてみた.
gmailのアプリパスワードも新たに発行した.

~/.msmtprc の作成
$ install /dev/null ~/.msmtprc -o matoken -g matoken -m 600
$ vi ~/.msmtprc
$ grep -v ^# ~/.msmtprc
defaults
logfile ~/.msmtp.log
aliases ~/.msmtp.aliases
tls on
tls_trust_file /etc/ssl/certs/ca-certificates.crt
auth on
syslog LOG_MAIL
account gmail
host smtp.gmail.com
port 587
from example@gmail.com
user example
password igeinleedafchygy
account yandex
tls_starttls off
host smtp.yandex.com
port 465
from example@yandex.com
user example
password throjfeekdewxeib
account nifty
tls_starttls off
host smtp.nifty.com
port 465
from example@nifty.com
user aaa99999
password 9Z#9999X
account default : gmail

送信テスト

msmtp コマンドで送信テストが出来る.
-a オプションでアカウントが指定できる.
-C オプションで設定ファイルが指定できる.(システムとユーザの設定を両方テストする)

$ echo "hello system msmtp" | msmtp -C /etc/msmtprc matohara@gmail.com
$ echo "hello user msmtp" | msmtp -C ~/.msmtprc -a gmail matohara@gmail.com

大抵のMTAでは . でmail body 終了となるが,msmtpでは`.`は普通にbody に含まれる.Ctrl + d で終了.

$ msmtp -a gmail matohara@gmail.com
Subject: hello
msmtp test
.
dot では終了にならない
Ctrl+d で終了
^d

aliases file

msmtp設定ファイルの alias で設定できる.

$ grep alias ~/.msmtprc
aliases ~/.msmtp.alias
$ sudo grep alias /etc/msmtprc
aliases /etc/aliases

このalias fileは通常のaliases ファイルと同じ形式の plain text で newaliases コマンドでの変換は不要.

メールアドレスは複数指定できる.default という名前は規定アドレスとなる.

root: hoge@example.com, fuga@example.com
default: piyo@example.com

以前のaliases ファイルを流用して以下のようにしてみたところ,

# /etc/aliases
mailer-daemon: postmaster
postmaster: root
nobody: root
hostmaster: root
usenet: root
news: root
webmaster: root
www: root
ftp: root
abuse: root
noc: root
security: root
root: matohara@gmail.com
default: matohara@gmail.com

以下のようにエラーとなった.alias先はユーザ名ではエラーとなるよう.

$ echo hello | sudo msmtp -C /etc/msmtprc root
msmtp: /etc/aliases: line 2: invalid address 'postmaster'

以下のようにそれぞれにメールアドレスを指定すると期待した動作となった.

$ sudo sed -i -e 's/ root$\| postmaster$/matohara@gmail.com/' /etc/aliases
$ cat /etc/aliases
# /etc/aliases
mailer-daemon:matohara@gmail.com
postmaster:matohara@gmail.com
nobody:matohara@gmail.com
hostmaster:matohara@gmail.com
usenet:matohara@gmail.com
news:matohara@gmail.com
webmaster:matohara@gmail.com
www:matohara@gmail.com
ftp:matohara@gmail.com
abuse:matohara@gmail.com
noc:matohara@gmail.com
security:matohara@gmail.com
root: matohara@gmail.com
default: matohara@gmail.com

パスワードをGnuPG暗号化ファイルに格納して利用する

パスワードをgpgで暗号化したファイルに格納することが可能.この場合アカウントごとにファイルが必要なのが少し面倒.
password porseypacdoadwif の場合 porseypacdoadwif 部分だけを暗号化してファイルに格納する.(はじめpassword も含めてしまい失敗した)

$ grep ^password\  ~/.msmtprc | head -1 | awk {'print $2'} | gpg2 --default-recipient-self -e - > ~/.msmtp-password-gmail.gpg
$ grep ^password\  ~/.msmtprc | head -2 | tail -1 | awk {'print $2'} | gpg2 --default-recipient-self -e - > ~/.msmtp-password-yandex.gpg
$ grep ^password\  ~/.msmtprc | tail -1 | awk {'print $2'} | gpg2 --default-recipient-self -e - > ~/.msmtp-password-nifty.gpg

msmtprc の password を削除して,代わりに passwordeval gpg2 --no-tty -q -d 暗号ファイル と設定を変更する.

$ grep ^passworde ~/.msmtprc
passwordeval gpg2 --no-tty -q -d ~/.msmtp-password-gmail.gpg
passwordeval gpg2 --no-tty -q -d ~/.msmtp-password-yandex.gpg
passwordeval gpg2 --no-tty -q -d ~/.msmtp-password-nifty.gpg

後はこれまでのようにmsmtpを呼ぶとgpg-agentが起動する.

※システム側はシステムメールが送れなくなるのでこの設定をしないほうがいいと思う.

パスワードをopenssl暗号化ファイルに格納

システムメールでgpg agentを利用するのは多分無理なのでopensslで暗号化してみる.パスワードはNICのmac addressにしてある.気休めレベルだけど試しに設定.
マシンが乗っ取られた場合はどうしようもないけれど /etc/msmtprc, /etc/msmtp-password ファイル流出時の時間稼ぎくらいにはなる?
NIC が使っていないものも含め増減したり変更になった場合は復元できなくなるので注意.

mac address をパスワードとしてopensslで暗号化
$ umask 0077; grep ^password\  /etc/msmtprc | head -1 | awk {'print $2'} | sudo openssl enc -e -md sha256 -aes-256-cbc -a -A -salt -pbkdf2 -in /dev/stdin -out /etc/msmtp-password -pass pass:`hwinfo --network | grep 'Permanent HW Address' | sed 's/^.*: //' | sort -n | tr -d '\n'`
復元テスト
$ sudo openssl enc -d -md sha256 -aes-256-cbc -a -A -salt -pbkdf2 -in /etc/msmtp-password -pass pass:`hwinfo --network | grep 'Permanent HW Address' | sed 's/^.*: //' | sort -n | tr -d '\n'`
igeinleedafchygy
/etc/msmtprc の password を削除して passwordeval に書き換え
$ grep passworde /etc/msmtprc
passwordeval openssl enc -d -md sha256 -aes-256-cbc -a -A -salt -pbkdf2 -in /etc/msmtp-password -pass pass:`hwinfo --network | grep 'Permanent HW Address' | sed 's/^.*: //' | sort -n | tr -d '\n'`

※ifconfigやiproute2を使わずhwinfoを使ってPermanent HW Addressを使っているのはmac address偽装対策

MTA パッケージの導入

msmtp コマンドでメールが送信できるようになったら,msmtp-mta pkg を導入する.これでsendmailコマンドにシンボリックリンクが張られて同様に利用できるようになる.システムメールも飛ぶようになる.

$ sudo apt install msmtp-mta
$ ls -l /usr/sbin/sendmail
lrwxrwxrwx 1 root root 12 11月 29  2016 /usr/sbin/sendmail -> ../bin/msmtp

オフライン時にmsmtpを利用する

msmtpはオフライン時に実行するとエラーとなる.通常は常にオンラインなので問題はないが,持ち運びNotePCなどではオフラインオンラインが発生してメールの送信に失敗することがある.

$ echo 'hoge' | msmtp -a gmail matoken@gmail.com
msmtp: cannot locate host smtp.gmail.com: 名前またはサービスが不明です
msmtp: could not send mail (account gmail from /etc/msmtprc)

/usr/share/doc/msmtp/examples/ 以下の msmtpq 若しくは msmtpqueue に格納されているscriptを利用することでオフライン時にキューとして貯めておいてオンライン時に送信といったことが出来る.

どちらもsendmailと置き換えが可能なので,ネットワークダウン時に`/usr/sbin/sendmail`をこれに置き換えてオンライン時に戻してqueueをフラッシュするようにするといいかもしれない.

Debian/Ubuntuなら以下のあたりで,

  • /etc/network/if-down.d/
    /usr/sbin/sendmail を msmtpq or msmtpqueue に向ける

  • /etc/network/if-pre-up.d/
    /usr/sbin/sendmail を msmtp に向ける

  • /etc/network/if-up.d/
    queueをフラッシュ

NetworkManagerだと /etc/NetworkManager/dispatcher.d/ 以下で同じことが出来る.

msmtpq

圧縮されているmsmtpqを展開して実行権を付与する
$ sudo gunzip /usr/share/doc/msmtp/examples/msmtpq/msmtpq.gz
$ sudo chmod 755 /usr/share/doc/msmtp/examples/msmtpq/msmtpq
使いやすい場所にシンボリックリンクを張る
$ sudo ln -s /usr/share/doc/msmtp/examples/msmtpq/msmtpq /usr/local/bin/msmtpq
$ sudo ln -s /usr/share/doc/msmtp/examples/msmtpq/msmtp-queue /usr/local/bin/msmtp-queue
queueとlogディレクトリを作成
$ install -d -m 700 ~/.msmtp.queue
$ install -d -m 700 ~/log
オフライン時に送信しようとする
$ echo 'msmtpq' | msmtpq -C ~/.msmtprc -a gmail matoken@gmail.com
mail for [ -C /home/matoken/.msmtprc -a gmail matoken@gmail.com ] : couldn't be sent - host not connected
enqueued mail as : [ 2018-09-18-06.21.48 ] ( -C /home/matoken/.msmtprc -a gmail matoken@gmail.com ) : successful
queueを確認する
$ msmtp-queue -d
mail  num=[ 1 ]  id=[ 2018-09-18-06.21.18 ]
mail  num=[ 2 ]  id=[ 2018-09-18-06.21.48 ]
queueをフラッシュする
$ msmtp-queue -r
mail [ 1 ] [ 2018-09-18-06.21.18 ] from queue ; send was successful ; purged from queue
mail [ 2 ] [ 2018-09-18-06.21.48 ] from queue ; send was successful ; purged from queue
$ msmtp-queue -d
no mail in queue

msmtpqueue

使いやすい場所にシンボリックリンクを張る
$ sudo ln -s /usr/share/doc/msmtp/examples/msmtpqueue/msmtp-enqueue.sh /usr/local/bin/msmtp-enqueue.sh
$ sudo ln -s /usr/share/doc/msmtp/examples/msmtpqueue/msmtp-listqueue.sh /usr/local/bin/msmtp-listqueue.sh
~$ sudo ln -s /usr/share/doc/msmtp/examples/msmtpqueue/msmtp-runqueue.sh /usr/local/bin/msmtp-runqueue.sh
`msmtp`コマンドの代わりに`msmtp-enqueue.sh`を使う
$ echo 'queue' | msmtp-enqueue.sh -C ~/.msmtprc -a gmail matoken@gmail.com
queueを確認する
$ msmtp-listqueue.sh
No mail in queue
今回のようにメールの内容がbodyだけでFrom, To, Subject が存在しないとこのscriptはうまく機能しない><
         egrep -s --colour -h '(^From:|^To:|^Subject:)' "$i" || echo "No mail in queue";
直接`~/.msmtpqueue/`を確認するとqueueが溜まっているのがわかる
$ ls -lA ~/.msmtpqueue/
合計 8
-rw------- 1 matoken matoken  7  9月 18 00:15 2018-09-18-00.15.53.mail
-rw------- 1 matoken matoken 53  9月 18 00:15 2018-09-18-00.15.53.msmtp
Subjectの付いたメールがある時
$ msmtp-listqueue.sh
No mail in queue
Subject: offline><
オンライン時にqueueをフラッシュする
$ msmtp-runqueue.sh
*** Sending 2018-09-18-00.15.53.mail to -C /home/matoken/.msmtprc -a gmail matoken@gmail.com ...
2018-09-18-00.15.53.mail sent successfully
*** Sending 2018-09-18-00.27.21.mail to -C /home/matoken/.msmtprc -a gmail matoken@gmail.com ...
2018-09-18-00.27.21.mail sent successfully

#sudoの場合も ~root/.msmtpqueue/ だった.

tips

gmailで以下のエラーとなった場合 tls_starttls on ( tls onのときの既定値? )と設定すると送信できた
$ echo "hello msmtp" | sudo msmtp -a gmail matohara@gmail.com
msmtp: envelope from address matohara@gmail.com not accepted by the server
msmtp: server message: 530 5.7.0 Must issue a STARTTLS command first. k126-v6sm14991126pgk.26 - gsmtp
msmtp: could not send mail (account gmail from /etc/msmtprc)
Yandexでメール送信時に帰ってこない場合 tls_starttls off と設定すると送信できた

niftyで以下のエラーとなった場合 tls_starttls off と設定すると送信できた
msmtp: network read error: 接続が相手からリセットされました
msmtp: could not send mail (account nifty from /etc/msmtprc)

試した環境

環境1(Raspberry Pi 2B/Raspbian stretch)
$ dpkg-query -W msmtp msmtp-mta gnupg2 openssl
gnupg2  2.1.18-8~deb9u2
msmtp   1.6.6-1
msmtp-mta       1.6.6-1
openssl 1.1.0f-3+deb9u2
$ lsb_release -d
Description:    Raspbian GNU/Linux 9.4 (stretch)
$ uname -m
armv7l
環境2(Ubuntu 18.04 LTS)
$ dpkg-query -W msmtp msmtp-mta gnupg2 openssl
gnupg2  2.2.4-1ubuntu1.1
msmtp   1.6.6-1
msmtp-mta       1.6.6-1
openssl 1.1.0g-2ubuntu4.1
$ lsb_release -d
Description:    Ubuntu 18.04.1 LTS
$ uname -m
x86_64
環境3(Debian sid)
$ dpkg-query -W msmtp msmtp-mta gnupg2 openssl
gnupg2  2.2.10-1
msmtp   1.6.7-1
msmtp-mta
openssl 1.1.1-1
$ lsb_release -d
Description:    Debian GNU/Linux unstable (sid)
$ uname -m
x86_64