mpv audio delay

動画プレイヤーのmpvを最近良く使うけどBluetoothで音が遅れるのでディレイ掛けたい.
vlcだとj,kというショートカットで50msずつずらせたので同じようなことがしたい.
man見ると載っててmpvだとCtrl + / Ctrl -みたい,だけど100ms単位.
コマンドラインオプションや設定ファイルだと細かく指定できた.

  • ショートカット
       Ctrl + and Ctrl -
              Adjust audio delay by +/- 0.1 seconds.

※100ms単位(VLCは50ms単位)

  • オプション
       --audio-delay=<sec>
              Audio delay in seconds (positive or negative float value). Positive values delay the audio, and negative values delay the video.

こちらは細かい時間を指定可能.以下は-250msを指定.
$ mpv --audio-delay=-0.25 FILE
この状態でショートカットを利用すると-250ms -> -150msのような感じに100ms単位で移動する.

  • 設定ファイル
$ cat ~/.config/mpv/mpv.conf
audio-delay=-0.25
  • 環境
$ lsb_release -d
Description:    Ubuntu Zesty Zapus (development branch)
$ uname -a
Linux x200 4.9.0-15-generic #16-Ubuntu SMP Fri Jan 20 15:31:12 UTC 2017 x86_64 x86_64 x86_64 GNU/Linux
$ dpkg-query -W mpv
mpv     0.23.0-2

引用はmpv(1)より

コマンドスニペットを手軽に調べられるコマンドのborg

borgはOK borgというsiteのスニペットをコマンドライン上から検索したり編集できるコマンドのようです.borgはgo製でApache License Version 2.0のソフトウェアです.

導入

導入方法は如何から対応バイナリを入手して適当な場所に置き,実行権をつけるだけです.arm linuxとか*BSDとか結構いろいろそろっています.

今回はこんな感じで導入しました.

$ wget https://github.com/ok-borg/borg/releases/download/v0.0.1/borg_linux_amd64 -O ~/usr/local/bin/borg && chmod +x ~/usr/local/bin/borg

利用方法

基本的にコマンドの後ろに調べたいキーワードをつけるだけです.規定値では5つの例が表示されます. bashでloopどう書くんだっけ?

$ borg "bash loop"
(1) Bash Shell Do While Loop Infinite loop?
         [11] while [ `prog -some flags` = "Another instance of this program is running, please exit it first" ]
              -
              bay=$(prog -some flags)
              while [ $bay = "Another instance of this program is running, please exit it first" ]
              do
              echo "Awaiting Access to program"
              bay=$(prog -some flags)
              done
              .....
         [12] while true
              do
         ...  

(2) Bash foreach loop
         [21] xargs cat <filenames.txt
              -
              for fn in `cat filenames.txt`; do
                  echo "the next file is $fn"
                  cat $fn
              done
         [22] for fn in `cat filenames.txt`; do cat "$fn"; done
         [23] while read filename
              do
                  echo "Printing: $filename"
                  cat "$filename"
         ...

(3) Bash loop ping successful
         [31] ((count = 100))                            # Maximum number to try.
              while [[ $count -ne 0 ]] ; do
                  ping -c 1 8.8.8.8                      # Try once.
                  rc=$?
                  if [[ $rc -eq 0 ]] ; then
                      ((count = 1))                      # If okay, flag to exit loop.
                  fi
                  ((count = count - 1))                  # So we don't go forever.
              done
              if [[ $rc -eq 0 ]] ; then                  # Make final determination.
         ...

(4) Limit for bash loop
        [41] for(( i=1; i <= 1000; i++ )); do
                 name=$(date --date="$i day ago" +%Y%m%d%H%M%S)
                 mkdir -p "$name" &&
                 touch "$name/${name}_file" ||
                 break
             done

(5) Bash 'for' loop syntax?
         [51] for (($i=0...
              -
              for ((i=0;i<10;i++))
         [52] for i in `seq 0 9`
              do
                  echo "the i is $i"
              done
         [53] for i in {0..9}
                do
                  echo $i
                done
         ...

画像をタイルに結合って?

$ borg "image tile"
(1) ImageMagick crop huge image
         [11] $ time convert -crop 512x512 +repage huge.tif x/image_out_%d.tif
              real    0m5.623s
              user    0m2.060s
              sys     0m2.148s
              $ time vips dzsave huge.tif x --depth 1 --tile-size 512 --overlap 0 --suffix .tif
              real    0m1.643s
              user    0m1.668s
              sys     0m1.000s
         [12]  convert -monitor -limit area 2mb myLargeImg.tif myLargeImg.mpc
              -
               #!/bin/bash
         ...

(2) Set clipboard to image - pbcopy
        [21] cat image.png | impbcopy -
        [22] # Copy image to clipboard
             uuencode SomeFile.jpg - | pbcopy
             -
             # Paste from clipboard to image file
             pbpaste | uudecode -o AnotherFile.jpg


(3) Using Amazon MapReduce/Hadoop for Image Processing
         [31] and should be able to be done using Bash
         [32] #!/usr/bin/env bash
              # NLineInputFormat gives a single line: key is offset, value is Isotropic Url
              read offset isofile
              # Retrieve file from Isotropic server to local disk
              echo "reporter:status:Retrieving $isofile" >&2
              target=`echo $isofile | awk '{split($0,a,"/");print a[5] a[6]}'`
              filename=$target.tar.bz2
              #$HADOOP_INSTALL/bin/hadoop fs -get $isofile ./$filename
              curl  $isofile -o $filename
         ...

(4) Convert multipage PDF to a single image
        [41] convert in.pdf -append out%d.png
             -
             convert *.png output.pdf
             -
             convert foo?.png output.pdf
        [42] convert in.pdf +append out%d.png

(5) bash cgi won't return image
        [51] echo -ne "Content-type: image/png\n\n"
             -
             echo -e "Content-type: image/png\n"
             -
               -n     do not output the trailing newline

とかとか.

オプションはこんな感じとりあえず省略されないように-fをつけてページャに渡すと良さそう.

$ borg --help
Usage of borg:
-f  (= false)
    Print full results, ie. no more '...'
-h (= "borg.crufter.com")
    Server to connect to
-l  (= 5)
    Result list limit. Defaults to 5
-p  (= false)
    Private search. Your search won't leave a trace. Pinky promise. Don't use this all the time if you want to see the search result relevancy improved

検索だけでなくスニペットの追加や編集もできるようです.

サーバも選べるので自分用のメモを蓄積することもできますね. ちょっと惜しいのはサーバと通信して結果を表示するのでオフラインでは使えないというところ. オフラインで使いたい場合はローカルにサーバを立てるか別の方法を使うしかなさそうです.

コマンドラインで動作する絵文字検索ソフトウェアのemoj

PCで絵文字を入力するとき日本語入力システムがあればそれで入力できますが,英語圏では恐らく無理.てことでいくつかツールがあるのですが,コマンドラインで動作するemojを見つけたので試してみました.

導入はnpmか,

npm install emoj

snapで.

$ sudo snap install emoj

後はemojコマンドに引数を与えるか,emojコマンドを引数無しで実行してライブモードで利用します. 引数やライブモードで入力する文字列は表示したい絵文字に関連する単語を入力します.ライブモードはEnterでクリアされ,Ctrl + cでexitできます.表示された絵文字をコピー&ペーストして利用するようです.1つ目に出てくる絵文字をクリップボードにクリップする--copy/-cというオプションもあるようですが手元ではうまく動いていません.

$ emoj neko
🐱  👥  ↪  😻  ↔  🐈
$ emoj cat
🐱  🐈  😺  😻  😸  😼  😽
$ emoj

› sushi
🍣  🍱  🍙  🍤  😋  🍚  😍

asciicast

絵文字のフォントがない場合はNoto Fontsを利用するのが手っ取り早いと思います.

日本語入力システムを使う人やGUIを利用する人は日本語入力システムやemojione-pickerを使ったほうが便利かもしれません.

形態素解析システムJUMAN++をちょっと試したメモ

京都大学 黒橋・河原研究室より2016-09-23にリリースされた新しい形態素解析システムだそうです.とりあえず手元の環境で動かしてみたのでそのメモです.

環境

Debian stretch amd64 / Ubuntu 16.10 amd64 で確認しました.どちらも以下の手順でOKでした.開発元ではCent OS 6.7で動作確認をしているようです.

build

必要なパッケージを導入してmake.

$ sudo apt install libboost-dev build-essential
$ wget http://lotus.kuee.kyoto-u.ac.jp/nl-resource/jumanpp/jumanpp-1.01.tar.xz
$ sha256sum jumanpp-1.01.tar.xz 0d587416a3eb7123638f9c1e30a649b72dfb483448839168dcb48be572c5919a  jumanpp-1.01.tar.xz
$ tar tvf ./jumanpp-1.01.tar.xz
$ tar xf ./jumanpp-1.01.tar.xz
$ ./configure --prefix=${HOME}/usr/local
$ make
$ make install

動作確認

適当に文章を入れてみたり.

$ ~/usr/local/bin/jumanpp
こんにちはJUMANPP++
こんにち こんにち こんにち 名詞 6 時相名詞 10 * 0 * 0 "代表表記:今日/こんにち カテゴリ:時間"
は は は 助詞 9 副助詞 2 * 0 * 0 NIL
JUMANPP JUMANPP JUMANPP 未定義語 15 その他 1 * 0 * 0 "品詞推定:名詞"
+ + + 未定義語 15 その他 1 * 0 * 0 "品詞推定:名詞"
EOS

青空文庫の古典を流し込んでみたり.

$ wget -O - http://www.aozora.gr.jp/cards/000160/files/2617_ruby_23916.zip | zcat | iconv -f SJIS -t UTF-8 - | ~/usr/local/bin/jumanpp
三十 三十 三十 名詞 6 数詞 7 * 0 * 0 "カテゴリ:数量"
年 ねん 年 接尾辞 14 名詞性名詞助数辞 3 * 0 * 0 "代表表記:年/ねん 準内容語 カテゴリ:時間"
後 ご 後 接尾辞 14 名詞性名詞接尾辞 2 * 0 * 0 "代表表記:後/ご 内容語"
の の の 助詞 9 接続助詞 3 * 0 * 0 NIL
世界 せかい 世界 名詞 6 普通名詞 1 * 0 * 0 "代表表記:世界/せかい カテゴリ:場所-その他"
      :

古典とかよりTwitterとかのほうがいいかもしれない.

$ curl 'https://twitter.com/search?f=tweets&vertical=default&q=lang%3Aja%20near%3A%22%E6%97%A5%E6%9C%AC%22%20within%3A15mi&src=typd&lang=ja' | grep 'class="TweetTextSize  js-tweet-text tweet-text"' | lynx -stdin -dump -nolist | ~/usr/local/bin/jumanpp

ちなみにちょっと試したいだけであれば導入しなくても以下のページで試せます.ラティス表示も楽しい.

Ubuntu16.10b2でQRCode生成アプリのQreatorを試す

Ubuntu 16.10b2 amd64を最近試しています。 いつも使う感じのアプルケーションをdpkg –set-selectionsで導入したあとUbuntu Softwareを眺めていて良さそうなアプリケーションを導入して試したりしています。

Screenshot from 2016-10-03 01-22-48

そこでQreatorというアプリを見つけました。これは簡単にGUIでQR codeが生成できるアプリケーションです。名刺、位置情報、電話(SMS)、テキスト、URL、Wi-FiのQR codeが生成できるようです。 自分用に似たようなもののweb cgiも作ってあるのですが、便利そうってことで試してみました。

Screenshot from 2016-10-03 00-56-57

$ apt show qreator 
Package: qreator
Version: 13.05.3-2fakesync1
Priority: optional
Section: universe/python
Origin: Ubuntu
Maintainer: Ubuntu Developers <ubuntu-devel-discuss@lists.ubuntu.com>
Original-Maintainer: Chow Loong Jin <hyperair@debian.org>
Bugs: https://bugs.launchpad.net/ubuntu/+filebug
Installed-Size: 1,303 kB
Depends: python:any (>= 2.6.6-7~), dconf-gsettings-backend | gsettings-backend, python-imaging, python-cairo, python-dbus, python-defer, python-gi, gir1.2-champlain-0.12, gir1.2-clutter-1.0, gir1.2-glib-2.0, gir1.2-gdkpixbuf-2.0, gir1.2-gtk-3.0, gir1.2-gtkchamplain-0.12, gir1.2-gtkclutter-1.0, gir1.2-nmgtk-1.0, gir1.2-networkmanager-1.0, python-qrencode, python-requests, python-vobject, python-xdg
Homepage: https://launchpad.net/qreator
Download-Size: 196 kB
APT-Manual-Installed: yes
APT-Sources: http://jp.archive.ubuntu.com/ubuntu yakkety/universe amd64 Packages
Description: graphical utility for creating QR codes
 Qreator enables you to easily create your own QR codes to encode different
 types of information in an efficient, compact and cool way.
 .
 Qreator supports creating the following kinds of QR codes:
  - Business card
  - Geolocation
  - Phone call/SMS
  - Text
  - URL
  - Wi-Fi network

#Debianだとsidにならあるみたい。 * Debian — パッケージ検索結果 — qreator

しかし、起動して情報を入力してもQR codeが表示されません。 バグレポに上がってないかなと探したらありました。

Screenshot from 2016-10-03 00-57-42

python-qrencodeの問題のようです。該当行2行を書き換えてみたところ動くようになりました。

$ diff /tmp/QRCode.py /usr/share/qreator/qreator/QRCode.py
76c76
<         bytearr = array.array('B', self.image.tostring("raw", "BGRA", 0, 1))
-
>         bytearr = array.array('B', self.image.tobytes("raw", "BGRA", 0, 1))
$ diff /tmp/__init__.py /usr/lib/python2.7/dist-packages/qrencode/__init__.py
47c47
<     im = Image.fromstring('L', (size, size), data)
-
>     im = Image.frombytes('L', (size, size), data)

Screenshot from 2016-10-03 01-09-36

とりあえず修正が降りてくるまではPPAを使うと良さそうです。(versionも古いし……)

ubuntuでpipが見当たらない状態を復旧

鹿児島らぐのオフ会で @seoponさんからpipでjanome入れてみましょうって時に,以前sudo hogehogeしてからpip使えなくなっちゃって方が. 見てみるとpkgは入っているけどpipコマンド自体がいなくなってる感じみたいでした.恐らくオペミスで消したかパスのないところに移動しちゃった? (以下は多分こんなだったというのを再現.)

$ pip
プログラム 'pip' はまだインストールされていません。 次のように入力することでインストールできます:
sudo apt install python-pip
$ sudo apt install python-pip
パッケージリストを読み込んでいます... 完了
依存関係ツリーを作成しています
状態情報を読み取っています... 完了
python-pip はすでに最新バージョン (8.1.1-2ubuntu0.2) です。
アップグレード: 0 個、新規インストール: 0 個、削除: 0 個、保留: 0 個。
$ which pip
$ dpkg -L python-pip | grep \/pip$
/usr/bin/pip
/usr/lib/python2.7/dist-packages/pip
$ ls -l /usr/bin/pip
ls: '/usr/bin/pip' にアクセスできません: そのようなファイルやディレクトリはありません

pkgをreinstallして解決しました.

$ sudo apt install --reinstall python-pip
パッケージリストを読み込んでいます... 完了
依存関係ツリーを作成しています
状態情報を読み取っています... 完了
アップグレード: 0 個、新規インストール: 0 個、再インストール: 1 個、削除: 0 個、保留: 0 個。
144 kB のアーカイブを取得する必要があります。
この操作後に追加で 0 B のディスク容量が消費されます。
取得:1 http://jp.archive.ubuntu.com/ubuntu xenial-updates/universe amd64 python-pip all 8.1.1-2ubuntu0.2 [144 kB]
144 kB を 0秒 で取得しました (571 kB/s)
(データベースを読み込んでいます ... 現在 902816 個のファイルとディレクトリがインストールされています。)
.../python-pip_8.1.1-2ubuntu0.2_all.deb を展開する準備をしています ...
python-pip (8.1.1-2ubuntu0.2) で (8.1.1-2ubuntu0.2 に) 上書き展開しています ...
man-db (2.7.5-1) のトリガを処理しています ...
python-pip (8.1.1-2ubuntu0.2) を設定しています ...
mk@x201s:~$ !ls
ls -l /usr/bin/pip
-rwxr-xr-x 1 root root 292  8月 12 06:59 /usr/bin/pip
$ which pip
/usr/bin/pip
$ pip -V
pip 8.1.2 from /usr/local/lib/python2.7/dist-packages (python 2.7)

とりあえず.

byobu+screenでfunctionkeyを無効にする

機能覚えてないし遠いしたまに間違って押して混乱したりするので無効にしました.
Debian stretch amd64, Ubuntu 16.04 LTS amd64で確認.

$ vi ~/.byobu/keybindings

して

source $BYOBU_PREFIX/share/byobu/keybindings/common

の次の行頭で i して編集モードにした後
Ctrl+a !(aは設定してあるescape key)する.
するとこんなのが出てくるので,

:source /usr/share/byobu/keybindings/f-keys.screen

頭の : を消して

source /usr/share/byobu/keybindings/f-keys.screen.disable

を書いておく

保存して起動しなおして反映.

#viである必然性はないのでお好きなテキストエディタでどうぞ.
#tmuxの場合はこっち~/.byobu/keybindings.tmuxになるのかな?(それとも byobu-select-backend で切り替えるとファイル名入れ替わる?)

コマンドラインからGooglecastにcast出来るcastnowを試す

見つけたので試してみました

Debian stretch amd64, Ubuntu 16.04 LTS amd64で確認しています.

$HOME以下にPATH通してnpmで導入しています./usr/local以下で良ければnpm install castnow -gだけでいいかも.

$ sudo apt install npm nodejs-legacy
$ echo 'PATH="$PATH":$HOME/node_modules/.bin' >> ~/.bashrc
$ source ~/.bashrc
$ npm install castnow

入りましたがChromecastがみあたらない?

$ castnow --help
 
Usage: castnow [<media>, <media>, ...] [OPTIONS]
 
Option                  Meaning
--tomp4                 Convert file to mp4 during playback
--device <name>         The name of the Chromecast device that should be used
--address <ip>          The IP address or hostname of your Chromecast device
--subtitles <path/url>  Path or URL to an SRT or VTT file
--subtitle-scale <scale> Subtitle font scale
--subtitle-color <color> Subtitle font RGBA color
--myip <ip>             Your local IP address
--quiet                 No output
--peerflix-* <value>    Pass options to peerflix
--ffmpeg-* <value>      Pass options to ffmpeg
--type <type>           Explicitly set the mime-type (e.g. "video/mp4")
--bypass-srt-encoding   Disable automatic UTF-8 encoding of SRT subtitles
--seek <hh:mm:ss>       Seek to the specified time on start using the format hh:mm:ss or mm:ss
--loop                  Loop over playlist, or file, forever
--help                  This help screen
 
Player controls
 
Key                     Action
space                   Toggle between play and pause
m                       Toggle mute
up                      Volume Up
down                    Volume Down
left                    Seek backward
right                   Seek forward
n                       Next in playlist
s                       Stop playback
quit                    Quit
 
$ castnow
Error: device not found

名前解決が出来なかったようでipを指定するとcast出来ました.別のマシンでは通ったのでこのマシンがおかしいようです.

$ avahi-browse -a -t -l -r
+ wlp3s0 IPv6 x201s                                         Remote Disk Management local
+ wlp3s0 IPv4 Chromecast-KagoLUG                            _googlecast._tcp     local
= wlp3s0 IPv6 x201s                                         Remote Disk Management local
   hostname = [x201s.local]
   address = [fe80::222:faff:fe33:456a]
   port = [22]
   txt = []
= wlp3s0 IPv4 Chromecast-KagoLUG                            _googlecast._tcp     local
   hostname = [Chromecast-KagoLUG.local]
   address = [192.168.2.206]
   port = [8009]
   txt = ["rs=" "bs=FA8FCA59198D" "st=1" "ca=4101" "fn=Chromecast-KagoLUG" "ic=/setup/icon.png" "md=Chromecast" "ve=05" "rm=A652B47431F36207" "id=7c14aaaa62a6002dd95ba94814e5c5e0"]
$ castnow --address 192.168.2.206 http://commondatastorage.googleapis.com/gtv-videos-bucket/ED_1280.mp4
 
  State     : Playing....

パイプも使えるので色々応用できそうな気がします.
(最近Chromiumがamd64/i386しかなくなったようですが,これを使えば他のアーキテクチャでもスクリーンキャストもできそう?)

起動済みのXをTigerVNCで共有

通常はVNCは新しいXを起動して使うことが多いと思いますが,ヘッドレス環境や入力デバイスの貧弱な環境デモの際など既に起動済みのXの画面を利用したいことがあります.(例えばKoboとかマウス忘れたとか><)


昔はvinoを使っていましたが,設定画面がGnomeに統合されてGnome環境以外で利用するのが面倒になってしまいました.


一応dconfを書き換えれば設定できます.

% gsettings list-recursively org.gnome.Vino
org.gnome.Vino notify-on-connect true
org.gnome.Vino alternative-port uint16 5900
org.gnome.Vino disable-background false
org.gnome.Vino use-alternative-port true
org.gnome.Vino icon-visibility 'client'
org.gnome.Vino use-upnp true
org.gnome.Vino view-only false
org.gnome.Vino prompt-enabled false
org.gnome.Vino disable-xdamage false
org.gnome.Vino authentication-methods ['vnc']
org.gnome.Vino network-interface ''
org.gnome.Vino require-encryption false
org.gnome.Vino mailto ''
org.gnome.Vino lock-screen-on-disconnect false
org.gnome.Vino vnc-password 'xxxxxxxxxxx'

GUIが良ければdconf-editorとかを.

20160304_00:03:38-25955

#MATE環境でvinoが起動してこない場合は次のページを -> Raspberry_Pi/Ubuntu_MATE – matoken’s wiki.

Gnome重いしdconf書き換えるんもめんどいなということで最近はx11vncを使っていました.

$ sudo apt install x11vnc
$ x11vnc -localhost -rfbauth $HOME/.vnc/passwd -display :0

今回以下の記事を読んでTigerVNCでも出来ることを知りました!

今回はVinoと同じく現在ログインしているデスクトップを転送するため,TigerVNCサーバーはユーザー権限で動作し,新しい仮想ディスプレイは作成しません。TigerVNCにはそのような便利なコマンドが用意されています。

続いて次のコマンドを実行し,TigerVNCを起動します。

$ x0vncserver -display :0 -passwordfile ~/.vnc/passwd

TigerVNCに含まれるx0vncserverを使うといけるようです.

しかしDebianにもパッケージがないようです.

$ w3m -dump 'https://packages.debian.org/search?suite=all&section=all&arch=any&searchon=names&keywords=tigervnc'|grep 'tigervnc を名前に含むパッケージを' -A4
tigervnc を名前に含むパッケージを、すべてのスイート、すべてのセクション、すべて
のアーキテクチャで検索しました。
 
残念ながら、検索結果はありませんでした
 

Ubuntu 14.04環境が別にあるのでそちらにいくやさんの用意されたリポジトリを用意して導入してみます.

しかし,add-apt-reposotoryが見当たりません.環境がおかしくなっている?

$ sudo add-apt-reposotory ppa:ikuya-fruitsbasket/tigervnc
sudo: add-apt-reposotory: command not found
$ add-apt-reposotory
コマンド 'add-apt-reposotory' は見つかりませんでした。もしかして:
 コマンド 'add-apt-repository' - パッケージ 'software-properties-common' (main)
add-apt-reposotory: コマンドが見つかりません
$ sudo apt install software-properties-common
$ add-apt-reposotory -h
コマンド 'add-apt-reposotory' は見つかりませんでした。もしかして:
 コマンド 'add-apt-repository' - パッケージ 'software-properties-common' (main)
add-apt-reposotory: コマンドが見つかりません
$ apt-file update
$ apt-file search add-apt-reposotory
$ dpkg -L software-properties-common|grep add-apt-reposotory

見つからない?

あ,スペルミスだ
~s/add-apt-reposotory/add-apt-repository/gですね.よく見ましょうorz

$ dpkg -L software-properties-common |grep bin
/usr/bin
/usr/bin/add-apt-repository
/usr/bin/apt-add-repository
$ add-apt-repository
エラー: root で実行する必要があります
$ add-apt-repository
エラー: root で実行する必要があります

ということでこんな感じでいけました.

$ sudo apt install software-properties-common
$ sudo add-apt-repository ppa:ikuya-fruitsbasket/tigervnc
$ sudo apt update && sudo apt upgrade
$ sudo apt install tigervncserver

よし早速!

$ x0vncserver -display :0 -passwordfile ~/.vnc/passwd
x0vncserver: unable to open display ":0"
~ImageCleanup called

そういえば起動してませんでした.この端末はX入れているけどX転送でたまにアプリを使うくらいなので起動していないのです.
slimを起動(確かデフォルトはlightdm)してloginして

$ sudo service slim start

再度

$ x0vncserver -display :0 -passwordfile ~/.vnc/passwd

そしてRemminaで接続……出来ない.fwのせいでした.とりあえずssh -L で5900を転送してlocalhostに接続しました.

20160304_04:03:41-24566

うまく行きました :)

しかし,クライアント側もTigerVNCで繋いでみたいところ.とりあえずi686とx86_64についてはバイナリ配布もされているようなのでこれを利用してみます.

とりあえず適当なディレクトリに展開して実行で動きました.

$ wget http://tigervnc.bphinz.com/nightly/xc/x86_64/tigervnc-Linux-x86_64-1.6.80-20160302gitf34a386c.tar.gz
$ md5sum tigervnc-Linux-x86_64-1.6.80-20160302gitf34a386c.tar.gz
ea9ea2396d42819d4ea588a6598f583b  tigervnc-Linux-x86_64-1.6.80-20160302gitf34a386c.tar.gz
$ tar xf tigervnc-Linux-x86_64-1.6.80-20160302gitf34a386c.tar.gz -C ~/tmp
$ ~/tmp/usr/bin/vncviewer &

ちなみに
vnc4serverにもx0vnc4serverというそれらしいものがあるようです.そのうち試してみよう.

ブートUSBメモリなどを作るmkusbを試してみる

USBメモリなどにisoを書き込んで起動デバイスを作れるとても便利なUNetbootinというツールがあります.
しかし,Debian jessie/stretchに入っていません.

なんでだろうとBTSを見るとうまく動かないバグがあるようです.(UEFI環境でNG?)

ざざっと眺めていてmkusbという同じようなツールがあるのを見かけたので試してみました.

環境

Debian stretch testing amd64です.

$ screenfetch
         _,met$$$$$gg.           mk@x220
      ,g$$$$$$$$$$$$$$$P.        OS: Debian testing-updates sid
    ,g$$P""       """Y$$.".      Kernel: x86_64 Linux 4.3.0-1-amd64
   ,$$P'              `$$$.      Uptime: 9h 7m
  ',$$P       ,ggs.     `$$b:    Packages: 3622
  `d$$'     ,$P"'   .    $$$     Shell: bash 4.3.42
   $$P      d$'     ,    $$P     Resolution: 1366x768
   $$:      $$.   -    ,d$$'     WM: Awesome
   $$\;      Y$b._   _,d$P'      WM Theme: awesome
   Y$$.    `.`"Y$$$$P"'          CPU: Intel Core i5-2540M CPU @ 3.3GHz
   `$$b      "-.__               GPU: Mesa DRI Intel(R) Sandybridge Mobile
    `Y$$                         RAM: 9768MiB / 15934MiB
     `Y$$.                      
       `$$b.                    
         `Y$$b.                 
            `"Y$b._             
                `""""           
 

Ubuntuはppaがあります.DebianはUbuntuのppaが使えます.他のLinuxディストリビューションでは導入スクリプト( mkusb-installer )が用意されています.

導入(ppa)

source.listを登録します.apt edit-sourcesコマンドでdeb http://ppa.launchpad.net/mkusb/ppa/ubuntu trusty mainを登録します.

$ sudo apt edit-sources mkusb
$ sudo chmod +r /etc/apt/sources.list.d/mkusb.list
$ cat /etc/apt/sources.list.d/mkusb.list
# "mkusb/install-to-debian - Community Help Wiki"
https://help.ubuntu.com/community/mkusb/install-to-debian
deb http://ppa.launchpad.net/mkusb/ppa/ubuntu trusty main
$ gpg --keyserver keyserver.ubuntu.com --recv-keys 54B8C8AC
gpg: 鍵54B8C8ACをhkpからサーバkeyserver.ubuntu.comに要求
gpg: 鍵54B8C8AC: 公開鍵"Launchpad PPA for MKUSB"をインポートしました
gpg:           処理数の合計: 1
gpg:             インポート: 1  (RSA: 1)
$ gpg --fingerprint 54B8C8AC
pub   4096R/54B8C8AC 2014-08-14
 フィンガー・プリント = 29D7 6ADA 2D15 A87B F4C6  8B82 3729 8274 54B8 C8AC
uid                  Launchpad PPA for MKUSB
 
$ gpg -a --export 54B8C8AC | sudo apt-key add -
OK
$ apt-key list|grep -A1 54B8C8AC
pub   4096R/54B8C8AC 2014-08-14
uid                  Launchpad PPA for MKUSB

パッケージリストの更新とmkusbパッケージの導入

$ sudo apt update
$ sudo apt install mkusb mkusb-nox
$ dpkg -L mkusb
/.
/usr
/usr/share
/usr/share/mkusb
/usr/share/mkusb/mkusb-start
/usr/share/mkusb/restore
/usr/share/mkusb/mkusb-st2
/usr/share/mkusb/usb-pack_efi.tar.gz
/usr/share/mkusb/grub.cfg
/usr/share/mkusb/maybe-problems.txt
/usr/share/mkusb/backup
/usr/share/icons
/usr/share/icons/mkusb.svg
/usr/share/icons/hicolor
/usr/share/icons/hicolor/scalable
/usr/share/icons/hicolor/scalable/apps
/usr/share/icons/hicolor/scalable/apps/mkusb.svg
/usr/share/icons/hicolor/48x48
/usr/share/icons/hicolor/48x48/apps
/usr/share/icons/hicolor/48x48/apps/mkusb.png
/usr/share/doc
/usr/share/doc/mkusb
/usr/share/doc/mkusb/README.Debian
/usr/share/doc/mkusb/copyright
/usr/share/doc/mkusb/changelog.Debian.gz
/usr/share/man
/usr/share/man/man8
/usr/share/man/man8/mkusb.8.gz
/usr/share/applications
/usr/share/applications/mkusb.desktop
/usr/sbin
/usr/sbin/mkusb
$ dpkg -L mkusb-nox
/.
/usr
/usr/share
/usr/share/doc
/usr/share/doc/mkusb-nox
/usr/share/doc/mkusb-nox/copyright
/usr/share/doc/mkusb-nox/changelog.Debian.gz
/usr/sbin
/usr/sbin/mkusb-nox

実行例

メニューから起動するか,

$ sudo -H /usr/sbin/mkusb

のようにして起動します.書き込むイメージが決まっている場合は引数に指定できます.イメージには.gzや.xzも指定可能なので展開の手間が省けます.

$ sudo -H /usr/sbin/mkusb ./alpine-3.3.1-x86_64.iso
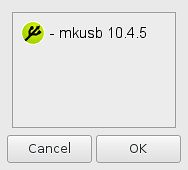
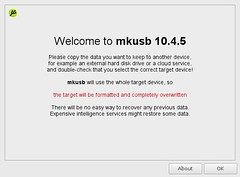
スプラッシュが出て,

20160224_06:02:32-32496
20160224_06:02:36-32565

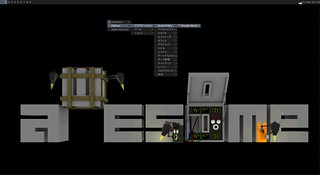
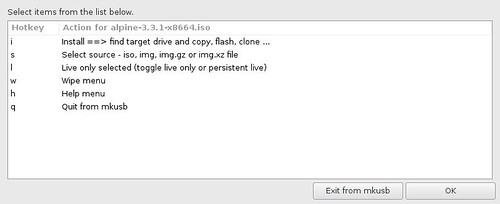
メニューが出てきます.cloneやwipeも可能です.
20160224_06:02:45-32658

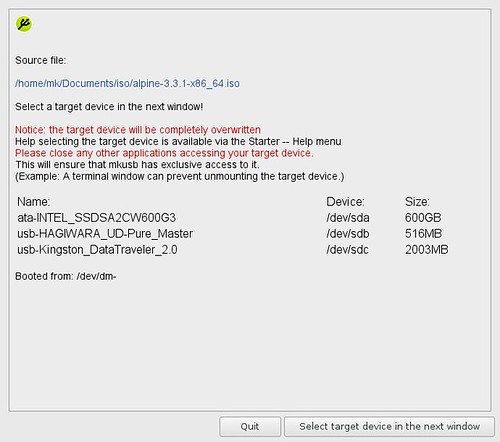
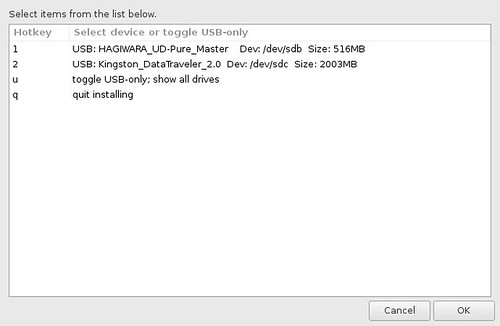
書き込み先のデバイスは間違えないようにしましょう.間違えるととても悲しいことになります.ちなみにSD Cardスロットの/dev/mmcblk0は検出されませんでした.USB-SDアダプタ経由だと出てきました.
20160224_06:02:26-868
20160224_06:02:43-1237

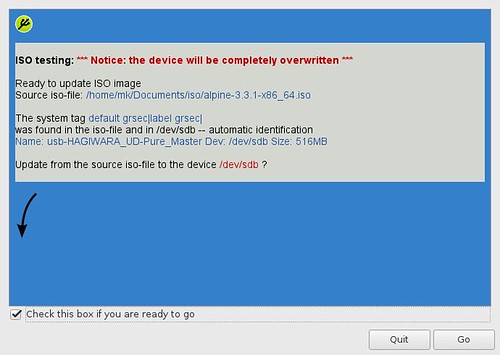
確認画面でチェックを入れて「Go」ボタンで書き込みが始まります.
20160224_06:02:05-2732
20160224_06:02:13-2827
20160224_06:02:17-2960

実行例(nox)

mkusb-noxコマンドを使うと端末で利用できます.nox版では複数のUSBメモリがある場合の選択方法はわかりませんでした.書き込むデバイスだけを差し込むようにするしか無いかもしれません.

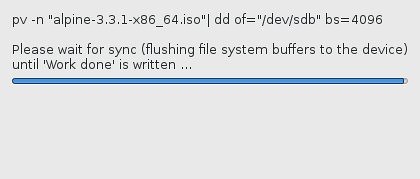
$ sudo /usr/sbin/mkusb-nox ./alpine-3.3.1-x86_64.iso
The iso file SHOULD BE loop mounted on a temporary file READ-ONLY:
mount: /dev/loop0 is write-protected, mounting read-only
disk_name_type=label
default grsec|label grsec| _found_ in iso-file
default grsec|label grsec| _found_ in /dev/sdb
 Final checkpoint
Install to /dev/sdb? (y/n)
y
pv "alpine-3.3.1-x86_64.iso"| dd of=/dev/sdb bs=4096 ...
  82MiB 0:00:00 [ 205MiB/s] [========================================================================================================================>] 100%            
20992+0 records in
20992+0 records out
85983232 bytes (86 MB) copied, 4.84297 s, 17.8 MB/s
syncing the drive ...
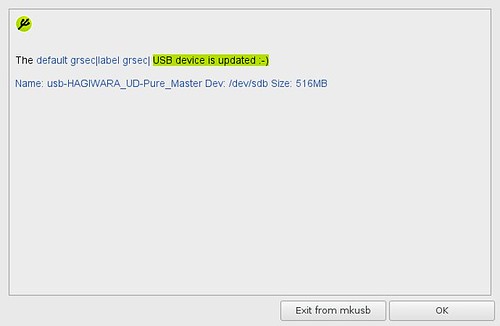
The default grsec|label grsec| USB device is re-cloned  :-)

問題なく利用できる場合はUNetbootinの方がマルチプラットホームだし使いやすそうです.状況により使い分けるのがいいのかもしれません.