Linux ARM版Vivaldiを入れてみた

20171207_01:12:04-24154

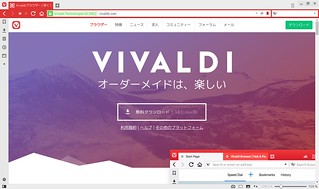
Operaの共同創設者でCEOだったJon Stephenson von Tetzchnerによって設立されたVivaldi Technologiesによって開発されているウェブブラウザがあります.
これまでx86/x64プラットホームのWindows/macOS/Linux版が提供されていましたが,2017/12/05にLinux ARM版(armhf)がリリースされました.

Raspberry PiのRaspbianがメインのようですが,他のARM環境でも試したら普通に動きました :)

といってもやはりRAM512MBのようなマシンでは辛いですね.RAM2GBのマシンだと今のところいい感じそうです.Midoriやqutebrowserでうまく表示できないMastodonやgmail/Google+なども問題なく表示できますし,Chromeの拡張機能も使えます.

Linux ARM版Vivaldiの入手と確認

deb pkgダウンロード

$ wget https://downloads.vivaldi.com/stable/vivaldi-stable_1.13.1008.34-1_armhf.deb

hash

hashとか見当たらないけど手元ではこんな感じだった

$ md5sum vivaldi-stable_1.13.1008.34-1_armhf.deb 
7515f51385a9a264ad5bb7612438aeda  vivaldi-stable_1.13.1008.34-1_armhf.deb
$ sha1sum vivaldi-stable_1.13.1008.34-1_armhf.deb 
6b103d205f6aa7a5f3b394ba8d32dc9ca87bf0cd  vivaldi-stable_1.13.1008.34-1_armhf.deb
$ sha256sum vivaldi-stable_1.13.1008.34-1_armhf.deb 
e7af5d021bf0c2968fcf0271e8f741552e34bcf2d032318eb8ea95356067297d  vivaldi-stable_1.13.1008.34-1_armhf.deb
$ sha512sum vivaldi-stable_1.13.1008.34-1_armhf.deb 
f47f2d26e8045af9ba680129feca765cf3f9dc7ea76930071e9688ef50aa78a482b40ba5747fb4470d30520177bda371ec79e5a210a93dcf2e49251425001c6d  vivaldi-stable_1.13.1008.34-1_armhf.deb

パッケージ情報確認

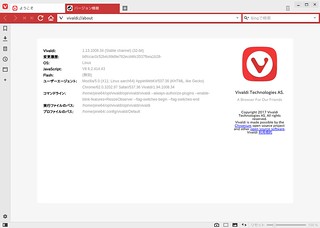
$ dpkg-deb -I ./vivaldi-stable_1.13.1008.34-1_armhf.deb
 新形式 debian パッケージ、バージョン 2.0。
 サイズ 45154158 バイト: コントロールアーカイブ = 9840 バイト。
    1269 バイト、   16 行      control              
   15872 バイト、  442 行   *  postinst             #!/bin/sh
   12544 バイト、  324 行   *  postrm               #!/bin/sh
    1220 バイト、   42 行   *  prerm                #!/bin/sh
 Package: vivaldi-stable
 Version: 1.13.1008.34-1
 Architecture: armhf
 Maintainer: Vivaldi Package Composer <packager@vivaldi.com>
 Installed-Size: 131921
 Pre-Depends: dpkg (>= 1.14.0)
 Depends: gconf-service, libasound2 (>= 1.0.16), libatk1.0-0 (>= 1.12.4), libc6 (>= 2.16), libcairo2 (>= 1.6.0), libcups2 (>= 1.4.0), libdbus-1-3 (>= 1.2.14), libexpat1 (>= 2.0.1), libfontconfig1 (>= 2.8.0), libgcc1 (>= 1:4.4.0), libgconf-2-4 (>= 3.2.5), libgdk-pixbuf2.0-0 (>= 2.22.0), libglib2.0-0 (>= 2.28.0), libgtk-3-0 (>= 3.9.10), libnspr4 (>= 2:4.9-2~), libpango-1.0-0 (>= 1.14.0), libpangocairo-1.0-0 (>= 1.14.0), libx11-6 (>= 2:1.4.99.1), libx11-xcb1, libxcb1 (>= 1.6), libxcomposite1 (>= 1:0.3-1), libxcursor1 (>> 1.1.2), libxdamage1 (>= 1:1.1), libxext6, libxfixes3, libxi6 (>= 2:1.2.99.4), libxrandr2 (>= 2:1.2.99.3), libxrender1, libxss1, libxtst6, ca-certificates, fonts-liberation, libnss3 (>= 3.26), xdg-utils (>= 1.0.2), wget
 Recommends: adobe-flashplugin, chromium-codecs-ffmpeg-extra
 Conflicts: vivaldi-beta, vivaldi-preview
 Replaces: vivaldi-beta, vivaldi-preview
 Provides: www-browser
 Section: web
 Priority: optional
 Homepage: https://vivaldi.com
 Description: A new browser for our friends
  Vivaldi browser is made with power users in mind by people who love the Web.

導入

とりあえずDebian jessie armhf/Ubuntu 16.04 LTS aarch64で動いている.

Debian/Ubuntu等

$ sudo dpkg -i ./vivaldi-stable_1.13.1008.34-1_armhf.deb

以下のように依存パッケージが足りない場合は,

dpkg: 依存関係の問題により vivaldi-stable:armhf の設定ができません:
 vivaldi-stable:armhf は以下に依存 (depends) します: libnss3 (>= 3.26)...しかし:
  パッケージ libnss3:armhf はまだインストールされていません。

dpkg: パッケージ vivaldi-stable:armhf の処理中にエラーが発生しました (--install):
 依存関係の問題 - 設定を見送ります

こんな感じで足りないpkgが入るはず.その後見送られていたvivaldi-stableの設定の続きも実行される.

$ sudo apt install -f

64bit ARM環境

バージョン情報_009

aarch64でも試した.
既にadd archtecture armhfして色々入れていた環境に入れてクリーンな環境で検証していないけど多分こんな感じ.

$ sudo dpkg --add-architecture armhf
$ sudo apt update
$ sudo dpkg -i ./vivaldi-stable_1.13.1008.34-1_armhf.deb
$ sudo apt install -f

—-追記—-
クリーンなDragonBoard 410cにDebian stretch aarch64(lonaro)を入れた環境でも確認したがこの手順でokだった :)
—-追記終わり—-

.debが使えない環境

deb以外の環境ではこんな感じで適当な場所に展開して動かせた.

$ mkdir -p ~/opt/vivaldi
$ ar p vivaldi-stable_1.13.1008.34-1_armhf.deb data.tar.xz | tar xJ -C ~/opt/vivaldi
$ rm vivaldi-stable_1.13.1008.34-1_armhf.deb
$ ~/opt/vivaldi/opt/vivaldi/vivaldi

Slackwareだと以下のsctiptが使えそう(未確認)

問題

sandbox

もし,こんなエラーが出たら

$ ~/opt/vivaldi/opt/vivaldi/vivaldi
[13021:13021:1205/215600.516642:FATAL:setuid_sandbox_host.cc(157)] The SUID sandbox helper binary was found, but is not configured correctly. Rather than run without sandboxing I'm aborting now. You need to make sure that /home/matoken/opt/vivaldi/opt/vivaldi/vivaldi-sandbox is owned by root and has mode 4755.
Aborted[This script will find the latest Vivaldi binary package, download it and repackage it into Slackware format.](https://gist.github.com/ruario/dcbba70da900dac68fcc883542ff7ace "This script will find the latest Vivaldi binary package, download it and repackage it into Slackware format.")

こんな感じでオーナーとパーミッションを設定したらok.

$ chmod 4755 ~/opt/vivaldi/opt/vivaldi/vivaldi-sandbox
$ sudo chown root.root ~/opt/vivaldi/opt/vivaldi/vivaldi-sandbox

若しくは --no-sandbox option

$ ~/opt/vivaldi/opt/vivaldi/vivaldi --no-sandbox

日本語豆腐問題

20171206_06:12:20-506920171206_07:12:16-6600

とりあえず適当な日本語フォント(今回はVLゴシック)を入れて,Vivaldiを再起動で直った.(Dejavuが入っていたので指定してみたけど直らなかった)

$ sudo apt install fonts-vlgothic

関連

Python Boot CampテキストをUbuntu 16.04 LTSで試す

2017.10で告知のあった「Python Boot Camp in 鹿児島」で使う「Python Boot Campテキスト」を見るとLinuxはUbuntu 17.04 serverがターゲットになっている

1. Pythonをはじめる前に — Python Boot Camp Text 2016.04.28 ドキュメント

1.3.3. Linux (Ubuntu Server) での場合
ここではLinuxとしてUbuntu 17.04にPython3.6をインストールする方法を説明します。

LTSのDesktop使いたい人も居るだろうなとUbuntu 16.04 LTS arm64で一通り確認してみた

「1.3.3. Linux (Ubuntu Server) での場合」のPython導入は以下のように3.5に変更

$ sudo apt update && sudo apt upgrade -y
$ sudo apt -y install python3.5 python3.5-dev python3.5-venv
$ python3.5 -V
Python 3.5.2

「5.1.2. ファイルへの書き込み」でファイルの確認前にflushしないとファイルが空

>>> f.flush()

「5.1.5. 追記モードでの書き込み」でファイルの確認前にflushしないとファイルが更新されない

>>> f.flush()

後は問題無さそう

Debianの場合もstable(stretch)では同じだと思う.Python 3.6はtesting(Buster)以降になるみたい(未確認)

このチュートリアルはBeautifulSoupまでやるので例えばcalibrでニュースサイトをスクレイピングしてKindleに自動転送といったようなレシピも書けるようになりますね :)

speedtest.netがcliで利用できるspeedtest-cliを試す

九里 真夏 @orumin そういえば speedtest.net って Linux の CLI client もありますね。

ってことでLinuxのcliで動くPython製のspeedtest-cliをちょっと試してみた.

speedtest.netでの回線速度計測をcliで行えます.python製でpipとかで各種環境に導入可能.

Debianだとjessie以降all, Ubuntuだと16.04LTS以降allにpkgもあるのでapt一発で入るし,Raspberry PiなどのARMアーキテクチャなんかでも問題なく動きました.

規定値の動作はipからロケーション拾ってそこから近いサーバーで計測した結果を返すようです.
自宅のipアドレスでの自動判定では静岡になってたので手動で計測サーバを変更して鹿児島と東京を試しました.

help

$ speedtest-cli -h
usage: speedtest-cli [-h] [--bytes] [--share] [--simple] [--list]
[--server SERVER] [--mini MINI] [--source SOURCE]
[--timeout TIMEOUT] [--secure] [--version]

Command line interface for testing internet bandwidth using speedtest.net.
--------------------------------------------------------------------------
https://github.com/sivel/speedtest-cli

optional arguments:
-h, --help show this help message and exit
--bytes Display values in bytes instead of bits. Does not affect
the image generated by --share
--share Generate and provide a URL to the speedtest.net share
results image
--simple Suppress verbose output, only show basic information
--list Display a list of speedtest.net servers sorted by
distance
--server SERVER Specify a server ID to test against
--mini MINI URL of the Speedtest Mini server
--source SOURCE Source IP address to bind to
--timeout TIMEOUT HTTP timeout in seconds. Default 10
--secure Use HTTPS instead of HTTP when communicating with
speedtest.net operated servers
--version Show the version number and exit

規定値では自宅は静岡になっていて静岡サーバで計測する(実際は鹿児島)

$ speedtest-cli
Retrieving speedtest.net configuration...
Retrieving speedtest.net server list...
Testing from FreeBit (180.131.110.140)...
Selecting best server based on latency...
Hosted by ClickL Network (Shizuoka) [0.02 km]: 110.464 ms
Testing download speed........................................
Download: 2.07 Mbit/s
Testing upload speed..................................................
Upload: 0.92 Mbit/s

日本のサーバを確認する

$ speedtest-cli --list|grep -i japan
14180) ClickL Network (Shizuoka, Japan) [0.02 km]
8407) Allied Telesis Capital Corporation (Sagamihara, Japan) [111.58 km]
6087) Allied Telesis Capital Corporation (Fussa-shi, Japan) [120.41 km]
6508) at2wn (Yokohama, Japan) [125.30 km]
7510) ASEINet (Tokyo, Japan) [141.71 km]
12546) TB (Tokyo, Japan) [141.71 km]
12511) h3zjp (Nerima, Japan) [142.66 km]
8348) Foxcore-LS (Sodegaura, Japan) [167.71 km]
7139) SoftEther Corporation (Tsukuba, Japan) [192.41 km]
6368) gatolabo (Maibara, Japan) [194.62 km]
6766) JAIST(ino-lab) (Nomi, Japan) [232.28 km]
13641) NextechNetworkSolutions (Nara, Japan) [237.53 km]
6476) rxy (individual) (Osaka, Japan) [264.80 km]
8832) prize3046 (Ikeda, Japan) [269.86 km]
8193) kamiari (Sendai, Japan) [427.67 km]
7976) denpa893 (Hikari, Japan) [601.03 km]
6405) Allied Telesis Capital Corporation (Misawa, Japan) [686.38 km]
13568) KSL (Kagoshima, Japan) [820.38 km]
811) GLBB Japan KK (Chatan, Japan) [1397.84 km]
6581) haza (Haebaru, Japan) [1410.56 km]

鹿児島サーバで計測してみる

$ speedtest-cli --server 13568
Retrieving speedtest.net configuration...
Retrieving speedtest.net server list...
Testing from FreeBit (180.131.110.140)...
Hosted by KSL (Kagoshima) [820.38 km]: 103.499 ms
Testing download speed........................................
Download: 2.20 Mbit/s
Testing upload speed..................................................
Upload: 0.92 Mbit/s

東京を–simple optionで計測してみる

$ speedtest-cli --simple --server 7510
Ping: 150.627 ms
Download: 1.88 Mbit/s
Upload: 0.84 Mbit/s

サーバの数を確認してみる

$ speedtest-cli --list | wc -l
6509

speedtestはJavaScriptやAdobe Flashが必要なことが多くてヘッドレス環境などでは面倒でした.
iperfやnetcatなんかはお手軽ですが,速度テスト先のサーバの用意が必要です.

今回のspeedtest-cliはお手軽に導入できて世界各地のサーバ相手にcliでspeed testも出来ていい感じです.

Ubuntu 16.04 aarch64環境でmozc pkgが無いのでsource pkgからbuild

EDIT: 現在は次の記事の手順のほうが良いと思います -> Debian, Ubuntu で 上流のパッケージを借りてくる – matoken’s meme


最近Ubuntu 16.04 aarch64のi3 wmにモニタとキーボードを繋いでデスクトップ利用を試しています.しかし,日本語入力のためのmozcのバイナリパッケージが見当たりません.確認すると,xenialからartfulではi386/amd64/armhfのみの対応.

Debianではarmelも対応していますが,arm64はやっぱりありません.

armhf/armelで動いているならarm64もあまり悩まずソースパッケージからbuildできるのではと試してみました.

#dpkg –add-archtecture armhfしてMultiarchにしてarmhfのMozcを使うという手でも行けそうな気はする.(未確認)

環境構築

必要なパッケージの導入と,ソースパッケージの入手を行います.

$ sudo apt update
$ sudo apt upgrade
$ sudo apt install build-essential devscripts
$ sudo apt build-dep fcitx-mozc
$ apt source fcitx-mozc
  • apt build-depは指定したパッケージをbuildするのに必要なパッケージを導入できます.
  • apt sourceは指定したパッケージのソースパッケージを導入して展開してくれます.

※もしソースパッケージが見つからない場合はsource.listにdeb-srcの行があるか確認してみてください.無ければapt edit-sourcesコマンドで/etc/apt/source.listファイルを編集してdeb-srcを有効にしてください.以下のページが参考になると思います.

Archtectureにarm64を追加してバイナリパッケージ作成

次にソースディレクトリに降りて,debian/controlファイルを開き,必要なパッケージのArchtectureにarm64を登録します.mozc-dataはallなのでそのままにしておきます.(はじめarm64をaarch64にしてうまく行かなかったですorz)

$ cd mozc-2.17.2116.102+gitfd0f5b34+dfsg
$ cp debian/control debian/control.org
$ vi debian/control
$ diff -u debian/control.org debian/control
--- debian/control.org  2017-05-30 17:06:44.000000000 +0000  
+++ debian/control      2017-05-30 17:07:19.000000000 +0000  
@@ -28,7 +28,7 @@                                            
  This open-source project originates from Google Japanese Input.
                              mozc-data                               
 Package: ibus-mozc                                          
-Architecture: i386 amd64 armel armhf                        
+Architecture: i386 amd64 armel armhf arm64                  
 Depends: ${misc:Depends}, ${shlibs:Depends}, mozc-data,     
        ibus (>= 1.2), mozc-server (= ${binary:Version}), tegaki-zinnia-japanese
 Recommends: mozc-utils-gui (= ${binary:Version})            dpkg-buildpackage
@@ -45,7 +45,7 @@                                            
  This open-source project originates from Google Japanese Input.
                                mozc-data                             
 Package: fcitx-mozc                                         
-Architecture: i386 amd64 armel armhf                        
+Architecture: i386 amd64 armel armhf arm64                  
 Depends: ${misc:Depends}, ${shlibs:Depends}, fcitx-bin, fcitx-data, fcitx-modules,
        mozc-server (= ${binary:Version}), mozc-data, tegaki-zinnia-japanese
 Recommends: fcitx, mozc-utils-gui (= ${binary:Version})     
@@ -64,7 +64,7 @@                                            
  fcitx-mozc provides client part of the Mozc input method.  

 Package: emacs-mozc                                         
-Architecture: i386 amd64 armel armhf                        
+Architecture: i386 amd64 armel armhf arm64                  
 Depends: ${misc:Depends}, emacs | emacs23 | emacs24, emacs-mozc-bin (= ${binary:Version})
 Conflicts: emacsen-common (<< 2.0.0)                        
 Description: Mozc for Emacs                                 
@@ -76,7 +76,7 @@                                            
  This open-source project originates from Google Japanese Input.

 Package: emacs-mozc-bin                                     
-Architecture: i386 amd64 armel armhf                        
+Architecture: i386 amd64 armel armhf arm64                  
 Depends: ${misc:Depends}, ${shlibs:Depends}, mozc-server (= ${binary:Version})
 Description: Helper module for emacs-mozc                   
  Mozc is a Japanese Input Method Editor (IME) designed for multi-platform
@@ -87,7 +87,7 @@                                            
  This open-source project originates from Google Japanese Input.

 Package: mozc-server                                        
-Architecture: i386 amd64 armel armhf                        
+Architecture: i386 amd64 armel armhf arm64                  
 Depends: ${misc:Depends}, ${shlibs:Depends}                 
 Multi-Arch: foreign                                         
 Description: Server of the Mozc input method                
@@ -99,7 +99,7 @@                                            
  This open-source project originates from Google Japanese Input.

 Package: mozc-utils-gui                                     
-Architecture: i386 amd64 armel armhf                        
+Architecture: i386 amd64 armel armhf arm64                  
 Depends: ${misc:Depends}, ${shlibs:Depends}, mozc-data      
 Recommends: mozc-server (= ${binary:Version})               
 Suggests: ibus-qt

次にdpkg-buildpackageコマンドでパッケージを作成します.手元のマシンではちょうど1時間ほどで終了しました.(あとで-j4とかすると30分ほどに)

$ dpkg-buildpackage -us -uc
$ ls ../*.debmozc-data
../emacs-mozc-bin_2.17.211archtecture6.102+gitfd0f5b34+dfsg-1ubuntu1.1_arm64.deb  ../ibus-mozc_2.17.2116.102+gitfd0f5b34+dfsg-1ubuntu1.1_arm64.deb    ../mozc-utils-gui_2.17.2116.102+gitfd0f5b34+dfsg-1ubuntu1.1_arm64.deb
../emacs-mozc_2.17.2116.102+gitfd0f5b34+dfsg-1ubuntu1.1_arm64.deb      ../mozc-data_2.17.2116.102+gitfd0f5b34+dfsg-1ubuntu1.1_all.deb
../fcitx-mozc_2.17.2116.102+gitfd0f5b34+dfsg-1ubuntu1.1_arm64.deb      ../mozc-server_2.17.2116.102+gitfd0f5b34+dfsg-1ubuntu1.1_arm64.deb

出来上がったパッケージの導入

今回はfcitxを使っていたので,fcitx-mozcを導入しました.導入した後にログインしなおして,fcitx-config-gtkを起動するとMozcが登録されて利用できるようになりました. :)

$ sudo apt-get install ../mozc-server_2.17.2116.102+gitfd0f5b34+dfsg-1ubuntu1.1_arm64.deb ../mozc-data_2.17.2116.102+gitfd0f5b34+dfsg-1ubuntu1.1_all.deb ../fcitx-mozc_2.17.2116.102+gitfd0f5b34+dfsg-1ubuntu1.1_arm64.deb ../mozc-utils-gui_2.17.2116.102+gitfd0f5b34+dfsg-1ubuntu1.1_arm64.deb 

重かったり不具合が出るようならskkあたりにしようかと思っていましたが,現在このパッケージを1週間ほど利用して特に問題なく使えています.

あまり推奨しませんが,私の作ったパッケージをしばらく以下においておきます.必要な方は試してみてください.(上の手順に + dhc -i + dpkg-buildpackage -j4したもの)

ところでこれはどうすればいいのかな.Debianでも動作確認してバグレポでok?そしてUbuntuはSync mozc from Debian unstableを待つ感じ?

Podcastが無くなって困る

現在Podcastをpodgetで取得して,

2 * * * *       podget -s

その中の新しいものだけをownCloudにコピーしてAndroidやPCで視聴しています.

10 * * * *      cd ~mk/POD ; find . -mmin -2880 -type f | egrep -v 'm3u$|LOG\/' | rsync --delete --progress --files-from=- ~mk/POD/ /var/www/owncloud/data/matoken/files/podcast/; find /var/www/owncloud/data/matoken/files/podcast/ -ctime +7 -type f -print0 | xargs -0 rm ; find /var/www/owncloud/data/matoken/files/podcast/news/ -mmin +1`

今日聞こうとしたらownCloud内のPodcastが0個になっていました.心当たりはUbuntu 14.04 LTSからUbuntu 16.04 LTSへのdist-upgrade.ownCloudは上げる前と後に動作確認してたんで他の部分が怪しいとログを見るとpodgetがエラーを吐いています.こんな感じ.

$ podget -s
/home/mk/.podget/podgetrc cannot be verified to be compatible with this version of podget.

It is missing the version line that is included in configuration files created by newer versions of podget.

Please create a new configuration file by running 'podget --create-config <FILENAME>',
and then converting your old configuration to the new format.  Then move the new file
in place of the old and podget will work as it used to.

設定ファイルが使えなくなってるみたいですね.枯れてるのかと思ってたら結構変化があったようです.
ちなみに更新前のバージョンがpodget 0.6.9-1で現在はpodget 0.7.9-1でした.

てことで,設定ファイルの雛形を別の場所に書き出して,

$ podget --create-config /tmp/podgetrc
podget

Configuration filename specified by -c or --create-config violates the following rules...

Suggestion(s):
  1. Filenames should not include any directory configuration.
     Remove the directory configuration.
     If you need to specify a directory other than the default,
     use the -d or --dir_config command line options.

Closing session.

…….--dir_config付けて再度.

$ podget --dir_config /tmp --create-config podgetrc
podget
  Installing default user configuration file in /tmp/podgetrc
  Installing default server list configuration.

Closing session.

https://gist.github.com/1b5fba2e949409a87e1955e0c779b057

diffを取ってみると設定項目自体はそう変わってない感じですが,設定値が大文字小文字が変わったりしています.
比較しながら書き換えて叩くと動き始めたようです.

$ podget
podget


Session directory not found, creating
Session file not found.  Creating podget.18364 .

-------------------------------------------------
Category: tech                 Name: 電脳空間カウボーイズ

Downloading feed index from http://feeds.feedburner.com/weblogs/csc
2017-04-06 06:13:13 URL:http://feeds.feedburner.com/weblogs/csc [46549] -> "-" [1]

Downloading csc_2017_design2.mp3 from http://onosendai.jp/csc
2017-04-06 06:20:43 URL:http://onosendai.jp/csc/csc_2017_design2.mp3 [51781411/51781411] -> "/home/mk/POD/tech/電脳空間カウボーイズ/csc_2017_design2.mp3" [1]
PLAYLIST: Adding tech/電脳空間カウボーイズ/csc_2017_design2.mp3 to /home/mk/POD/New-2017-04-06.m3u

Downloading csc_2017_design1.mp3 from http://onosendai.jp/csc
2017-04-06 06:25:04 URL:http://onosendai.jp/csc/csc_2017_design1.mp3 [37304885/37304885] -> "/home/mk/POD/tech/電脳空間カウボーイズ/csc_2017_design1.mp3" [1]
PLAYLIST: Adding tech/電脳空間カウボーイズ/csc_2017_design1.mp3 to /home/mk/POD/New-2017-04-06.m3u
 :

しかし,ダウンロード済みのファイルも取得しているような?
新規のみの設定にしているつもりなんですが,初回は舐めちゃうのかな?2度目のときに確認してみます.

# Force
# 0 == Only download new material.
# 1 == Force download all items even those you've downloaded before.
FORCE=0

とりあえず終わるまではsoundcloud辺りで聞いてます.

その後2回目はちゃんと期待通りの動作するのを確認したのでcrontabに登録し直しました.

byobu+screenでfunctionkeyを無効にする

機能覚えてないし遠いしたまに間違って押して混乱したりするので無効にしました.
Debian stretch amd64, Ubuntu 16.04 LTS amd64で確認.

$ vi ~/.byobu/keybindings

して

source $BYOBU_PREFIX/share/byobu/keybindings/common

の次の行頭で i して編集モードにした後
Ctrl+a !(aは設定してあるescape key)する.
するとこんなのが出てくるので,

:source /usr/share/byobu/keybindings/f-keys.screen

頭の : を消して

source /usr/share/byobu/keybindings/f-keys.screen.disable

を書いておく

保存して起動しなおして反映.

#viである必然性はないのでお好きなテキストエディタでどうぞ.
#tmuxの場合はこっち~/.byobu/keybindings.tmuxになるのかな?(それとも byobu-select-backend で切り替えるとファイル名入れ替わる?)

コマンドラインからGooglecastにcast出来るcastnowを試す

見つけたので試してみました

Debian stretch amd64, Ubuntu 16.04 LTS amd64で確認しています.

$HOME以下にPATH通してnpmで導入しています./usr/local以下で良ければnpm install castnow -gだけでいいかも.

$ sudo apt install npm nodejs-legacy
$ echo 'PATH="$PATH":$HOME/node_modules/.bin' >> ~/.bashrc
$ source ~/.bashrc
$ npm install castnow

入りましたがChromecastがみあたらない?

$ castnow --help
 
Usage: castnow [<media>, <media>, ...] [OPTIONS]
 
Option                  Meaning
--tomp4                 Convert file to mp4 during playback
--device <name>         The name of the Chromecast device that should be used
--address <ip>          The IP address or hostname of your Chromecast device
--subtitles <path/url>  Path or URL to an SRT or VTT file
--subtitle-scale <scale> Subtitle font scale
--subtitle-color <color> Subtitle font RGBA color
--myip <ip>             Your local IP address
--quiet                 No output
--peerflix-* <value>    Pass options to peerflix
--ffmpeg-* <value>      Pass options to ffmpeg
--type <type>           Explicitly set the mime-type (e.g. "video/mp4")
--bypass-srt-encoding   Disable automatic UTF-8 encoding of SRT subtitles
--seek <hh:mm:ss>       Seek to the specified time on start using the format hh:mm:ss or mm:ss
--loop                  Loop over playlist, or file, forever
--help                  This help screen
 
Player controls
 
Key                     Action
space                   Toggle between play and pause
m                       Toggle mute
up                      Volume Up
down                    Volume Down
left                    Seek backward
right                   Seek forward
n                       Next in playlist
s                       Stop playback
quit                    Quit
 
$ castnow
Error: device not found

名前解決が出来なかったようでipを指定するとcast出来ました.別のマシンでは通ったのでこのマシンがおかしいようです.

$ avahi-browse -a -t -l -r
+ wlp3s0 IPv6 x201s                                         Remote Disk Management local
+ wlp3s0 IPv4 Chromecast-KagoLUG                            _googlecast._tcp     local
= wlp3s0 IPv6 x201s                                         Remote Disk Management local
   hostname = [x201s.local]
   address = [fe80::222:faff:fe33:456a]
   port = [22]
   txt = []
= wlp3s0 IPv4 Chromecast-KagoLUG                            _googlecast._tcp     local
   hostname = [Chromecast-KagoLUG.local]
   address = [192.168.2.206]
   port = [8009]
   txt = ["rs=" "bs=FA8FCA59198D" "st=1" "ca=4101" "fn=Chromecast-KagoLUG" "ic=/setup/icon.png" "md=Chromecast" "ve=05" "rm=A652B47431F36207" "id=7c14aaaa62a6002dd95ba94814e5c5e0"]
$ castnow --address 192.168.2.206 http://commondatastorage.googleapis.com/gtv-videos-bucket/ED_1280.mp4
 
  State     : Playing....

パイプも使えるので色々応用できそうな気がします.
(最近Chromiumがamd64/i386しかなくなったようですが,これを使えば他のアーキテクチャでもスクリーンキャストもできそう?)