Pidgin で Facebook にログインできなくなっていたので purple-facebook プラグインを試す

最近 Pidgin での Facebook 接続で以下のようなエラーが発生して接続できなくなっていた.
Screenshot from 2015-08-10 07-13-39

調べてみるとPidgin で利用している XMPP Chat API は2014-04-30 から非推奨になって,2015-04-30 から使えなくなっていたらしい.

何か方法はないかなと探してみると以下のようなプロジェクトを発見.

これを使えばfacebook chat が Pidgin でまた利用出来るようになる?ということで試してみた.

導入環境

  • Debian stretch amd64
  • Pidgin 2.10.11-1

リポジトリの登録

% sudo sh -c 'echo "deb http://download.opensuse.org/repositories/home:/jgeboski/Debian_8.0 ./" > /etc/apt/sources.list.d/jgeboski.list'

この URL の Debian_8.0 部分は host のディストリビューションによって変わる.以下のページを参照して設定する.

鍵登録

% wget wget http://download.opensuse.org/repositories/home:/jgeboski/Debian_8.0/Release.key
% gpg  ./Release.key
pub  2048R/1C85BB5E 2015-07-23 home:jgeboski OBS Project <home:jgeboski@build.opensuse.org>
% sudo apt-key add ./Release.key
OK
% rm ./Release.key

この URL の Debian_8.0 部分は host のディストリビューションによって変わる.以下のページを参照して設定する.

パッケージを最新にして purple-facebook pkg を導入

% sudo apt update && sudo apt upgrade && sudo apt install purple-facebook

Pidgin が起動していたら終了して起動し直す.
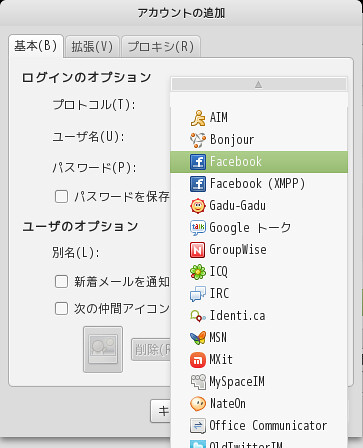
以下のようにこれまであった facebook (XMPP) の上に Facebook の項目が増えた.
Screenshot from 2015-08-10 07-40-23

既存の設定を書き換えるか,新規に Facebook プロトコルでの設定を行い,接続を試みる.

ログイン失敗

以下のエラーとなりログイン出来ない.

Login approvals are on. Expect an SMS shortly with a code to use for log in (406)

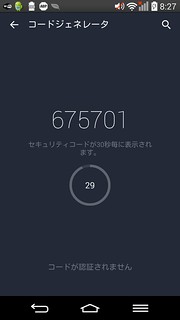
これはおそらく2段階認証が有効になっているため.パスワードの代わりにコードジェネレータ のコードを入力することでログインできた.
Screenshot_2015-08-10-08-27-02

#Google Hangout もどうにかならないかな……

バッテリをフル充電しないようにして長持ちさせるためのメモ

MassRide
NotePC を AC電源で利用する場合フル充電しっぱなしだとバッテリの寿命が短くなります.フル充電せずに手前で充電を止めるようにする方法のメモです.
#いつも持ち運ぶために100%にしたあと設定を覚えてなくてそのままにしてしまうのでメモ><

環境

  • Debian stretch amd64
  • Thinkpad X201s

導入

$ sudo apt install tlp

確認

% sudo tlp-stat -b             
--- TLP 0.7 --------------------------------------------

+++ ThinkPad Extended Battery Functions
tp-smapi   = active
tpacpi-bat = inactive (kernel module 'acpi_call' not installed)

+++ ThinkPad Battery Status: BAT0 (Main / Internal)
/sys/devices/platform/smapi/BAT0/manufacturer               = SANYO
/sys/devices/platform/smapi/BAT0/model                      = 42T4XXX
/sys/devices/platform/smapi/BAT0/manufacture_date           = 2010-08-14
/sys/devices/platform/smapi/BAT0/first_use_date             = 2010-09-22
/sys/devices/platform/smapi/BAT0/cycle_count                =    277
/sys/devices/platform/smapi/BAT0/design_capacity            =  57720 [mWh]
/sys/devices/platform/smapi/BAT0/last_full_capacity         =  27340 [mWh]
/sys/devices/platform/smapi/BAT0/remaining_capacity         =  22140 [mWh]
/sys/devices/platform/smapi/BAT0/remaining_percent          =     81 [%]
/sys/devices/platform/smapi/BAT0/remaining_running_time_now = not_discharging [min]
/sys/devices/platform/smapi/BAT0/remaining_charging_time    = not_charging [min]
/sys/devices/platform/smapi/BAT0/power_now                  =      0 [mW]
/sys/devices/platform/smapi/BAT0/power_avg                  =      0 [mW]

/sys/devices/platform/smapi/BAT0/start_charge_thresh        =     96 [%]
/sys/devices/platform/smapi/BAT0/stop_charge_thresh         =    100 [%]
/sys/devices/platform/smapi/BAT0/force_discharge            =      0

設定( 充電開始 % を75% /充電終了 % を 85% にする場合 )

% sudo tlp setcharge 75 85 BAT0                
Setting temporary charge thresholds for BAT0:
  stop  = 85
  start = 75

もしバッテリが複数ある場合は BAT0, BAT1 のようになるはず.

フル充電に戻す

外で使う前にフル充電したい場合など.

% sudo tlp fullcharge
Setting temporary charge thresholds for BAT0:
  stop  = 100
  start = 96

参考URL

関連記事

TeamViewer Linux版 を少し試す & 文字化け対応

[TeamViewer Linux版 あるのか.しらなかった

“Linux版TeamViewerの無料ダウンロード” https://www.teamviewer.com/ja/download/linux.aspx

https://plus.google.com/u/0/+KenichiroMATOHARA/posts/MtcA41kdpD9
(元投稿消えている)

ということでTeamViewer にLinux版があるのを知り試してみました.

導入自体はパッケージがあるのでこんな感じで(hash は見つからなかった……)
amd64版もあるようですがteamviewerd.service が起動しなかったりしたのでMultiarch なi386 を利用しています.arm版もあると嬉しい.

% wget http://download.teamviewer.com/download/teamviewer_i386.deb
% sha1sum teamviewer_10.0.41499_i386.deb 
438a1b27531faf8a89148b011e5214aa3f95ab1e  teamviewer_10.0.41499_i386.deb
% sha256sum teamviewer_10.0.41499_i386.deb 
0694c756b8cb5f2b09c8d6db960ced3e899d4ce43060e77ef4f1c36254dc31c4  teamviewer_10.0.41499_i386.deb
% sudo dpkg -i teamviewer_10.0.41499_i386.deb

このとき日本語Linux環境で利用した場合所々文字化けが起こります.
Screenshot from 2015-08-02 08-03-25

TeamViewer はWine経由で動作しているよう&Wineでよく見かける感じの文字化けだったのでWineの設定を探し設定変更したところ文字化けしなくなりました.

  • 修正内容
    /opt/teamviewer/tv_bin/wine/share/wine/wine.inf[Fonts] セクションに以下の設定を追加
HKLM,%FontSubStr%,"MS Gothic",,"Ume Gothic"
HKLM,%FontSubStr%,"MS PGothic",,"Ume Gothic"
HKLM,%FontSubStr%,"MS UI Gothic",,"Ume Gothic"
HKLM,%FontSubStr%,"MS Mincho",,"Ume Gothic"
HKLM,%FontSubStr%,"MS PMincho",,"Ume Gothic"

デーモンの再起動

% teamviewer daemon stop
% teamviewer daemon start

次バージョン以降で修正されることを期待してサポートにも投げてみました.(窓口合ってたかな?)

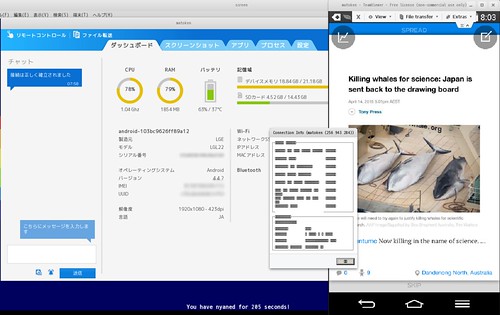
いつもはssh over (X/RDP/VNC)な感じで事足りてたしTeamViewer はプロプラ&個人用途以外は有償なのであまり興味はなかったのですが,今回使ってみてAndorid のの画面も引っ張ってこれるのはいいなと思いました.丁度ちょっと前に幾つかのAndroid版VNC Server software を試してうまく動かなかったので特に.

さくらのVPS シリアルコンソール(β版) が開始されていたので試す

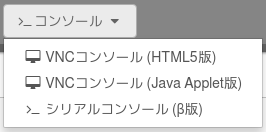
さくらのVPS ののサーバ設定を変えてtiarra や lingrircgw とかのの自動起動確認のために再起動しようと思い,再起動を見守るためにコンソールを立ち上げようとしたところ新しい項目が増えていました.

Screenshot from 2015-08-01 02-25-08

シリアルコンソール(β版) がそれです.
確認すると 7/23 ににリリースされたようです.

早速設定してみます.設定内容は自分メモを見ながら以下のような感じでで設定しましたちなみに,少なくともDebian Squeese ~ Jessie まで同じ設定でいけてます.

/etc/inittab

#T0:23:respawn:/sbin/getty -L ttyS0 9600 vt100

の部分を以下の様に変更.

T0:23:respawn:/sbin/getty -L ttyS0 115200 vt100

/etc/default/grub の以下の辺りを設定

GRUB_CMDLINE_LINUX_DEFAULT="console=tty0 console=ttyS0,115200n8"
GRUB_TERMINAL=serial
GRUB_SERIAL_COMMAND="serial --speed=115200 --unit=0"

GRUB に反映

$ sudo update-grub

再起動して動作確認.
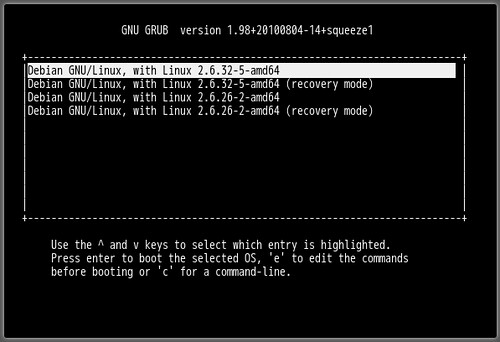
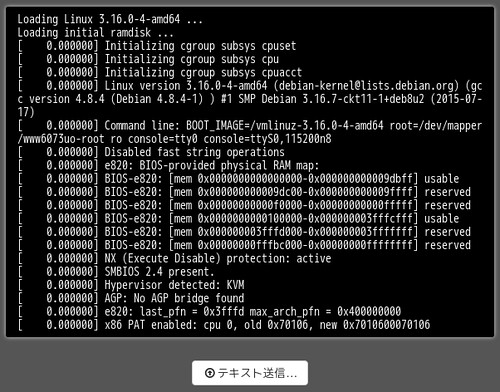
これでGRUB の画面からシリアルコンソールに表示されるようになりました.

Screenshot from 2015-08-01 03-05-28
Screenshot from 2015-08-01 02-50-34
Screenshot from 2015-08-01 13-33-25
Screenshot from 2015-08-01 13-32-17

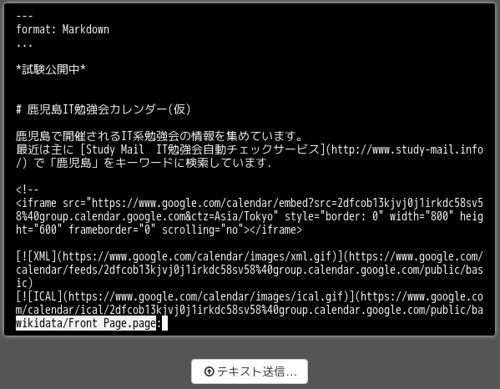
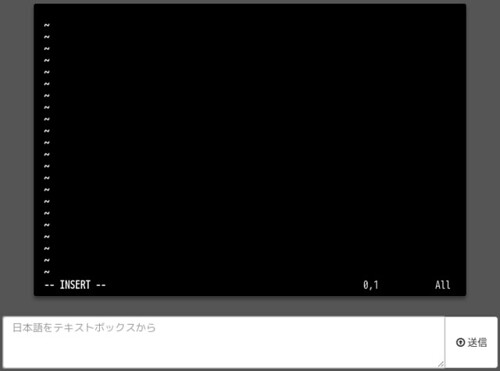
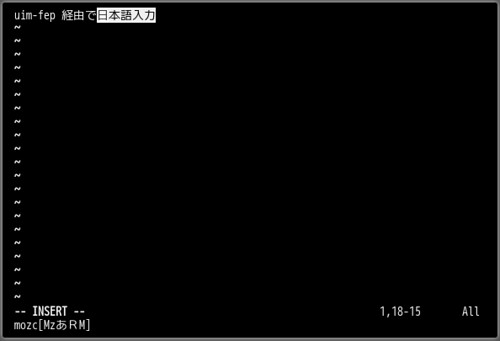
日本語入力は下のテキスト送信からとサポートサイトには書かれていますが,普通に uim-fep とかでも入力できました.
以下のような感じで設定すればいいんだけどこの辺りの詳細は以下のページを参考にしてみてください.

$ sudo apt install uim-fep uim-mozc
$ cat << __EOF__ > ~/.uim
(define-key generic-on-key? '("<Control>\\" "<Shift> " "<Control> "))
(define-key generic-off-key? '("<Control>\\" "<Shift> " "<Control> "))
$ uim-mozc -u mozc

Screenshot from 2015-08-01 13-34-11
Screenshot from 2015-08-01 13-37-51

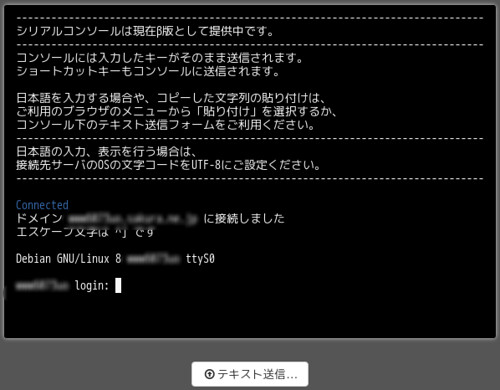
これまでは VNCコンソール(HTML5版)を利用していましたがこれからはシリアルでの利用が多くなりそうです.コピペが出来るのが大きい!後はこのシリアルが ssh 経由で利用できたりしたらまた色々使いやすくなりそうな気もします.(セキュリティは注意が必要ですが)

そうそう,ブラウザのシリアルの画面を閉じただけじゃ切断されずそのままなので最後にちゃんとログアウトしておきましょう.

user@hostname:~$ exit
logout

Debian GNU/Linux 8 hostname ttyS0

hostname login:

apache httpd 2.4 で嵌まる

DP1M0712

apahce httpd 2.2.(wheezy)から2.4.(jessie)への移行で適当なサーバをえいやで上げて動かなくなったのを復旧したメモ.

virtual host が有効にならない

/etc/apache2/sites-enabled/ 以下には設定ファイルがあるのに読み込まれず default しか表示されない.

sites-available からリンクを貼り直そうとするとエラーとなる

$ sudo a2dissite example.com
ERROR: Site example.com does not exist!
$ sudo rm /etc/apache2/sites-enabled/example.com
$ sudo a2ensite example.com
ERROR: Site example.com does not exist!

エラーメッセージで検索するとファイル名を *.conf にすれば良いよう.

この部分の該当場所は /etc/apache2/apache2.conf のここ

IncludeOptional sites-enabled/*.conf

2.2からの変更を確認するとこのように変わっていた.

 # Include the virtual host configurations:
-Include sites-enabled/
+IncludeOptional sites-enabled/*.conf

ということでこんな感じで

$ sudo rm /etc/apache2/sites-enabled/example.com
$ sudo mv /etc/apache2/sites-available/example.com /etc/apache2/sites-available/example.com.conf
$ sudo  a2ensite example.com.conf

設定ファイルの数が多かったら /etc/apache2/apache2.conf の設定を * にしても良いかも(未検証)

-IncludeOptional sites-enabled/*.conf
+IncludeOptional sites-enabled/*

403 が出る

エラーログは以下のような感じ.見慣れないエラー.

[authz_core:error] [pid 20566] [client nnn.nnn.nnn.nnn:49821] AH01630: client denied by server configuration: /var/www

以下のガイドを見るとどうもacl 周りのコマンド変更のようで

Order deny,allow
Deny from all

の代わりに

Require all granted

で動くようになった.


GNU Screen v4.3.0 を少し試す

先日リリースされたGNU Screen 4.3.0 の新機能が気になったのでbuild してみた。

  • New commands:
    • ‘sort’ command sorting windows by title
    • ‘bumpleft’, ‘bumpright’ – manually move windows on window list
    • ‘collapse’ removing numbering ‘gaps’ between windows, by
      renumbering

Build とか

% sudo apt-get install build-essential
% sudo apt-get build-dep screen
% wget http://ftp.gnu.org/gnu/screen/screen-4.3.0.tar.gz http://ftp.gnu.org/gnu/screen/screen-4.3.0.tar.gz.sig
% gpg --verify screen-4.3.0.tar.gz.sig
gpg: assuming signed data in `screen-4.3.0.tar.gz'
gpg: Signature made 2015年06月14日 02時01分43秒 JST using RSA key ID C53EF3A4
gpg: Good signature from "Amadeusz Sławiński <amade@asmblr.net>"
gpg: WARNING: This key is not certified with a trusted signature!
gpg:          There is no indication that the signature belongs to the owner.
Primary key fingerprint: 2EE5 9A5D 0C50 167B 5535  BBF1 B708 A383 C53E F3A4
% tar tvzf screen-4.3.0.tar.gz
% tar xzf screen-4.3.0.tar.gz
% cd screen-4.3.0
% ./configure --prefix=$HOME/usr/local --enable-colors256 --enable-rxvt_osc --enable-use-locale --enable-pam
% make
% make install
% where screen
/home/mk/usr/local/bin/screen
/usr/bin/screen
% screen --version
Screen version 4.03.00 (GNU) 27-May-15

そして気になっていた新機能を試してみました。

  • New commands:
    • ‘sort’ command sorting windows by title

想像ではawesome みたいにウィンドウの並びが縦横分割されていい感じに並ぶのかなーと思っていたのだけど、大分違った。
Ctrl-a : して sort と打ってみると、

Sorting inside a window is not allowed. Push CTRL-a “ and try again

と言われる。Ctrl + a " してscreen のウィンドウリストを出した状態で再度叩くとこんな感じでウィンドウタイトルでソートされた。

Screenshot from 2015-06-17 19:21:38

ちなみに、

  • ‘bumpleft’, ‘bumpright’ – manually move windows on window list

も試したけどコアダンプしたorz
多分指定ウィンドウを左右に移動出来るのだと思う

[screen caught signal 11. (core dumped)]

Debian jessie2stretch

Screenshot from 2015-06-17 12:08:41

jessie がリリースされて2月近く1度目のポイントリリース もされて普通に使えています.しかし,悟りを開くためにtesting のstretch にアップグレードしてみます.

以下に記すことにより悟りを開けば、アップグレード地獄という果てしない因果応報の葛藤から人は解脱し、Debian の涅槃の境地に到達できます。

Debian リファレンス 2.1.3. 永遠のアップグレード人生 より

参考URL

以下の公式文章と,前回Wheezy から Jessie にアップグレードした時のメモを参考にしました.

パッケージを最新にする

% sudo apt update
% sudo apt upgrade

backup

pkg 情報

デイリーでファイルに落として( /usr/bin/dpkg --get-selections "*" > dpkg_--get-selections )バックアップしているのでバックアップログを見てバックアップがちゃんと取れているのを確認

/etc, /var, /home など

デイリーでバックアップしているのでバックアップログを見てバックアップがちゃんと取れているのを確認
最近の $HOME はこんな感じでバックアップしている

ionice -c2 -n7 nice -n19 rsync --stats -avze ssh --delete --bwlimit=2048 --rsync-path="/usr/bin/ionice -c2 -n7 /usr/bin/nice -n19 /usr/bin/rsync" --exclude-from "$HOME/.rsync-backup_exclude-list" --link-dest=/mnt/backup/x201s/rsync/home/`/bin/date -d '1 day ago' +\%Y\%m\%d`/ $HOME micro-backup:/mnt/backup/x201s/rsync/home/`date +%Y%m%d`/

Pin の解除

% find /etc/apt/ -type f|grep preferences
/etc/apt/preferences
% rm /etc/apt/preferences

パッケージ状態の確認

% sudo dpkg --audit
% find /etc/apt/ -type f|grep preferences
% aptitude search "~ahold"

vim パッケージを削除をされないようにする

% sudo aptitude unmarkauto vim

以下はaptitude のman より

       markauto, unmarkauto
           それぞれ、自動的にインストールされた、および手動でインストールされたという印をパッケージに添付します。パッケージの指定は「install」コマンドと
           まったく同じ方法で行います。例えば「aptitude markauto '~slibs'」を実行すると、「libs」セクションのパッケージすべてに、自動的にインストールされ
           たという印が添付されます。

           自動的にインストールしたパッケージについてのさらに詳しい情報は、aptitude リファレンスマニュアルの「自動的にインストールしたパッケージの管理」セ
           クションを参照してください。

aptitude リファレンスマニュアルの「自動的にインストールしたパッケージの管理」セクション は以下から.

ソースリストの修正

非公式なソースを削除して公式だけにする.

% sudo rm -rf /etc/apt/sources.list.d
% sudo vi /etc/apt/sources.list
% grep -v ^# /etc/apt/sources.list|uniq

deb http://ftp.jp.debian.org/debian/ jessie main non-free contrib
deb-src http://ftp.jp.debian.org/debian/ jessie main non-free contrib

deb http://security.debian.org/ jessie/updates main contrib non-free
deb-src http://security.debian.org/ jessie/updates main contrib non-free

jessie をstretch にする.

% grep -v ^# /etc/apt/sources.list|uniq

deb http://ftp.jp.debian.org/debian/ stretch main non-free contrib
deb-src http://ftp.jp.debian.org/debian/ stretch main non-free contrib

deb http://security.debian.org/ stretch/updates main contrib non-free
deb-src http://security.debian.org/ stretch/updates main contrib non-free

コンソール端末に移動する

X の端末だとX が不安定になることがあるのでコンソールの端末に移動.Ctrl + Alt + 1~6 とかで移動してログインする.
fbtermなどを使わないと日本語表示が出来ないので LANG=C にしておく.

% echo $LANG
ja_JP.UTF-8
% LANG=C

root 権限になる

% sudo -s
# echo $LANG
C

ログの取得開始

# script ~mk/jessie2stretch.log 
Script started, file is /home/mk/jessie2stretch.log

パッケージ情報を更新

# apt-get update

アップグレードに必要な容量を確認する

# apt-get -o APT::Get::Trivial-Only=true dist-upgrade
 :
 :
 :
1551 upgraded, 72 newly installed, 8 to remove and 0 not upgraded.
Need to get 79.4 MB/1645 MB of archives.
After this operation, 469 MB of additional disk space will be used.
E: Trivial Only specified but this is not a trivial operation.

最小アップグレード

# apt-get upgrade
 :
1212 upgraded, 0 newly installed, 0 to remove and 340 not upgraded.
Need to get 0 B/1180 MB of archives.
After this operation, 137 MB of additional disk space will be used.
Do you want to continue? [Y/n] Y
 :

dist-upgrade の影響を確認する

# apt-get -s dist-upgrade
  :

dist-upgrade する

# apt-get dist-upgrade
  :
The following packages will be REMOVED:
  iceweasel-l10n-csb iceweasel-l10n-ku iceweasel-l10n-zu librpmsign1 libsane:i386 tracker-utils xserver-xorg-video-modesetting
  xserver-xorg-video-siliconmotion
  :
339 upgraded, 72 newly installed, 8 to remove and 0 not upgraded.
Need to get 79.4 MB/465 MB of archives.
After this operation, 332 MB of additional disk space will be used.
Do you want to continue? [Y/n] Y
  :

不要になったパッケージを削除する

# apt-get autoremove
  :
0 upgraded, 0 newly installed, 32 to remove and 0 not upgraded.
After this operation, 28.6 MB disk space will be freed.
Do you want to continue? [Y/n]Y
  :
0 upgraded, 0 newly installed, 0 to remove and 0 not upgraded.

sudo 設定確認

# lv /etc/sudoers

以前 sudoers が書き換わっていた事があるので確認
念の為別端末( Alt + 1~6 )で確認も

% sudo -s
[sudo] password for mk: 
# whoami
root

ログ終了

# exit
Script done, file is /home/mk/jessie2stretch.log

再起動

% sudo shutdown -r now jessie2stretch dist-upgrade!

Version 確認

% cat /etc/debian_version 
stretch/sid
% uname -a
Linux x220 3.16.0-4-amd64 #1 SMP Debian 3.16.7-ckt11-1 (2015-05-24) x86_64 GNU/Linux
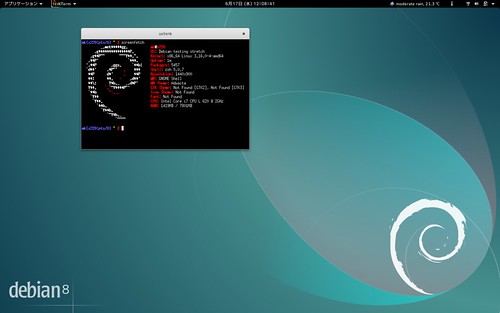
% screenfetch
         _,met$$$$$gg.           mk@x220
      ,g$$$$$$$$$$$$$$$P.        OS: Debian testing stretch
    ,g$$P""       """Y$$.".      Kernel: x86_64 Linux 3.16.0-4-amd64
   ,$$P'              `$$$.      Uptime: 2m
  ',$$P       ,ggs.     `$$b:    Packages: 5457
  `d$$'     ,$P"'   .    $$$     Shell: zsh 5.0.7
   $$P      d$'     ,    $$P     Resolution: 1440x900
   $$:      $$.   -    ,d$$'     WM: GNOME Shell
   $$\;      Y$b._   _,d$P'      WM Theme: Adwaita
   Y$$.    `.`"Y$$$$P"'          GTK Theme: Not Found [GTK2], Not Found [GTK3]
   `$$b      "-.__               Icon Theme: Not Found
    `Y$$                         Font: Not Found
     `Y$$.                       CPU: Intel Core i7 CPU L 620 @ 2GHz
       `$$b.                     RAM: 1413MB / 7801MB
         `Y$$b.                 
            `"Y$b._             
                `""""

サードパーティのsource list を復活させる

/etc/apt/sources.list.d/* をリストアしたり.

% ls -A /etc/apt/sources.list.d/
atlassian-hipchat.list  chrome-remote-desktop.list  google-chrome.list  google-chrome.list.save  owncloud-client.list  spideroak.com.sources.list  steam.list  wuala.list
% sudo apt update
% sudo apt list --upgradable
一覧表示... 完了
libowncloudsync0/不明 1.8.2-1 amd64 [1.8.1+dfsg-1 からアップグレード可]
owncloud-client/不明 1.8.2-1 amd64 [1.8.1+dfsg-1 からアップグレード可]
owncloud-client-l10n/不明 1.8.2-1 all [1.8.1+dfsg-1 からアップグレード可]
% sudo apt upgrade
% sudo apt dist-upgrade

未だjessie がリリースされてそう経ってないので差分が少なくディストリビューションアップグレードはあっさり終わりました.アップデート時に面倒な設定ファイルの書き換えも1つだけでした.

追記)
コンソールでのキーマップが[標準 105 キー (国際) PC] になっていたので,[標準 101 キー PC] に変更した.

% sudo dpkg-reconfigure keyboard-configuration

WordPress へのspam 投稿をしたことのあるIP を拒否するようにした

最近WordPress へのコメントとトラックバックスパムが酷くなってきました。URL が含まれている物は承認が必要なようにしているのですが面倒です。このときにスパムはスパムだと手動で振り分けをしているので振り分けたものからIP を抜き出してアクセス制限を掛けるとましにならないかと設定してみました。

データベースから該当IP を抜き出す

MySQL からスパムを指定したIP の一覧は以下のようにして取得出来そうです。

$ cat /etc/wordpress/spamcommentip.sql
SELECT comment_author_IP FROM wordpress.wp_comments WHERE comment_approved='spam'
$ /usr/bin/mysql -umy -p < /etc/wordpress/spamcommentip.sql | /usr/bin/sort -n | /usr/bin/uniq -c| sort -n|cut -c-7|uniq -c
     81       1
     31       2
     26       3
     12       4
      8       5
      9       6
      4       7
      9       8
      1       9
      1      10
      3      11
      2      12
      3      13
      1      14
      1      15
      1      18
      4      20
      1      22
      1      23
      1      24
      1      26
      1      43
      1      82
      1     119
      1     146
      1     394

自動化したいので、MySQL にアクセスする為のMySQL の設定ファイルと、IP を抜き出すsqlファイルを用意します。

  • MySQL アクセスの為の設定ファイル

    $ cd /etc/wordpress
    $ umask 077
    $ sudo touch .my.conf
    $ sudo chown www-data.root .my.conf
    $ vi .my.conf
    cat .my.conf 
    user=wp
    password=XXXXXXXXXXXXXX
    database=wordpress
    
  • IP を抜き出す為のsqlファイル

    $ sudo vi /etc/wordpress/spamcommentip.sql
    $ cat $ cat /etc/wordpress/spamcommentip.sql
    SELECT comment_author_IP FROM wordpress.wp_comments WHERE comment_approved='spam'
    

以下のようにしてIP の一覧が取得出来るようになりました。

$ /usr/bin/mysql --defaults-file=/etc/wordpress/.my.conf < /etc/wordpress/spamcommentip.sql

apache httpd の .htaccess で指定IPアドレスからの WordPress のコメント投稿とトラックバックを制限

Debian のパッケージで WordPress を導入しているので導入パスは /usr/share/wordpress/ です。
設定ファイルは /etc/wordpress 以下です。
/usr/share/wordpress/.htaccess/etc/wordpress/htaccess のシンボリックリンクになっています。

アクセス制限をするには .htaccessdeny from ip address な感じで行けます。
さっきのIPの一覧取得時に並べ替えて同一IPをまとめて頭にdeny from を付けるようにします。

$ /usr/bin/mysql --defaults-file=/etc/wordpress/.my.conf < /etc/wordpress/spamcommentip.sql | /usr/bin/sort -n | /usr/bin/uniq | /bin/grep -v 'comment_author_IP' | /bin/sed "s/^/  deny from /"

あまり無いと思いますが、正しいIP アドレスを登録してしまっても本文が読めるようにコメントやトラックバックだけ制限しようと思います。コメント、トラックバックは次のwp-comments-post.php / wp-trackback.php を利用するようなのでこのファイルへのアクセスを制限します。
.htaccess の Files ディレクティブを利用して以下ような感じでいけそうです。

<Files ~ wp-comments-post.php|wp-trackback.php>
  deny from ip address
</Files>

動作確認は自分のIPアドレスを一時的に登録して行いました。blog本文にはアクセス出来てコメントURL は拒否されています。

% w3m -dump_head https://matoken.org/blog/blog/2015/06/09/facebook-pgp/|head -1
HTTP/1.0 200 OK
% w3m -dump_head https://matoken.org/blog/wp-comments-post.php|head -1
HTTP/1.1 403 Forbidden

cron を使って自動的に更新するようにする

IP list は外部ファイルにして読み込むようにすると便利そうですが、Include ディレクティブは .htaccess からは利用出来無いようなので分割ファイルを作って連結することにします。

  • /etc/wordpress/htaccess_base
    • 元のhtaccess
  • /etc/wordpress/htaccess_spamhead
    • Files ディレクティブの先頭
  • /etc/wordpress/htaccess_spamiplist
    • データベースから抜き出して作成した拒否IPリスト
  • /etc/wordpress/htaccess_spamtail
    • Files ディレクティブの末尾
  • /etc/wordpress/htaccess
    • 最終的に結合されて.htaccess のリンク元になるファイル

htaccess_base / htaccess_spamhead / htaccess_spamtail を用意します。

$ sudo cp -p /etc/wordpress/htaccess /etc/wordpress/htaccess_base
$ sudo sh -c "echo '<Files ~ wp-trackback.php|wp-comments-post.php>' > /etc/wordpress/htaccess_spamhead"
$ sudo sh -c "echo '</Files>' > /etc/wordpress/htaccess_spamtail"

htaccess_spamiplist / htaccess はcron で1時間毎に作成するようにします。

$ sudo -u www-data crontab -e
$ sudo -u www-data crontab -l
14 * * * *      /usr/bin/mysql --defaults-file=/etc/wordpress/.my.conf < /etc/wordpress/spamcommentip.sql | /usr/bin/sort -n | /usr/bin/uniq | /bin/grep -v 'comment_author_IP' | /bin/sed "s/^/  deny from /" > /etc/wordpress/htaccess_spamiplist && /bin/cat /etc/wordpress/htaccess-base /etc/wordpress/htaccess_spamhead /etc/wordpress/htaccess_spamiplist /etc/wordpress/htaccess_spamtail > /etc/wordpress/htaccess

これで1時間毎にWordPress 上でspam と判定したコメント/トラックバックの送信元IP からコメント/トラックバックを拒否するようになりました。
うまくいくといいのですが……。

追記)
設定して数日経ちましたが,spam激減しました!

Debian Jessie のAdobe Flash Player をupdate-flashplugin-nonfreeで最新にする

IMGP9666_DNG

最近Debian Jessie でAdobe Flash が古いと怒られてるけどpkgでなかなか降りて来ないのでupdate-flashplugin-nonfree を手動で叩いて最新にしたメモです.
#え?GNU Gnashですか?ちょっとつらいですねARM とかでも動くのは良いんですが….

最近Iceweasel やFirefox でAdobe Flash のあるページを見ようとするとバージョンが古いのでAdobe Flash がブロックされます.とりあえず許可すると動作しますが面倒だし意図しないものも実行してしまいそうです.Jessie はtesting とはいえもう2週間位この状態が続いている気がするのでもしかしてFirefox がLinux以外のバージョンを元に古いと行ってる可能性があるのでは?と思って以下のページで確認すると最新は11.2.202.451 なのに対して11.2.202.425 と実際古かったです.

#しかしLinux版大分バージョン番号が離れてきましたね….今のところ見当たらないけどそろそろ対応できないsiteとか出てきたりして.

Debian Jessie ではAdobe Flash はflashplugin-nonfree パッケージを利用して導入しています.このパッケージはAdobe Flash Player のバージョンの確認を行い,最新版をダウンロードして導入してくれるものです.パッケージの中を見るとこんな感じでした.

% dpkg -L flashplugin-nonfree
/.
/var
/var/lib
/var/lib/flashplugin-nonfree
/var/cache
/var/cache/flashplugin-nonfree
/usr
/usr/sbin
/usr/sbin/update-flashplugin-nonfree
/usr/share
/usr/share/applications
/usr/share/man
/usr/share/man/man8
/usr/share/man/man8/update-flashplugin-nonfree.8.gz
/usr/share/icons
/usr/share/icons/hicolor
/usr/share/icons/hicolor/22x22
/usr/share/icons/hicolor/22x22/apps
/usr/share/icons/hicolor/48x48
/usr/share/icons/hicolor/48x48/apps
/usr/share/icons/hicolor/32x32
/usr/share/icons/hicolor/32x32/apps
/usr/share/icons/hicolor/24x24
/usr/share/icons/hicolor/24x24/apps
/usr/share/icons/hicolor/16x16
/usr/share/icons/hicolor/16x16/apps
/usr/share/pixmaps
/usr/share/bug
/usr/share/bug/flashplugin-nonfree
/usr/share/bug/flashplugin-nonfree/script
/usr/share/doc
/usr/share/doc/flashplugin-nonfree
/usr/share/doc/flashplugin-nonfree/copyright
/usr/share/doc/flashplugin-nonfree/changelog.gz
/usr/share/doc/flashplugin-nonfree/README
/usr/share/lintian
/usr/share/lintian/overrides
/usr/share/lintian/overrides/flashplugin-nonfree
/usr/lib
/usr/lib/flashplugin-nonfree
/usr/lib/flashplugin-nonfree/pubkey.asc
/usr/lib/mozilla
/usr/lib/mozilla/plugins
/usr/bin

README を確認するとWiki page 読んでねとのこと.

% cat /usr/share/doc/flashplugin-nonfree/README
Please read the information at:
http://wiki.debian.org/FlashPlayer

てことで--status で確認を行い,--installで最新に出来るようです.実際に叩いてみます.

% sudo /usr/sbin/update-flashplugin-nonfree
Usage:
  update-flashplugin-nonfree --install
  update-flashplugin-nonfree --uninstall
  update-flashplugin-nonfree --status
Additional options:
  --verbose
  --quiet
% sudo /usr/sbin/update-flashplugin-nonfree --status
Flash Player version installed on this system  : 11.2.202.425
Flash Player version available on upstream site: 11.2.202.451
flash-mozilla.so - auto mode
  link currently points to /usr/lib/flashplugin-nonfree/libflashplayer.so
/usr/lib/flashplugin-nonfree/libflashplayer.so - priority 50
/usr/lib/gnash/libgnashplugin.so - priority 10
Current 'best' version is '/usr/lib/flashplugin-nonfree/libflashplayer.so'.
% sudo /usr/sbin/update-flashplugin-nonfree --install
--2015-03-29 06:35:12--  https://fpdownload.macromedia.com/get/flashplayer/pdc/11.2.202.451/install_flash_player_11_linux.x86_64.tar.gz
 :
% sudo /usr/sbin/update-flashplugin-nonfree --status
Flash Player version installed on this system  : 11.2.202.451
Flash Player version available on upstream site: 11.2.202.451
flash-mozilla.so - auto mode
  link currently points to /usr/lib/flashplugin-nonfree/libflashplayer.so
/usr/lib/flashplugin-nonfree/libflashplayer.so - priority 50
/usr/lib/gnash/libgnashplugin.so - priority 10
Current 'best' version is '/usr/lib/flashplugin-nonfree/libflashplayer.so'.

ということで最新の11.2.202.451になりました.
なんで最近apt コマンドで最新になっていないのかは未確認です….