Mumble server設定メモ

鹿児島Linux勉強会 2017.01の遠隔で利用した設定メモです.

  • サーバのOSはDebian jessie amd64
  • 自動起動せず利用時に手動で起動する
  • fwも都度手動
  • サブチャンネルはなし
  • ssl証明書は既存のstartsslを利用

pkgの導入

$ sudo apt install mumble-server

自動起動を無効にする

$ sudo dpkg-reconfigure mumble-server

で設定画面に入り,

Mumble-server (murmurd) can start automatically when the server is booted.

Autostart mumble-server on server boot?

を選択する.
(/etc/default/mumble-serverMURMUR_DAEMON_START=0でも)

設定ファイルを編集

diff --git a/mumble-server.ini b/mumble-server.ini
index b445d4e..46f1dfd 100644
--- a/mumble-server.ini
+++ b/mumble-server.ini
@@ -12,7 +12,7 @@
 #        NOT regex = \w* BUT regex = \\w*

 # Path to database. If blank, will search for
-# murmur.sqlite in default locations or create it if not found.
+A
 database=/var/lib/mumble-server/mumble-server.sqlite

 # If you wish to use something other than SQLite, you'll need to set the name
@@ -86,7 +86,7 @@ pidfile=/var/run/mumble-server/mumble-server.pid
 # configure it here ehan ehrough D-Bus or Ice.
 #
 # Welcome message sent to clients when they connect.
-welcometext="<br />Welcome to this server running <b>Murmur</b>.<br />Enjoy your stay!<br />"
+welcometext="<br />Welcome to KagoLUG server running <b>Murmur</b>.<br />Enjoy your stay!<br />"

 # Port to bind TCP and UDP sockets to.
 port=64738
@@ -144,26 +144,28 @@ users=100
 # addresses.
 # Only uncomment the 'registerName' parameter if you wish to give your "Root" channel a custom name.
 #
-#registerName=Mumble Server
+registerName=KagoLUG Mumble Server
 #registerPassword=secret
 #registerUrl=http://mumble.sourceforge.net/
-#registerHostname=
+registerHostname=kagolug.org

 # If this option is enabled, the server will announce its presence via the 
 # bonjour service discovery protocol. To change the name announced by bonjour
 # adjust the registerName variable.
 # See http://developer.apple.com/networking/bonjour/index.html for more information
 # about bonjour.
-#bonjour=True
+bonjour=False

 # If you have a proper SSL certificate, you can provide the filenames here.
 # Otherwise, Murmur will create it's own certificate automatically.
-#sslCert=
-#sslKey=
+#sslCert=/etc/letsencrypt/live/kagolug.org/cert.pem
+sslCert=/etc/letsencrypt/live/kagolug.org/fullchain.pem
+sslKey=/etc/letsencrypt/live/kagolug.org/privkey.pem
+#sslCA=/etc/letsencrypt/live/kagolug.org/fullchain.pem

 # If Murmur is started as root, which user should it switch to?
 # This option is ignored if Murmur isn't started with root privileges.
-uname=mumble-server
+uname=root

 # If this options is enabled, only clients which have a certificate are allowed
 # to connect.

ssl証明書をクリア

$ sudo murmurd -wipessl
$ sudo killall murmurd

利用時

デーモンの起動とポート開放を行う

$ sudo service mumble-server start
$ sudo iptables -A INPUT -p udp -m udp --dport 64738 -j ACCEPT
$ sudo iptables -A INPUT -p tcp -m tcp --dport 64738 -j ACCEPT

利用者にはサーバとポートを伝える
– server : kagolug.org
– port : 64738

mumble://kagolug.org?title=KagoLUG%20Mumble%20Server&version=1.2.0

利用環境

  • PC : ThinkPad X200(Ubuntu 16.10 amd64)
  • マイク : elecom製の数百円のもの
  • スピーカー : Elecom LBT-SPTR01ECBK

はじめLBT-SPTR01ECBKでマイクとスピーカー両方の役割をと思っていたが,うまく音を拾えない&HSP/HFPでは音が悪く聞き取りづらかったので役割を分けた.
マイクはPC直付だったので音を拾いづらい&キー入力の音などを拾っていたはず.

利用完了時

デーモンの終了

$ sudo service mumble-server start

iptablesのmumbleルールを閉じる

$ sudo iptables -L --line-numbers | grep 64738
23   ACCEPT     udp  --  anywhere             anywhere             udp dpt:64738
24   ACCEPT     tcp  --  anywhere             anywhere             tcp dpt:64738
$ sudo iptables -D INPUT 23
$ sudo iptables -D INPUT 24
$ sudo iptables -L --line-numbers | grep 64738

課題

ssl証明書ファイルを読み込むためにdaemonをrootで動かしているのをmumble-serverユーザに戻したい.

-uname=mumble-server
+uname=root
$ sudo ls -l /etc/letsencrypt/live/kagolug.org/fullchain.pem /etc/letsencrypt/live/kagolug.org/privkey.pem
lrwxrwxrwx 1 root ssl-cert 40 Dec 26 10:30 /etc/letsencrypt/live/kagolug.org/fullchain.pem -> ../../archive/kagolug.org/fullchain9.pem
lrwxrwxrwx 1 root ssl-cert 38 Dec 26 10:30 /etc/letsencrypt/live/kagolug.org/privkey.pem -> ../../archive/kagolug.org/privkey9.pem

ssl-certグループにmumble-serverを登録で行けそう?

マイク

会議向けの全方位のマイクが欲しい
鹿児島Linux勉強会 2017.01に参加

今回は遠隔参加を試してみました.BigBluebuttonなどの会議システムは映像も双方向に送れていい感じなのですが,野良勉強会では回線が無かったり今使っているPCではリアルタイムエンコードが難しいという問題があります.そこで音声のみのMumbleを利用しました.

サーバはさくらのVPSに設定,会場ではBluetoothマイク兼スピーカーで……と思ったのですが,このマイクではうまく音を拾わない&ヘッドホンのプロファイルでは音質も悪いのでA2DPにしてスピーカーのみの利用として,マイクはPC直付にしました.
このマイクは一応前指向性ですが数百円の安物なので音質は悪かったと思います.
でも双方向でのやり取りが出来るのは良かったです.会議室利用の際は良さそうです.

今回は資料が事前に共有できていたので良かったですが,資料が事前に共有できない場合はやはりどうにか映像を共有する方法を考えないといけないでしょうね.
そうするとやはりBBBやYoutubeLive等が必要に…….(帯域をなるべく絞って映像のみRaspberry PiでYoutubeLive配信というのが現実的かな?)

私の発表した内容は以下の3本でした.

Raspberry PiのUSB OTGを試す // Speaker Deck

USBを保護するUSBGuard // Speaker Deck

ゲーミングプラットホームのLutris紹介 // Speaker Deck

データはこちら.
matoken / 鹿児島Linux勉強会2017.01 / ソース / — Bitbucket

Raspberry PiのUSB OTGはさわりだけでちょっとあれでした.次回までにもうちょっと…….

次回は2月上旬の土日にと思っています.今年は月一ペース開催を目標にと思っています.
最近は開催場所どうしよう……となって日が過ぎていくパターンなのでとりあえず日程アナウンスはして会場見つからなかったらマクドナルドとかで開催という感じで考えています.

コマンドスニペットを手軽に調べられるコマンドのborg

borgはOK borgというsiteのスニペットをコマンドライン上から検索したり編集できるコマンドのようです.borgはgo製でApache License Version 2.0のソフトウェアです.

導入

導入方法は如何から対応バイナリを入手して適当な場所に置き,実行権をつけるだけです.arm linuxとか*BSDとか結構いろいろそろっています.

今回はこんな感じで導入しました.

$ wget https://github.com/ok-borg/borg/releases/download/v0.0.1/borg_linux_amd64 -O ~/usr/local/bin/borg && chmod +x ~/usr/local/bin/borg

利用方法

基本的にコマンドの後ろに調べたいキーワードをつけるだけです.規定値では5つの例が表示されます. bashでloopどう書くんだっけ?

$ borg "bash loop"
(1) Bash Shell Do While Loop Infinite loop?
         [11] while [ `prog -some flags` = "Another instance of this program is running, please exit it first" ]
              -
              bay=$(prog -some flags)
              while [ $bay = "Another instance of this program is running, please exit it first" ]
              do
              echo "Awaiting Access to program"
              bay=$(prog -some flags)
              done
              .....
         [12] while true
              do
         ...  

(2) Bash foreach loop
         [21] xargs cat <filenames.txt
              -
              for fn in `cat filenames.txt`; do
                  echo "the next file is $fn"
                  cat $fn
              done
         [22] for fn in `cat filenames.txt`; do cat "$fn"; done
         [23] while read filename
              do
                  echo "Printing: $filename"
                  cat "$filename"
         ...

(3) Bash loop ping successful
         [31] ((count = 100))                            # Maximum number to try.
              while [[ $count -ne 0 ]] ; do
                  ping -c 1 8.8.8.8                      # Try once.
                  rc=$?
                  if [[ $rc -eq 0 ]] ; then
                      ((count = 1))                      # If okay, flag to exit loop.
                  fi
                  ((count = count - 1))                  # So we don't go forever.
              done
              if [[ $rc -eq 0 ]] ; then                  # Make final determination.
         ...

(4) Limit for bash loop
        [41] for(( i=1; i <= 1000; i++ )); do
                 name=$(date --date="$i day ago" +%Y%m%d%H%M%S)
                 mkdir -p "$name" &&
                 touch "$name/${name}_file" ||
                 break
             done

(5) Bash 'for' loop syntax?
         [51] for (($i=0...
              -
              for ((i=0;i<10;i++))
         [52] for i in `seq 0 9`
              do
                  echo "the i is $i"
              done
         [53] for i in {0..9}
                do
                  echo $i
                done
         ...

画像をタイルに結合って?

$ borg "image tile"
(1) ImageMagick crop huge image
         [11] $ time convert -crop 512x512 +repage huge.tif x/image_out_%d.tif
              real    0m5.623s
              user    0m2.060s
              sys     0m2.148s
              $ time vips dzsave huge.tif x --depth 1 --tile-size 512 --overlap 0 --suffix .tif
              real    0m1.643s
              user    0m1.668s
              sys     0m1.000s
         [12]  convert -monitor -limit area 2mb myLargeImg.tif myLargeImg.mpc
              -
               #!/bin/bash
         ...

(2) Set clipboard to image - pbcopy
        [21] cat image.png | impbcopy -
        [22] # Copy image to clipboard
             uuencode SomeFile.jpg - | pbcopy
             -
             # Paste from clipboard to image file
             pbpaste | uudecode -o AnotherFile.jpg


(3) Using Amazon MapReduce/Hadoop for Image Processing
         [31] and should be able to be done using Bash
         [32] #!/usr/bin/env bash
              # NLineInputFormat gives a single line: key is offset, value is Isotropic Url
              read offset isofile
              # Retrieve file from Isotropic server to local disk
              echo "reporter:status:Retrieving $isofile" >&2
              target=`echo $isofile | awk '{split($0,a,"/");print a[5] a[6]}'`
              filename=$target.tar.bz2
              #$HADOOP_INSTALL/bin/hadoop fs -get $isofile ./$filename
              curl  $isofile -o $filename
         ...

(4) Convert multipage PDF to a single image
        [41] convert in.pdf -append out%d.png
             -
             convert *.png output.pdf
             -
             convert foo?.png output.pdf
        [42] convert in.pdf +append out%d.png

(5) bash cgi won't return image
        [51] echo -ne "Content-type: image/png\n\n"
             -
             echo -e "Content-type: image/png\n"
             -
               -n     do not output the trailing newline

とかとか.

オプションはこんな感じとりあえず省略されないように-fをつけてページャに渡すと良さそう.

$ borg --help
Usage of borg:
-f  (= false)
    Print full results, ie. no more '...'
-h (= "borg.crufter.com")
    Server to connect to
-l  (= 5)
    Result list limit. Defaults to 5
-p  (= false)
    Private search. Your search won't leave a trace. Pinky promise. Don't use this all the time if you want to see the search result relevancy improved

検索だけでなくスニペットの追加や編集もできるようです.

サーバも選べるので自分用のメモを蓄積することもできますね. ちょっと惜しいのはサーバと通信して結果を表示するのでオフラインでは使えないというところ. オフラインで使いたい場合はローカルにサーバを立てるか別の方法を使うしかなさそうです.

端末をWeb共有できるttyd

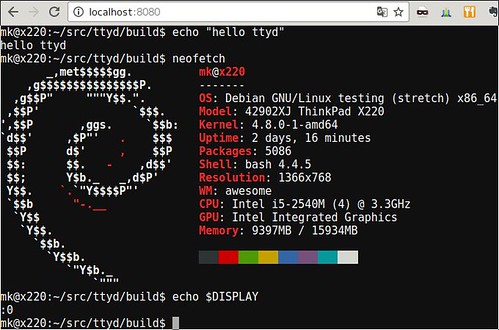
端末をWebブラウザで共有できるソフトウェエアです. 以前似たものでGoTTYを試してみましたが,ttydはGoTTYインスパイアらしいです. ttydはc製でMITライセンスです.

導入

今回はDebian stretch amd64(testing)に導入しました. README.mdではUbuntu 16.04での手順が書かれていますがそのまま使えました.

$ sudo apt install cmake g++ pkg-config git vim-common libwebsockets-dev libjson-c-dev libssl-dev
$ git clone https://github.com/tsl0922/ttyd.git
$ cd ttyd
$ mkdir build
$ cd build
$ cmake ..
$ make

動かしてみる

$ ./ttyd -p 8080 bash

としてウェブブラウザで http://localhost:8080/ に繋ぐと利用できます. tmuxのセッションを共有して複数のブラウザで1つの端末の操作とかdocker利用とかGoTTYと同じように利用できます.

$ ./ttyd -p 8080 tmux new -A -s ttyd
[2016/12/09 18:54:25:5954] NOTICE: Initial logging level 7
[2016/12/09 18:54:25:5954] NOTICE: Libwebsockets version: 2.0.3 unknown-build-hash
[2016/12/09 18:54:25:5954] NOTICE: IPV6 not compiled in
[2016/12/09 18:54:25:5954] NOTICE: libev support compiled in but disabled
[2016/12/09 18:54:25:5954] NOTICE: libuv support compiled in but disabled
[2016/12/09 18:54:25:5955] NOTICE:  Threads: 1 each 1024 fds
[2016/12/09 18:54:25:5955] NOTICE:  mem: platform fd map:  8192 bytes
[2016/12/09 18:54:25:5955] NOTICE:  Compiled with OpenSSL support
[2016/12/09 18:54:25:5955] NOTICE:  SSL disabled: no LWS_SERVER_OPTION_DO_SSL_GLOBAL_INIT
[2016/12/09 18:54:25:5955] NOTICE: Creating Vhost 'default' port 8080, 2 protocols
[2016/12/09 18:54:25:5955] NOTICE:  Listening on port 8080
[2016/12/09 18:54:25:5955] NOTICE:  mem: per-conn:          920 bytes + protocol rx buf
[2016/12/09 18:54:25:5956] NOTICE:  canonical_hostname = x220
[2016/12/09 18:54:25:5956] NOTICE: TTY configuration:
[2016/12/09 18:54:25:5956] NOTICE:   start command: tmux new -A -s ttyd
[2016/12/09 18:54:25:5956] NOTICE:   reconnect timeout: 10s
[2016/12/09 18:54:25:5956] NOTICE:   close signal: SIGHUP (1)
[2016/12/09 18:54:25:6057] NOTICE: lws_protocol_init
[2016/12/09 18:54:25:9806] NOTICE: HTTP connect from localhost (127.0.0.1), path: /
[2016/12/09 18:54:25:0015] NOTICE: HTTP connect from localhost (127.0.0.1), path: /auth_token.js
[2016/12/09 18:54:26:3474] NOTICE: client connected from localhost (127.0.0.1), total: 1
[2016/12/09 18:54:26:3548] NOTICE: started process, pid: 30365
[2016/12/09 18:54:34:2928] NOTICE: HTTP connect from localhost (127.0.0.1), path: /
[2016/12/09 18:54:34:3132] NOTICE: error on reading from skt : 104
[2016/12/09 18:54:34:3132] NOTICE: sending SIGHUP to process 30365
[2016/12/09 18:54:34:3138] NOTICE: process exited with code 256, pid: 30365
[2016/12/09 18:54:34:3138] NOTICE: client disconnected from localhost (127.0.0.1), total: 0
[2016/12/09 18:54:34:5554] NOTICE: HTTP connect from localhost (127.0.0.1), path: /auth_token.js
[2016/12/09 18:54:34:5732] NOTICE: client connected from localhost (127.0.0.1), total: 1
[2016/12/09 18:54:34:5811] NOTICE: started process, pid: 30505
[2016/12/09 18:54:40:0073] NOTICE: wsi 0x556bcbc34500: TIMEDOUT WAITING on 3 (did hdr 0, ah 0x556bcbbc0c50, wl 0, pfd events 0)
[2016/12/09 18:54:40:0074] NOTICE: lws_header_table_detach: wsi 0x556bcbc34500: ah held 6s, ah.rxpos 0, ah.rxlen 0, mode/state 0 4,wsi->more_rx_waiting 0

20161209_18:12:56-1180

GoTTYについてはこちらを.


勉強会向けサーバを作ってみる2 / Rasbian jessieを試す/ Google Authenticatorのパスコードを作る from Kenichiro MATOHARA

wgetライクにbittorrentを取得するtget

wgetコマンドのような使い勝手のBittorrentクライアントのtgetを試してみました. node製MITライセンスのアプリケーションです.

導入はnpmで.tgetではなくt-getなので注意.

$ npm install -g t-get

torrentファイル,マグネットリンクの他torrent URLでもダウンロードできるようです. 実行すると以下のようなプログレスが表示されてダウンロードが始まります.行幅はハードコードされているようです.

$ tget https://downloads.raspberrypi.org/raspbian_latest.torrent
 downloading 1 files (1.4GB) [============================= ] 97% 64.0s 588.8KB/s 99 peers

ダウンロード完了時は以下のような感じ.ダウンロード完了後直ちに終了します.

$ tget https://downloads.raspberrypi.org/raspbian_latest.torrent
------------------
2016-11-25-raspbian-jessie.zip 1.4GB
------------------
 downloaded 1 files (1.4GB)

ファイルの保存先はカレントディレクトリで,カレントディレクトリに書き込めない場合はエラーにならずファイルが消えてしまうようです.

便利だけどアップロード関係なく終了してしまうのでBittorrentへの貢献度は低そうです. ちなみに最近はリモートのTransmissionをfile serverで動作させて,Transmission-remote-gtkで操作しています.

Screenfetch的な情報表示コマンドのNeofetch

Screenfetch的な情報表示コマンドのNeofetch

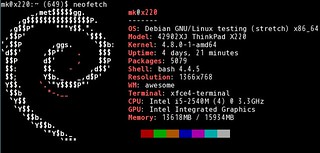
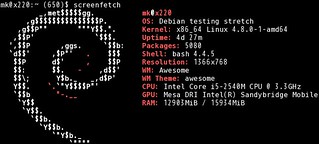
よくデスクトップのキャプチャを取得するときに表示されているScreenfetchコマンドというものがあります.システムの情報とアスキーアートを素敵に表示してくれます. これににたものでNetfetchというものを見かけたので試してみました.こちらは画像も扱えるようです.

導入

以下のページに各種環境への導入方法が書かれています.

Debian sid/stretchにはパッケージがあるようなことが書かれていますが,

Neofetch is in Debian Unstable/Stretch's official repositories.

今はsidのみのようです.

ということでひとまずstretchではこんな感じで導入しました.

$ #-- /etc/apt/sources.list.d/neofetch を作る
$ sudo apt edit-sources neofetch
$ cat /etc/apt/sources.list.d/neofetch.list
deb http://dl.bintray.com/dawidd6/neofetch jessie main
$ #-- 鍵のインポート
$ wget "https://bintray.com/user/downloadSubjectPublicKey?username=bintray" -O Release-neofetch.key
$ gpg Release-neofetch.key
pub   rsa4096 2015-02-17 [SC]
      8756C4F765C9AC3CB6B85D62379CE192D401AB61
uid           Bintray (by JFrog) <bintray@bintray.com>
sub   rsa4096 2015-02-17 [E]
$ sudo apt-key add Release-neofetch.key
$ rm Release-neofetch.key
$ #-- pkg情報更新&pkg導入
$ sudo apt update
$ sudo apt install neofetch

早速実行

$ neofetch --help

    NEOFETCH

    USAGE: neofetch --option "value" --option "value"

    NOTE: There's also a config option for each flag below.

    Info:
    --disable infoname          Allows you to disable an info line from appearing
                                in the output.
                                NOTE: You can supply multiple args. eg.
                                'neofetch --disable cpu gpu disk shell'
                                NOTE: The arguments must all be lowercase.
    --os_arch on/off            Hide/Show OS architecture.
    --speed_type type           Change the type of cpu speed to display.
                                Possible values: current, min, max, bios,
                                scaling_current, scaling_min, scaling_max
                                NOTE: This only support Linux with cpufreq.
    --cpu_shorthand type        Shorten the output of CPU
                                Possible values: name, speed, tiny, on, off
    --cpu_cores type            Whether or not to display the number of CPU cores
                                Takes: logical, physical, off
                                NOTE: 'physical' doesn't work on BSD.
    --cpu_speed on/off          Hide/Show cpu speed.
    --cpu_temp on/off           Hide/Show cpu temperature.
                                NOTE: This only works on Linux and BSD.
                                NOTE: For FreeBSD-based systems, you need to enable coretemp
                                      kernel module.
    --distro_shorthand on/off   Shorten the output of distro (tiny, on, off)
                                NOTE: This option won't work in Windows (Cygwin)
    --kernel_shorthand on/off   Shorten the output of kernel
                                NOTE: This option won't work in BSDs (except PacBSD and PC-BSD)
    --uptime_shorthand on/off   Shorten the output of uptime (tiny, on, off)
    --refresh_rate on/off       Whether to display the refresh rate of each monitor
                                Unsupported on Windows
    --gpu_brand on/off          Enable/Disable GPU brand in output. (AMD/NVIDIA/Intel)
    --gtk_shorthand on/off      Shorten output of gtk theme/icons
    --gtk2 on/off               Enable/Disable gtk2 theme/icons output
    --gtk3 on/off               Enable/Disable gtk3 theme/icons output
    --shell_path on/off         Enable/Disable showing $SHELL path
    --shell_version on/off      Enable/Disable showing $SHELL version
    --ip_host url               Url to query for public IP
    --song_shorthand on/off     Print the Artist/Title on seperate lines
    --birthday_shorthand on/off Shorten the output of birthday
    --birthday_time on/off      Enable/Disable showing the time in birthday output
    --birthday_format format    Format the birthday output. (Uses 'date' cmd format)

    Text Formatting:
    --colors x x x x x x        Changes the text colors in this order:
                                title, @, underline, subtitle, colon, info
    --underline on/off          Enable/Disable the underline.
    --underline_char char       Character to use when underlining title
    --bold on/off               Enable/Disable bold text

    Color Blocks:
    --color_blocks on/off       Enable/Disable the color blocks
    --block_width num           Width of color blocks in spaces
    --block_height num          Height of color blocks in lines
    --block_range start end     Range of colors to print as blocks

    Bars:
    --bar_char 'elapsed char' 'total char'
                                Characters to use when drawing bars.
    --bar_border on/off         Whether or not to surround the bar with '[]'
    --bar_length num            Length in spaces to make the bars.
    --bar_colors num num        Colors to make the bar.
                                Set in this order: elapsed, total
    --cpu_display mode          Bar mode.
                                Takes: bar, infobar, barinfo, off
    --memory_display mode       Bar mode.
                                Takes: bar, infobar, barinfo, off
    --battery_display mode      Bar mode.
                                Takes: bar, infobar, barinfo, off
    --disk_display mode         Bar mode.
                                Takes: bar, infobar, barinfo, off

    Image:
    --image type                Image source. Where and what image we display.
                                Possible values: wall, ascii,
                                /path/to/img, /path/to/dir/, off
    --size 00px | --size 00%    How to size the image.
                                Possible values: auto, 00px, 00%, none
    --crop_mode mode            Which crop mode to use
                                Takes the values: normal, fit, fill
    --crop_offset value         Change the crop offset for normal mode.
                                Possible values: northwest, north, northeast,
                                west, center, east, southwest, south, southeast

    --xoffset px                How close the image will be to the left edge of the
                                window. This only works with w3m.
    --yoffset px                How close the image will be to the top edge of the
                                window. This only works with w3m.
    --bg_color color            Background color to display behind transparent image.
                                This only works with w3m.
    --gap num                   Gap between image and text.
                                NOTE: --gap can take a negative value which will
                                move the text closer to the left side.
    --clean                     Delete cached files and thumbnails.

    Ascii:
    --ascii value               Where to get the ascii from, Possible values:
                                distro, /path/to/ascii
    --ascii_colors x x x x x x  Colors to print the ascii art
    --ascii_distro distro       Which Distro's ascii art to print
                                NOTE: Arch and Ubuntu have 'old' logo varients.
                                NOTE: Use 'arch_old' or 'ubuntu_old' to use the old logos.
                                NOTE: Ubuntu has flavor varients.
                                NOTE: Change this to 'Lubuntu', 'Xubuntu', 'Ubuntu-GNOME'
                                or 'Ubuntu-Budgie' to use the flavors.
    --ascii_logo_size           Size of ascii logo.
                                Supported distros: Arch, Gentoo, Crux, OpenBSD.
    --ascii_bold on/off         Whether or not to bold the ascii logo.
    --logo | -L                 Hide the info text and only show the ascii logo.

    Screenshot:
    --scrot | -s /path/to/img   Take a screenshot, if path is left empty the screen-
                                shot function will use $scrot_dir and $scrot_name.
    --upload | -su /pth/t/img   Same as --scrot but uploads the scrot to a website.
    --image_host                Website to upload scrots to. Takes: imgur, teknik
    --scrot_cmd cmd             Screenshot program to launch

    Other:
    --config /path/to/config    Specify a path to a custom config file
    --config none               Launch the script without a config file
    --help                      Print this text and exit
    --version                   Show neofetch version
    -v                          Display error messages.
    -vv                         Display a verbose log for error reporting.

オプション結構多いです. とりあえず素で実行.

20161207_05:12:12-5188

情報もScreenfetchより増えています.

20161207_05:12:20-9093

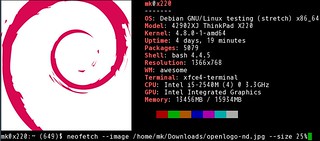
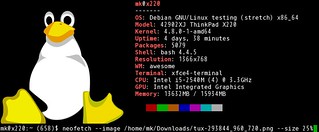
次は画像を指定してみます.画像サイズが大きかったので25%に縮小もしています. 楽しい :)

20161207_05:12:35-3963

20161207_06:12:30-16979

画像の表示については環境によってうまく行く行かないがあるようです.うまく表示されない場合は以下のWikiを参照すると良さそうです.

コマンドラインで動作する絵文字検索ソフトウェアのemoj

PCで絵文字を入力するとき日本語入力システムがあればそれで入力できますが,英語圏では恐らく無理.てことでいくつかツールがあるのですが,コマンドラインで動作するemojを見つけたので試してみました.

導入はnpmか,

npm install emoj

snapで.

$ sudo snap install emoj

後はemojコマンドに引数を与えるか,emojコマンドを引数無しで実行してライブモードで利用します. 引数やライブモードで入力する文字列は表示したい絵文字に関連する単語を入力します.ライブモードはEnterでクリアされ,Ctrl + cでexitできます.表示された絵文字をコピー&ペーストして利用するようです.1つ目に出てくる絵文字をクリップボードにクリップする--copy/-cというオプションもあるようですが手元ではうまく動いていません.

$ emoj neko
🐱  👥  ↪  😻  ↔  🐈
$ emoj cat
🐱  🐈  😺  😻  😸  😼  😽
$ emoj

› sushi
🍣  🍱  🍙  🍤  😋  🍚  😍

asciicast

絵文字のフォントがない場合はNoto Fontsを利用するのが手っ取り早いと思います.

日本語入力システムを使う人やGUIを利用する人は日本語入力システムやemojione-pickerを使ったほうが便利かもしれません.

BluemanだけでNetworkManagerを使わずBluetooth tetheringを使う

最近の自転車移動でThinkpad X200を運んでいるのですがちょっと重い. PC使うかわからないようなときも持ち運んでいるのですが重いし壊しそうだしであまり良くない. 最近値崩れしたKINGJIM PORTABOOK(XMC10)や小さくて可愛いGPD-WINとかほしいのですがお金ない.てことで昔買ってあまり使っていないFujitsu FMV-U8250 + 外部キーボードで荷物の軽量化出来ないかなと.

ちなみにGPD-WINを日本で利用する人の技適問題は以下の辺りから買うと大丈夫のよう.(他は多分NG)

ということでとりあえずFujitsu FMV-U8250にUSB-Bluetoothアダプタを接続してBluetooth外部キーボードとBluetooth tetheringな環境を整えようと思ったのですが,OSをDevuan jessieにしてBluemanで繋ごうとすると,

Connection Failed: the name org.freedesktop.NetworkManager was not provided by ant .service files

というエラーで接続できませんでした. NetworkManagerに依存しているようです.

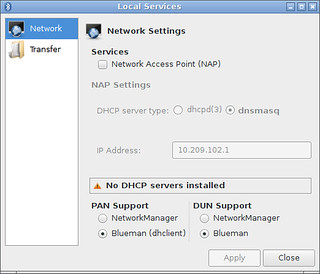
しかしいまのネットワークマネージャーはWicdでNetworkManagerは入っていません.どうにかならないかなーとBluemanの設定を見るとそれらしいものを発見.

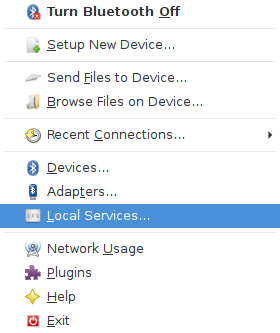
  • View -> Local Service
  • NetworkのPAN SupportとDUN SupportをそれぞれBluemanに

blueman01

blueman02

これでNetworkManagerのない環境でもBluetooth tetheringで繋がるようになりました :)

ちなみにX200(9セルバッテリ)の重量は1.7kg近く,FMV-U8250(大容量バッテリ)はで700g近く+キーボード420g…….体積は結構減ってるけど案外軽くなってませんね.キーボードが案外重いです.使い勝手も大分落ちるし微妙?

マルチプラットホーム&スライドに特化したMarkdown WriterのMarpを試す

最近勉強会の発表資料はスライドにせずにMarkdownやAsciidocで書いてhtmlやpdfに書き出してました.これをSlideshareとかに置いているのですが,スライド形式に比べてアクセスが1桁少ないです. Markdownでスライドにする方法はいろいろあるのですが,1ページの分量がまちまちになってはみ出したりと言ったことをよくやってしまいあまりつかっていませんでした.

そんなところにプレゼンテーション向けのMarkdown Writerがあったので試してみました.

マルチプラットホームでElectron製です.PDFファイルへの書き出しも可能です.

雰囲気は以下の画像でだいたいわかるんじゃないかと思います.

https://yhatt.github.io/marp/images/marp-cast.gif

https://yhatt.github.io/marp/images/marp-cast.gif

左ペインでMarkdownを書いて右ページにプレビューが表示されます. プレビューは3種類選べますが,"1:1 slide/Slide List"のどちらかだとスライド形式でプレビューが表示されるのでレイアウトを確認しながら書くことができます.

試しにちょっと書いてみました. するとMarpのプレビュー,Evinceでは問題なかったのですが,SlideshareにPDFをアップロードすると背景画像やフッターが上下反転しています……. 試しにSpekerdeckにもアップロードしてみましたがこちらは問題なし. 恐らくSlideshareの問題ではないかと思います.

Electron製ということで降るmのマシンでは重いかなと思っていたのですが,Core2Duoのマシンでも試してみましたが一気にスクロールとかしなければ重く感じるところはなく実用範囲内に感じました.